Real-Time CDC Pipelines from Snowflake to Kafka

Glenn Gillen
VP of Product, GTM


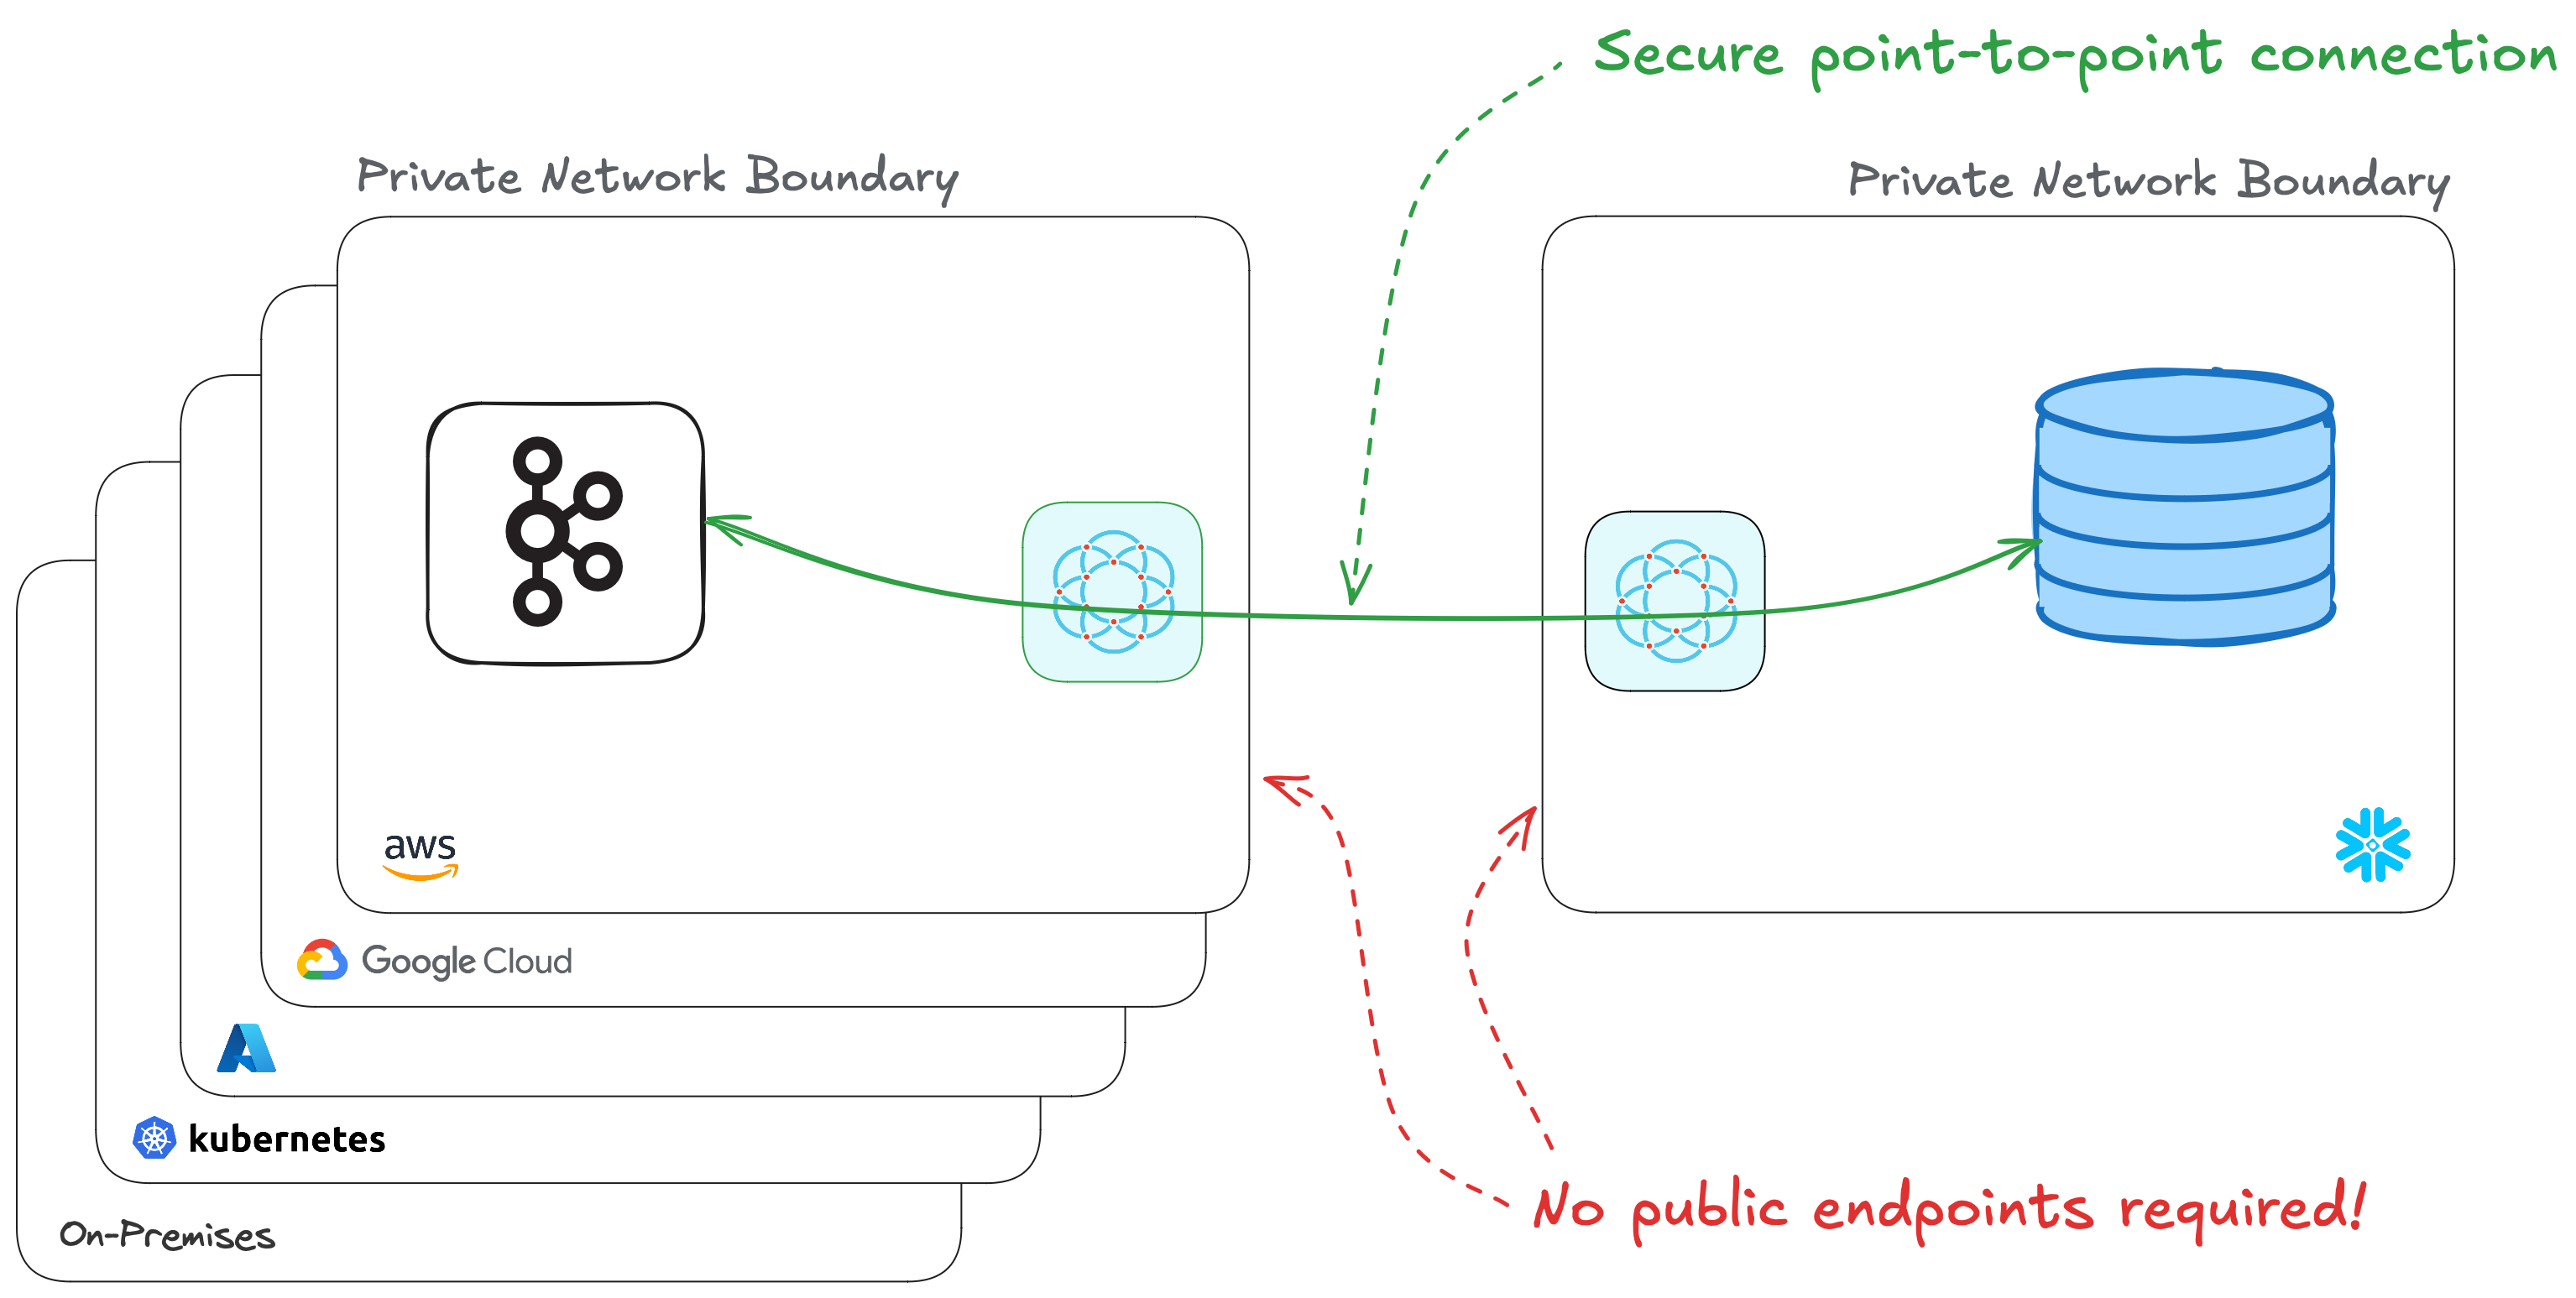
What if I told you there was a way to use Change Data Capture (CDC) to stream all those insights you've got in Snowflake, in real-time, back to the your private Kafka systems? That it'll use private point-to-point connections that don't require you to manage IP allow lists, open firewall ports, or setup services like PrivateLink, and that it will take you less than 15 minutes to setup!
Introducing the Snowflake Push to Kafka Connector!
Quick links
- Push to Kafka Connector in the Snowflake Marketplace
- Ockam Node for Amazon MSK in the AWS Marketplace
Snowflake 💙 Apache Kafka
Snowflake is The Data Cloud and the place to support workloads such as data warehouses, data lakes, data science / ML / AI, and even cybersecurity. This centralization brings a huge amount of convenience through breaking down data silos and allowing teams to make smart data-informed decisions.
After enriching the data and finding new insights, those insights need to make their way back out to the other apps and business systems that can act upon them. Apache Kafka (and Kafka-compatible alternatives) is the system of choice for building flexible, scalable, and reliable streaming platforms to connect data producers and consumers. Connecting to your Kafka broker can be problematic depending on your network topology. It would be convenient to give the broker a public address, but that's a significant increase in risk for a system that handles a lot of important data. Managing IP allow lists and updating firewall ingress rules improves security but can be cumbersome to manage. Alternatives like PrivateLink are better, but they too can be cumbersome to setup and require your systems to be on the same public cloud and in the same region.
In this post I'm going to show you how to securely connect Snowflake to your private Apache Kafka broker, in just a few minutes. We will:
- Setup a Snowflake Stream to capture changes to a table in Snowflake
- Setup a managed Kafka cluster in AWS
- Connect Snowflake to Kafka with a private encrypted connection - without needing to expose either system to the public internet!
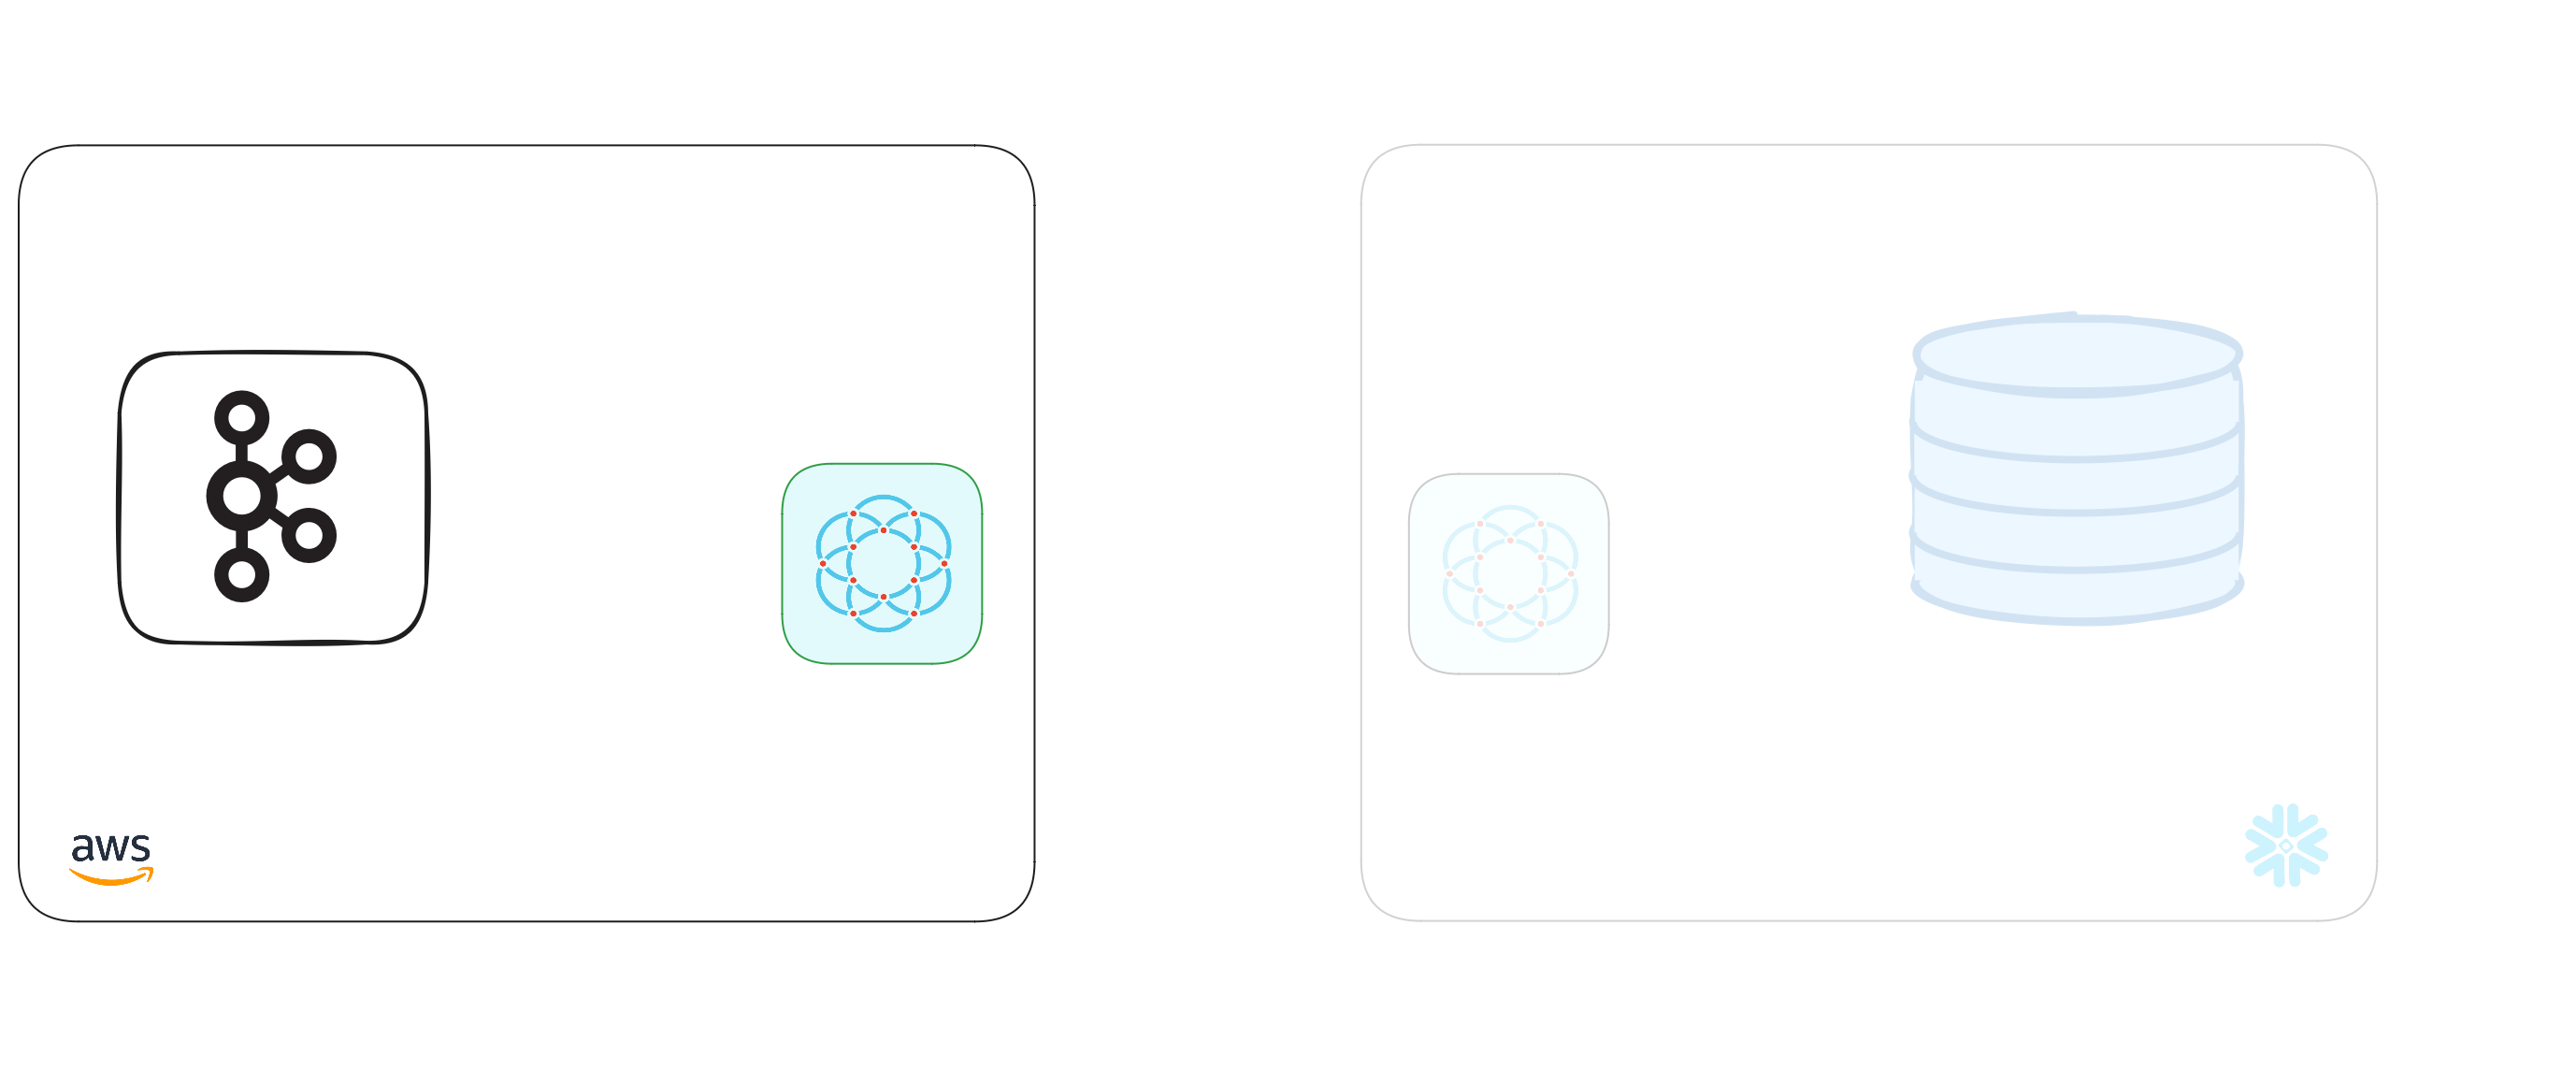
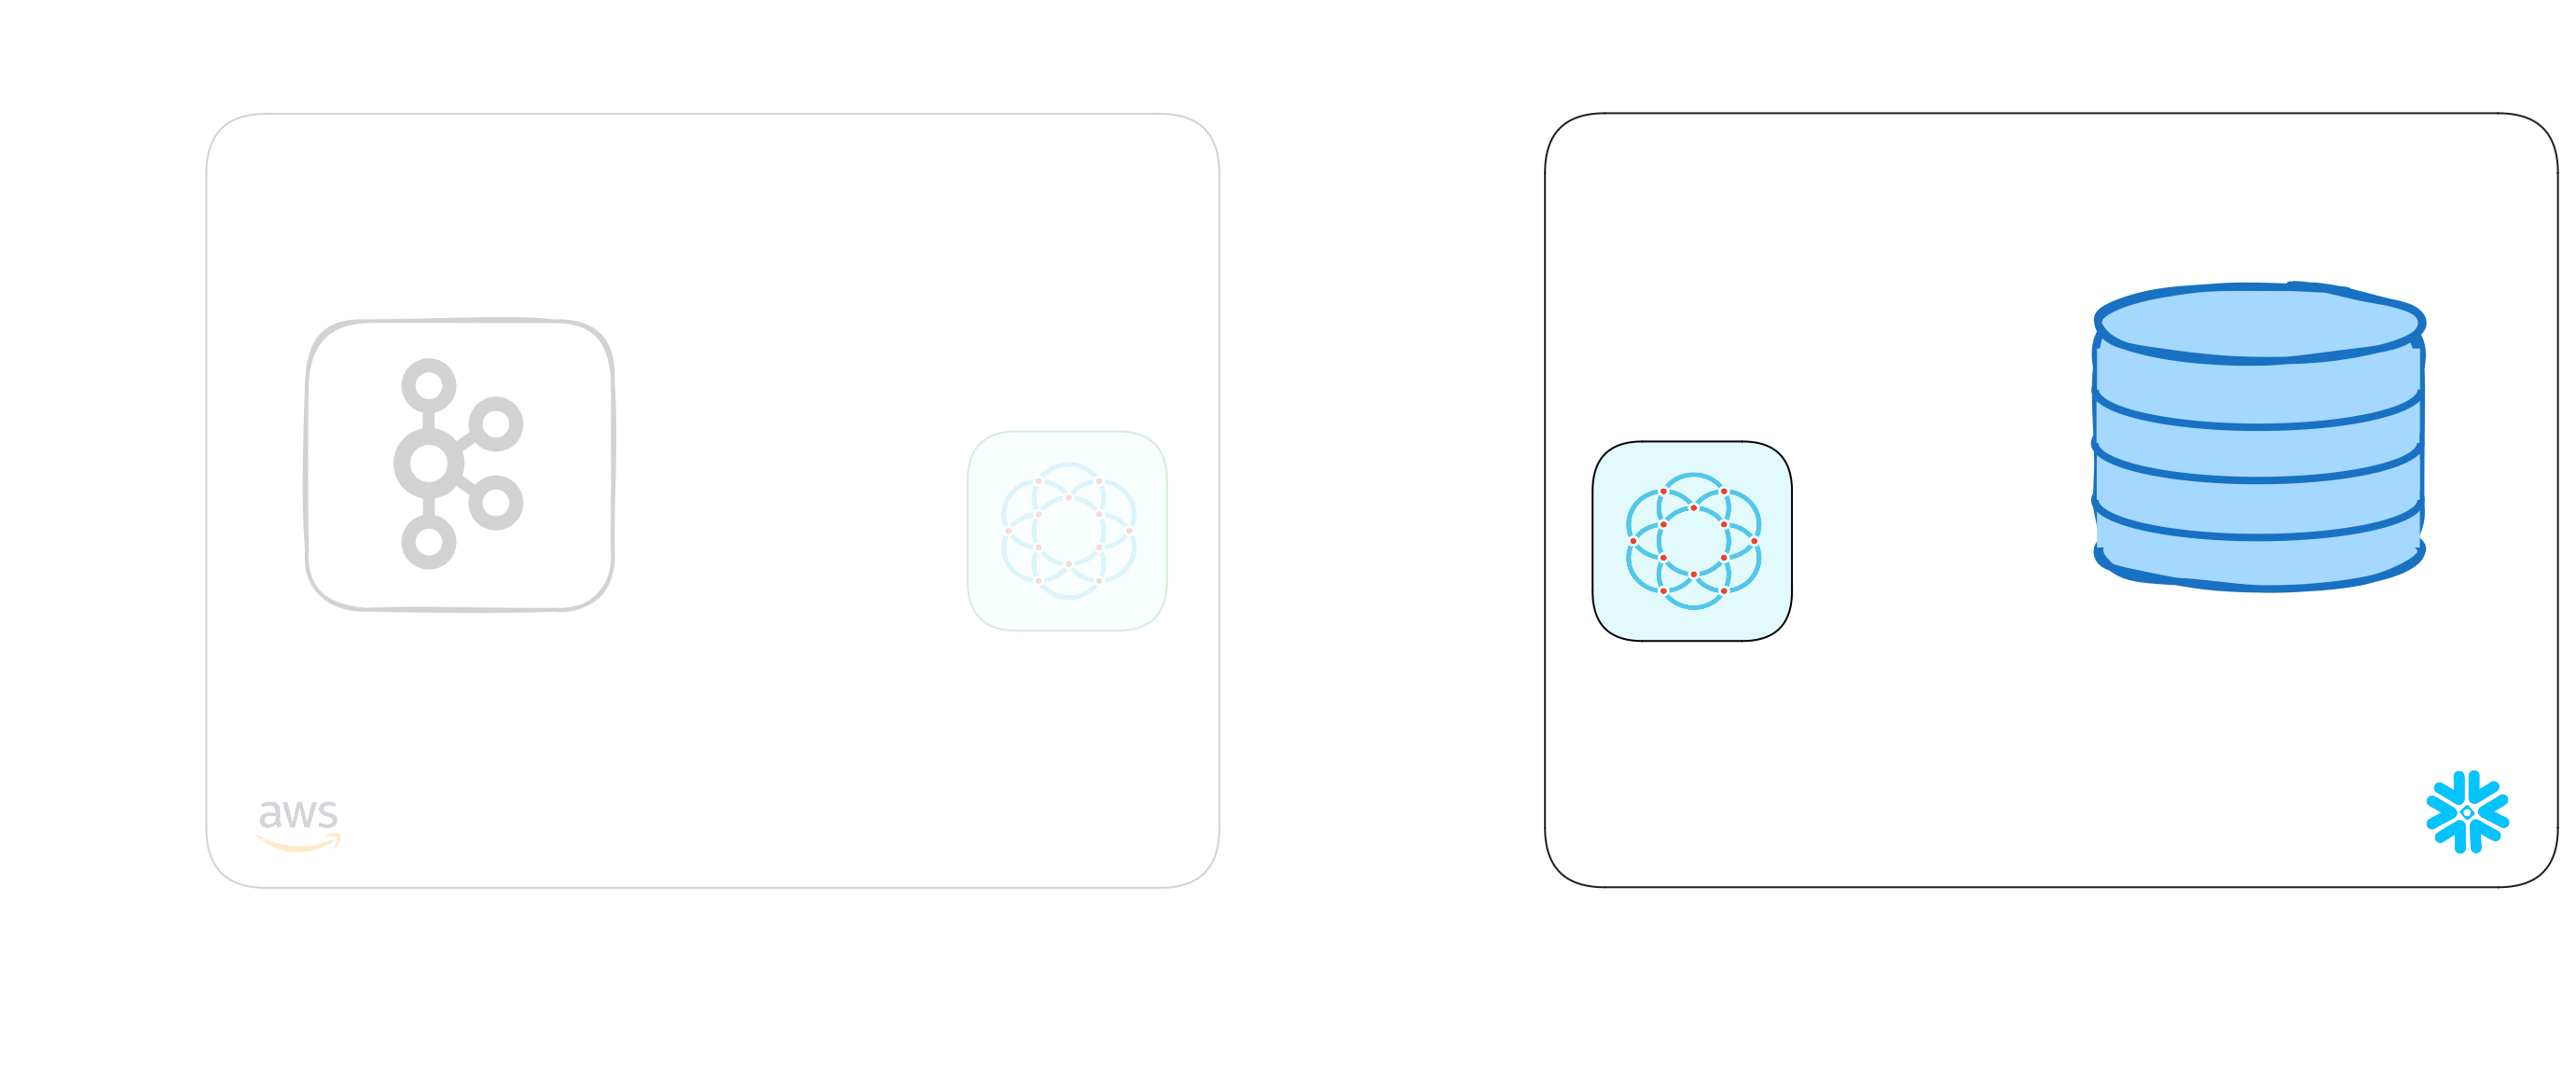
The final architecture diagram will look like this:
Snowflake streams
Snowflake streams are a way to capture every change made to a table (that is, every insert, update, and delete) and record it somewhere else. You may hear it called Change Data Capture (CDC) and it's an effective way to respond to changes in the data that you care about.
Create a stream
Amazon Managed Streaming for Kafka (MSK)
We're going to provision an MSK cluster so we can see an end-to-end experience of data moving from Snowflake to Kafka. If you have an existing Kafka broker you're able to use you can skip this step.
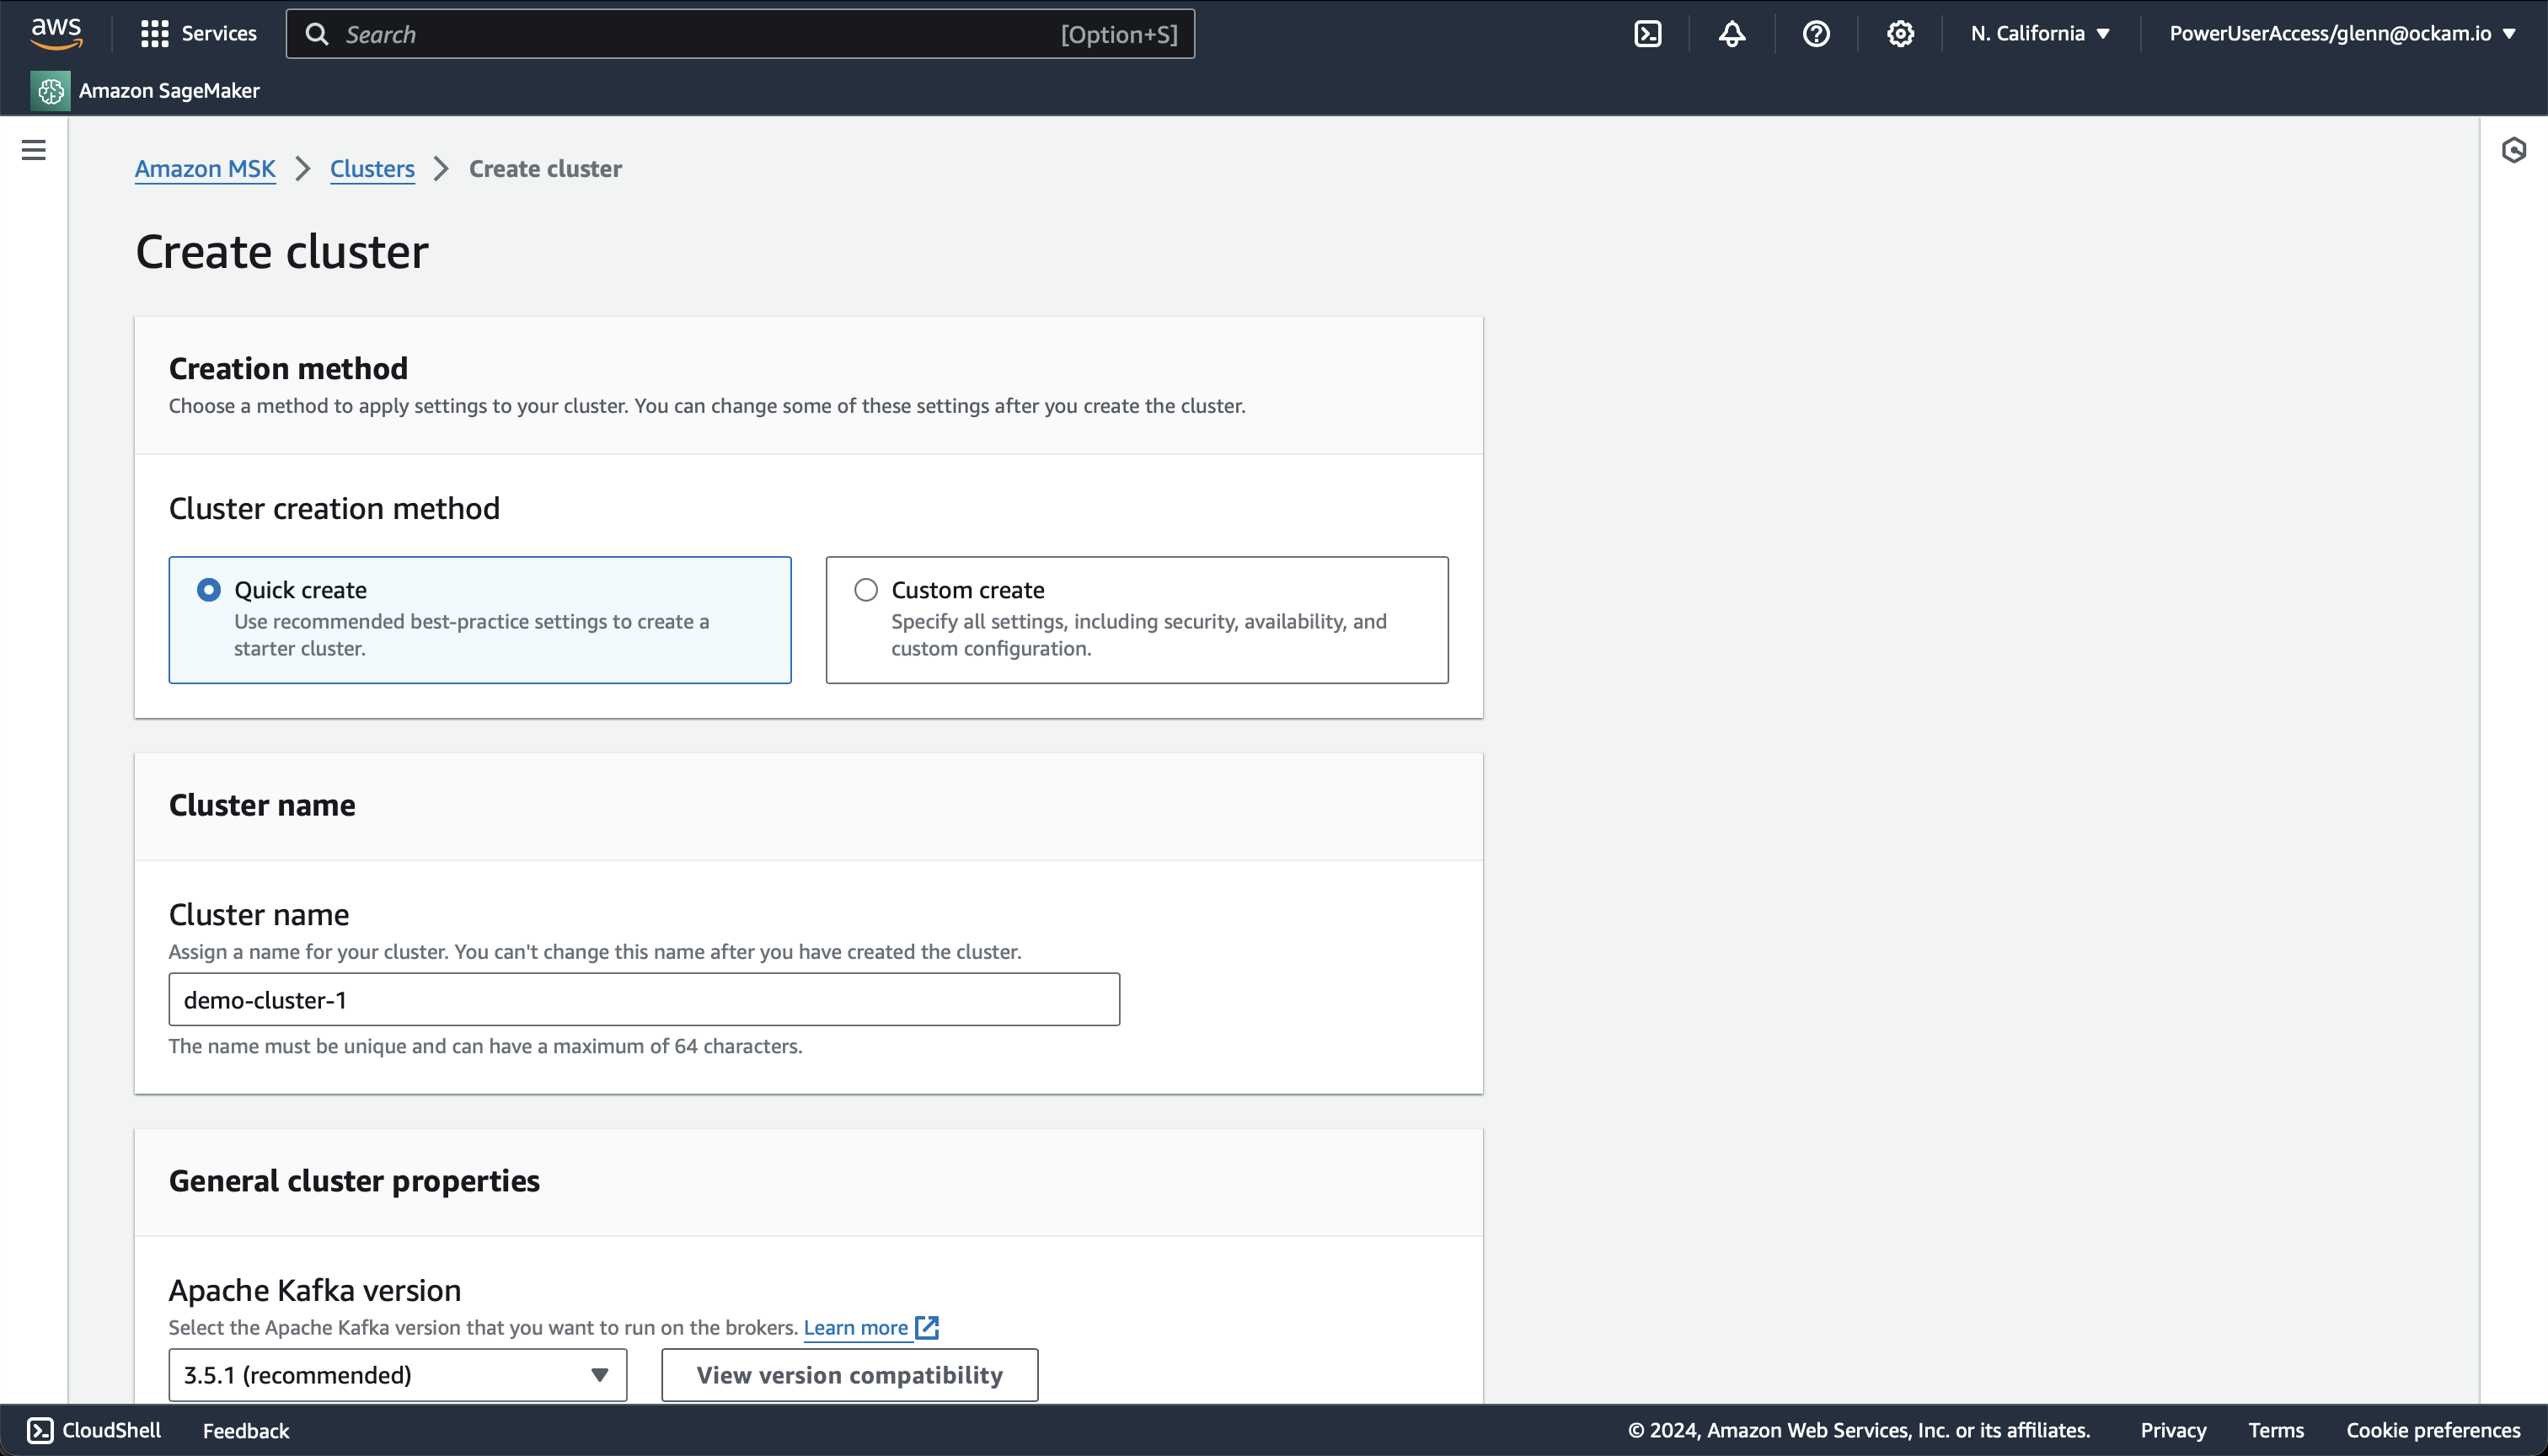
Create an MSK cluster
Within your AWS Console search for
MSK in the search field at the top and select the matching result. Visit the
Clusters screen, and then click Create Cluster.
The Quick Create option provides a good set of defaults for creating a
Kafka cluster, so unless you've previous knowledge or experience to know you
might want something different I'd suggest just confirming the details and
then clicking Create cluster at the bottom of the screen.
Once you've started the cluster creation it may take about 15 minutes for provisioning to complete and for your broker to be available.
Connect Snowflake to Kafka
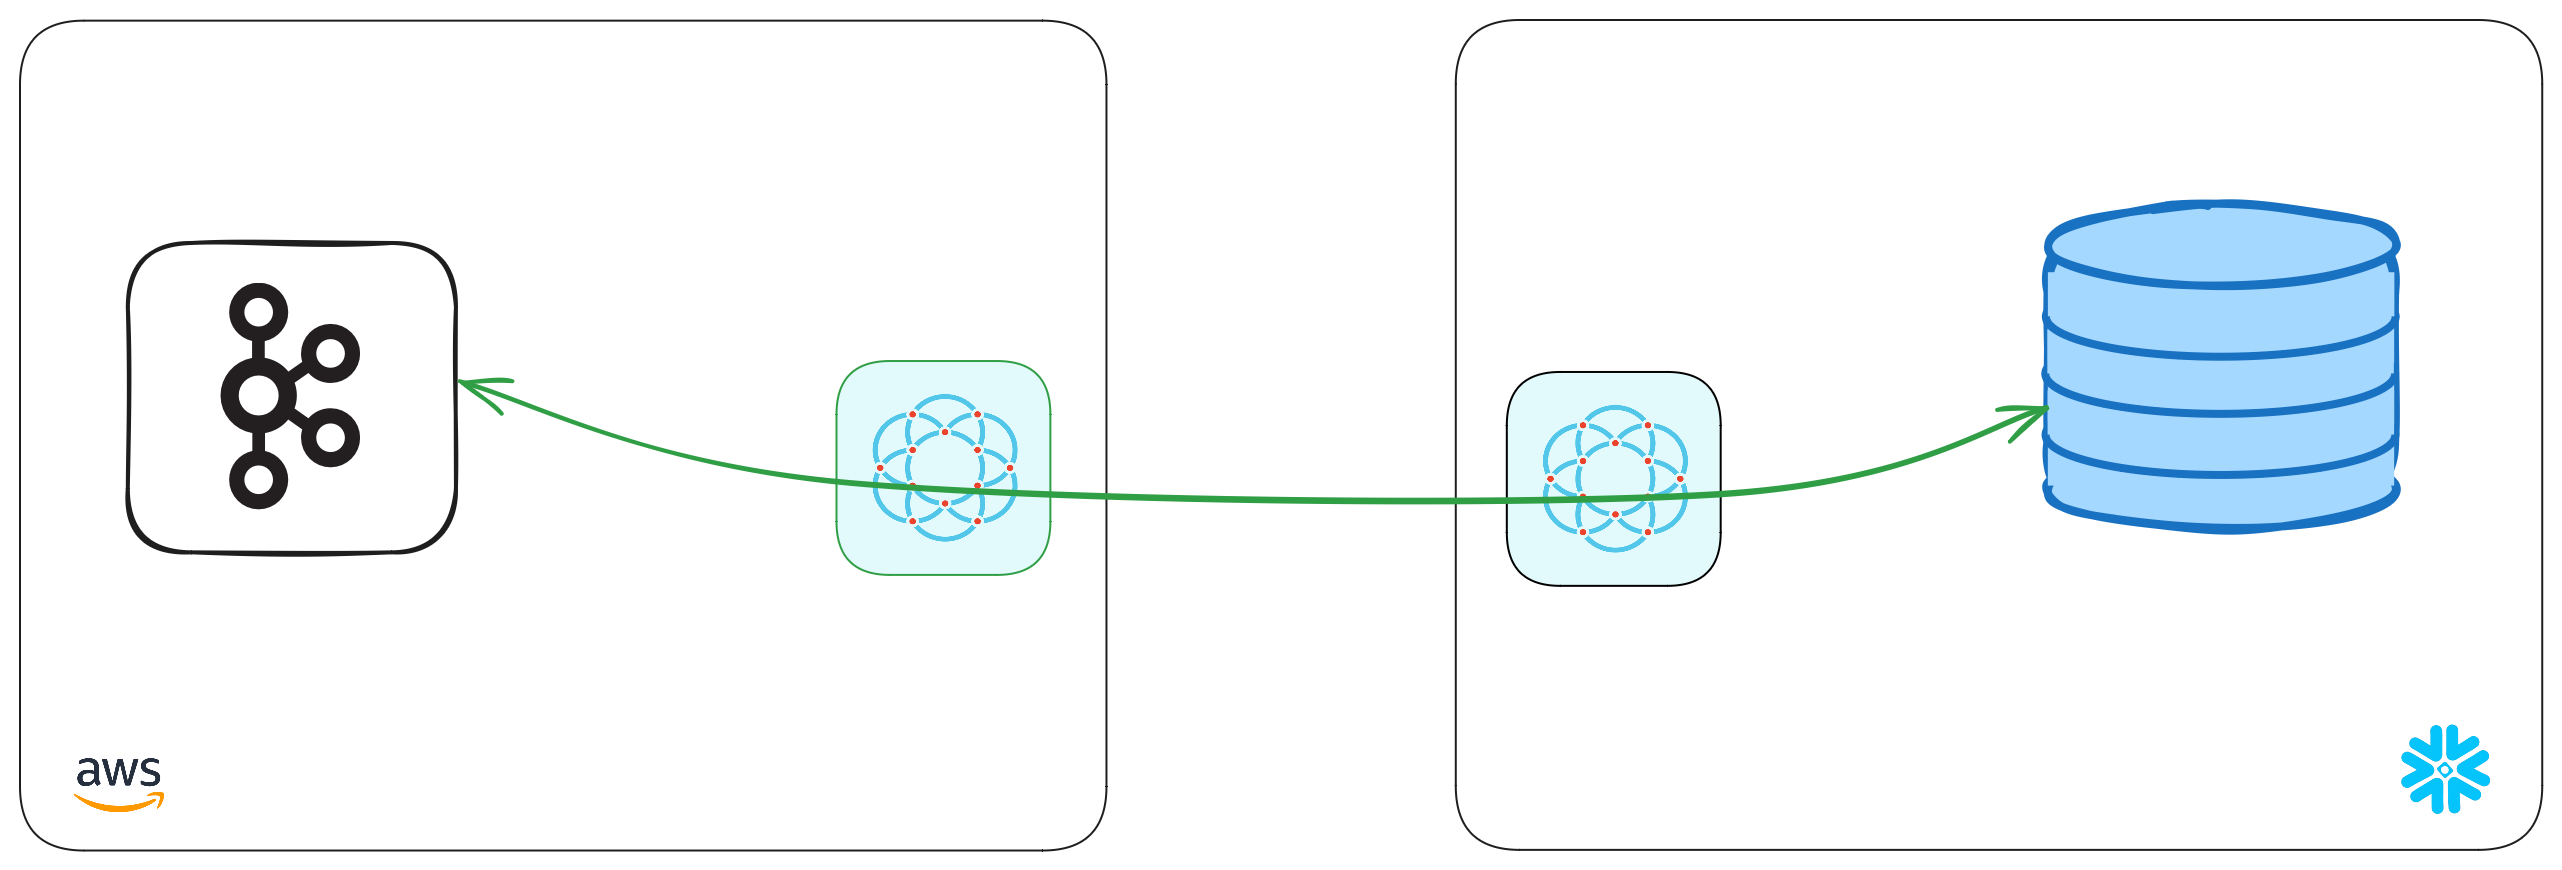
We've created a stream, Kafka is running. It's now time to connect the two! The next stage is going to complete the picture below, by creating a point-to-point connection between the two systems — without the need to expose any systems to the public internet!
Launch the Snowflake Native App
The Snowflake Push to Kafka Connector by Ockam is available in the Snowflake Marketplace.
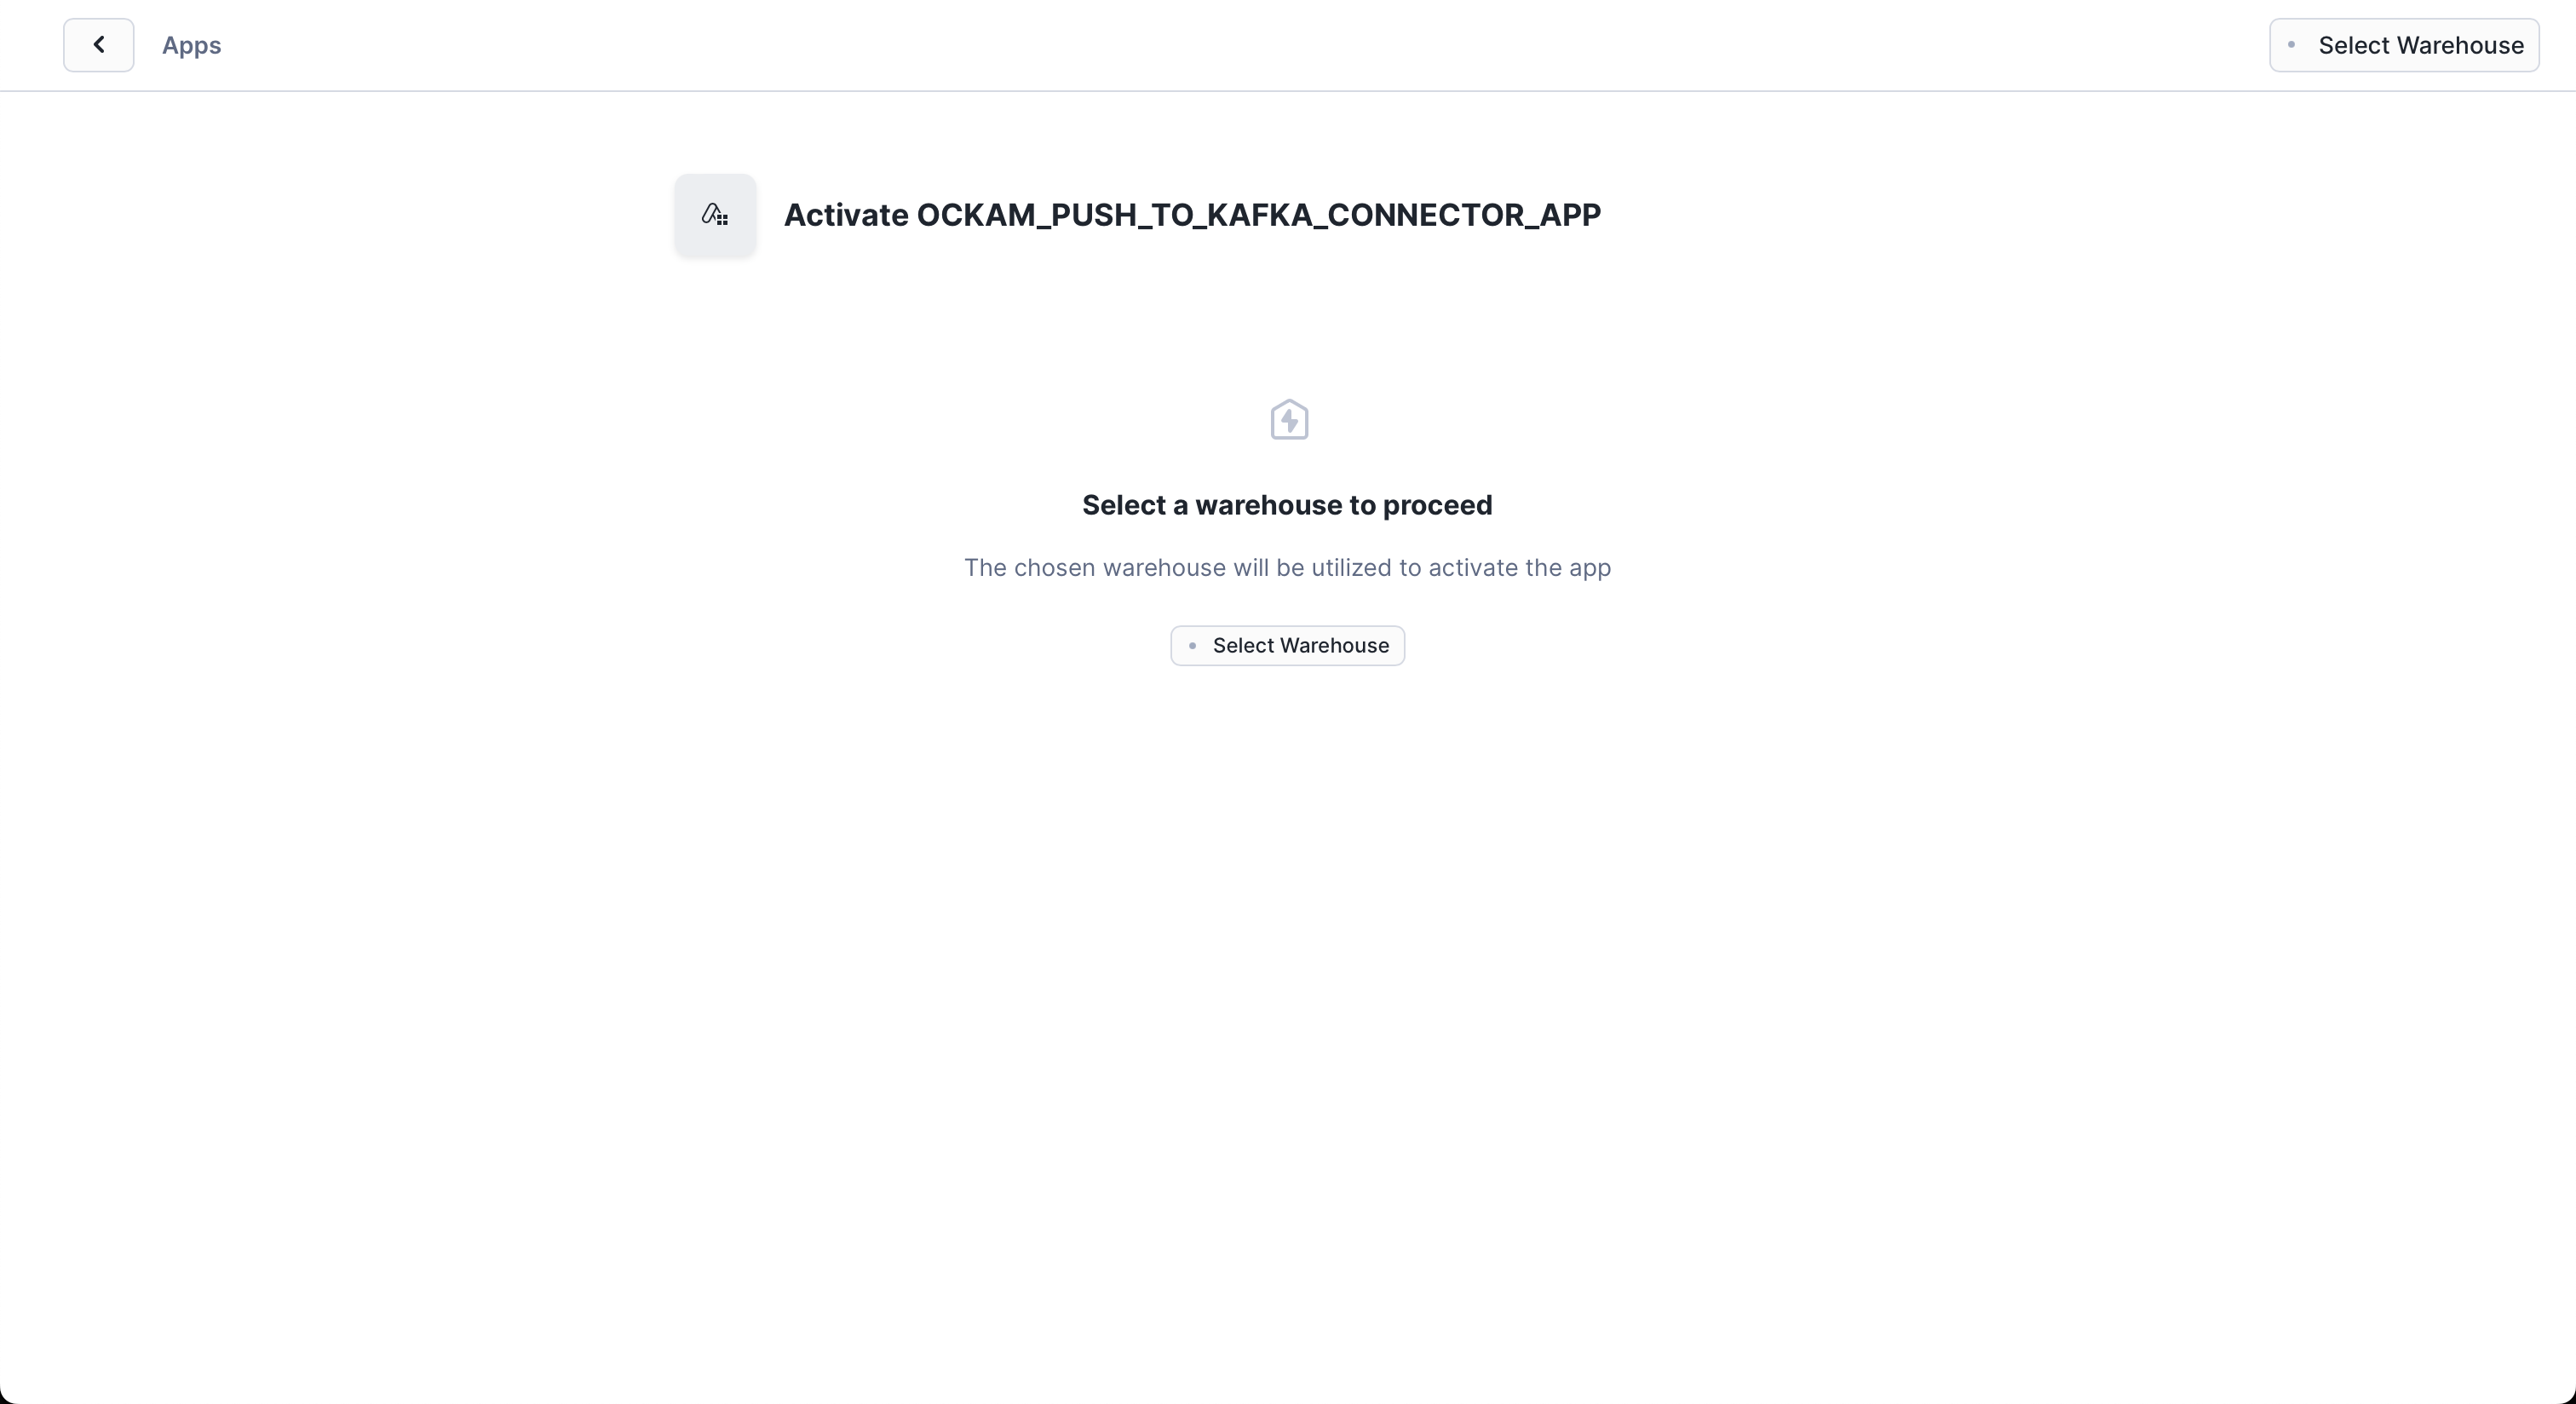
Select a warehouse
The first screen you're presented with will ask you to select the warehouse to utilize to activate the app.
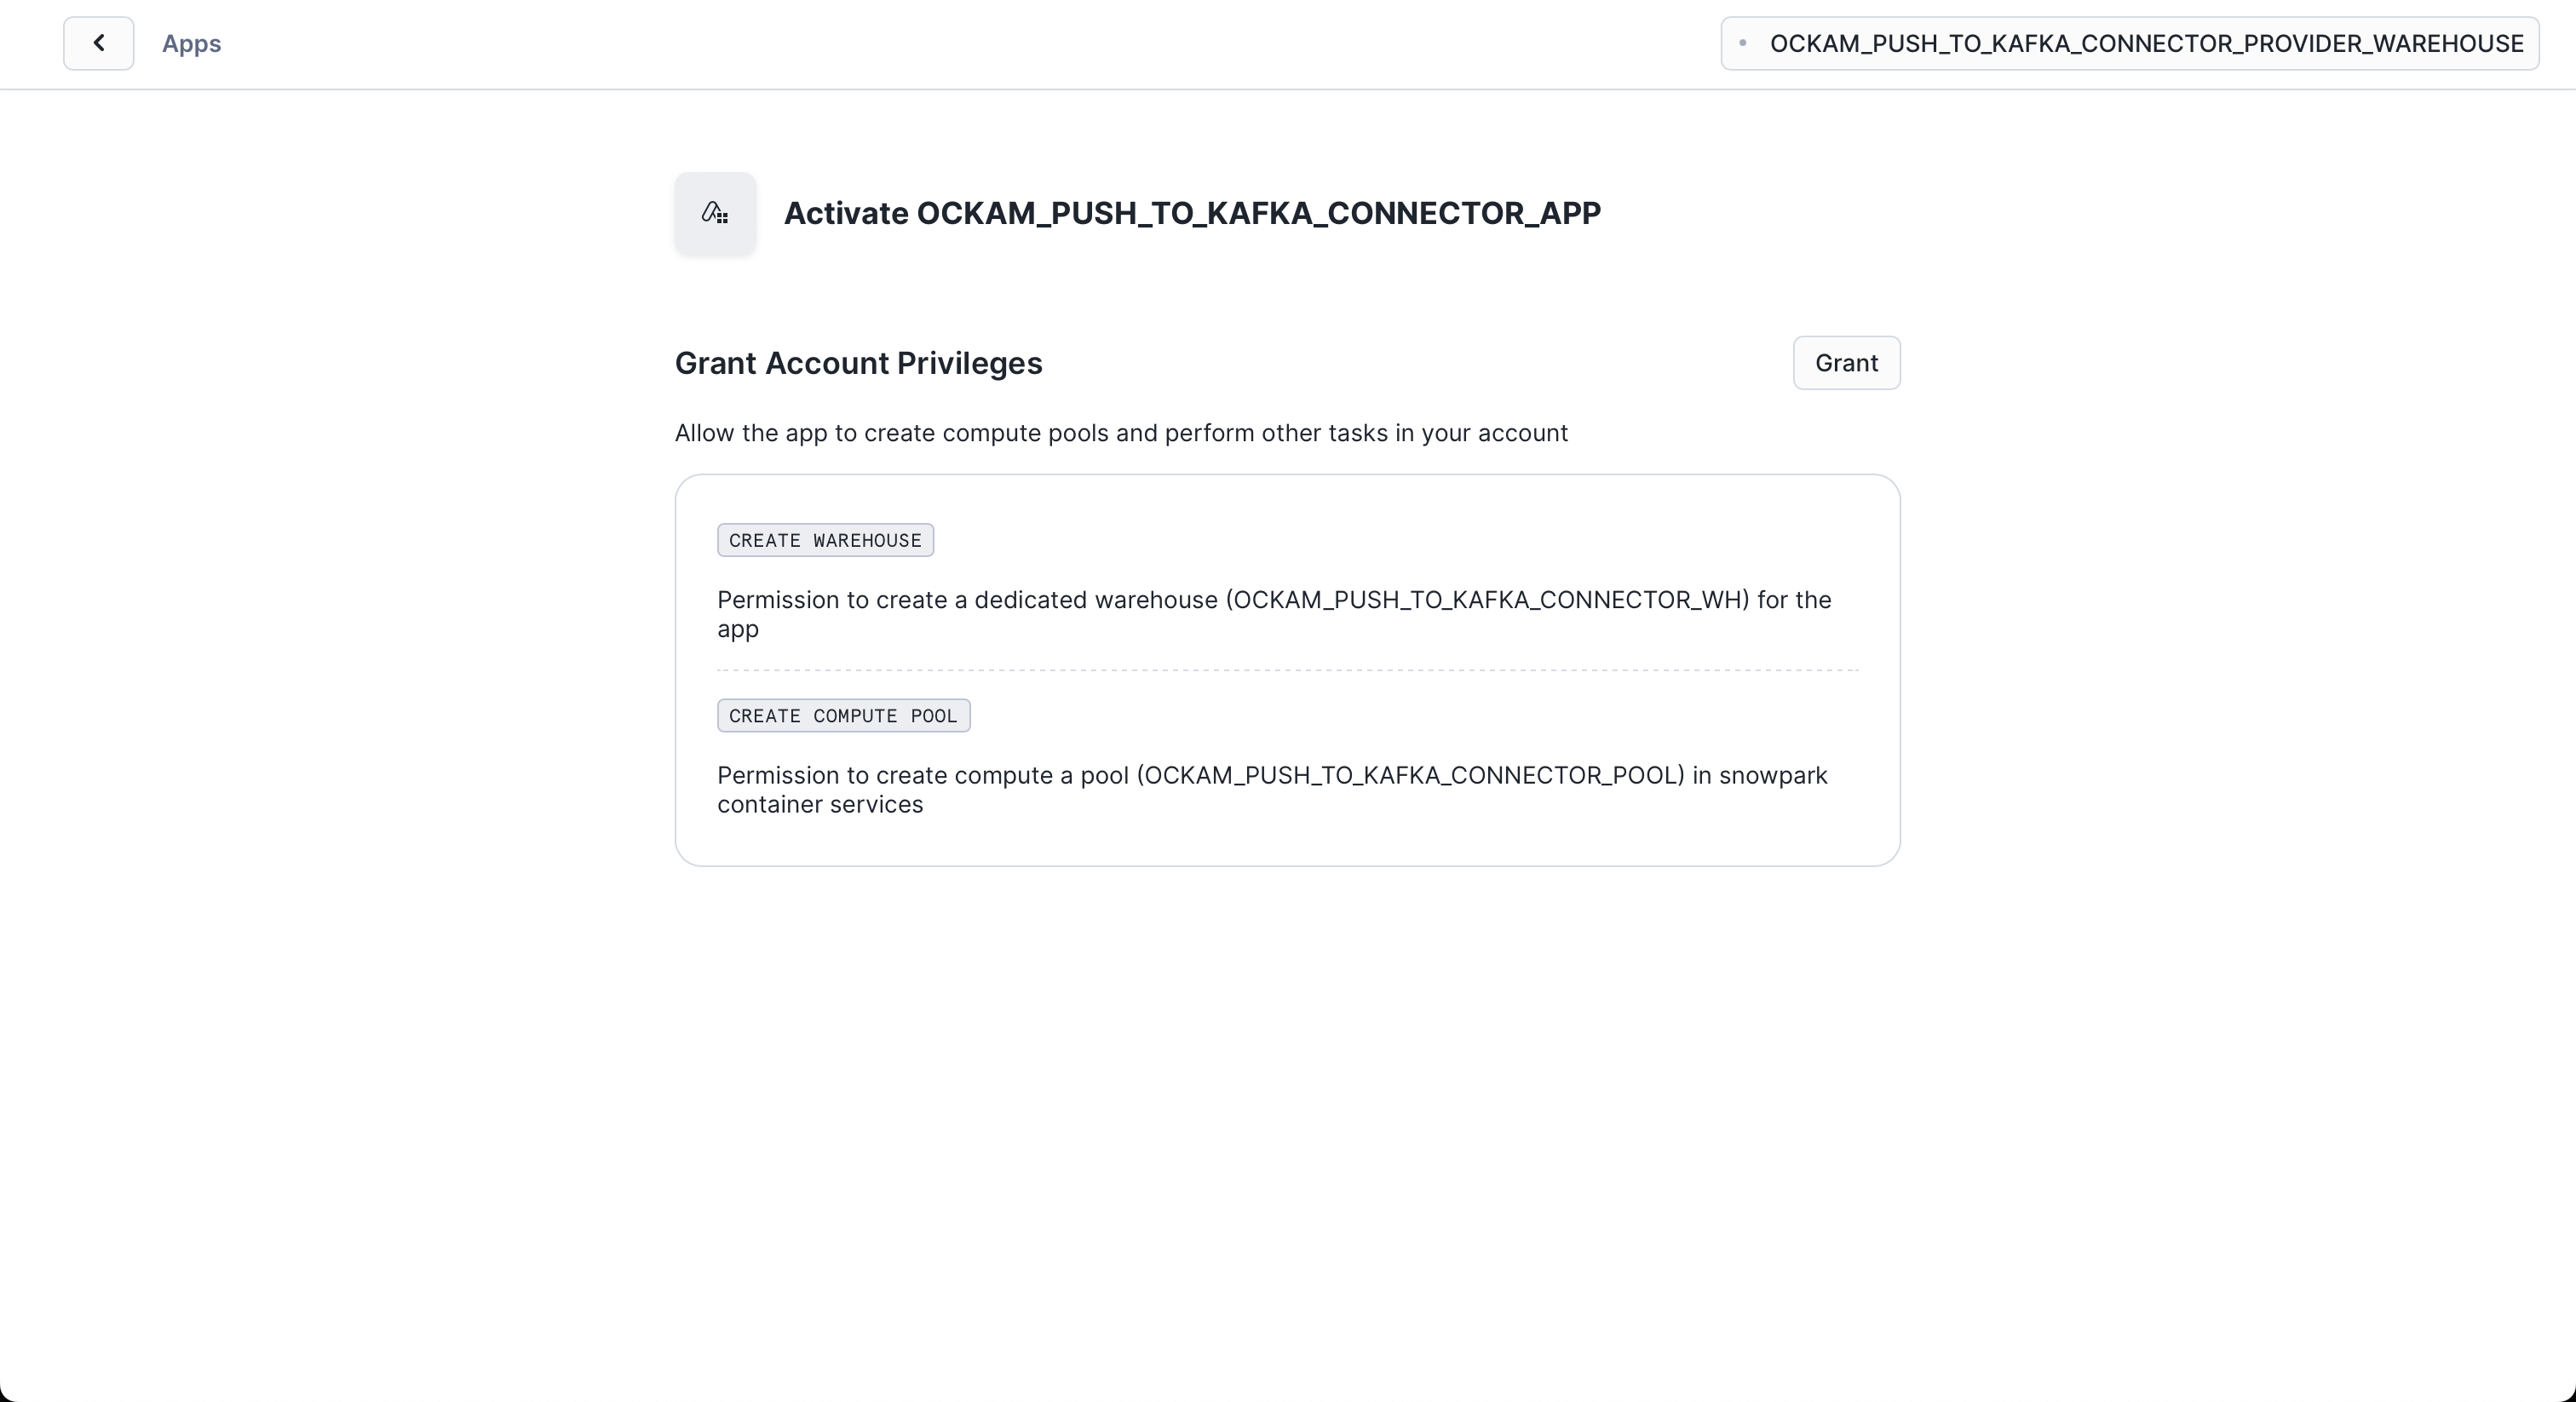
Grant account privileges
Click the Grant button to the right of this screen. The app will then be
automatically granted permissions to create a warehouse and create a compute
pool.
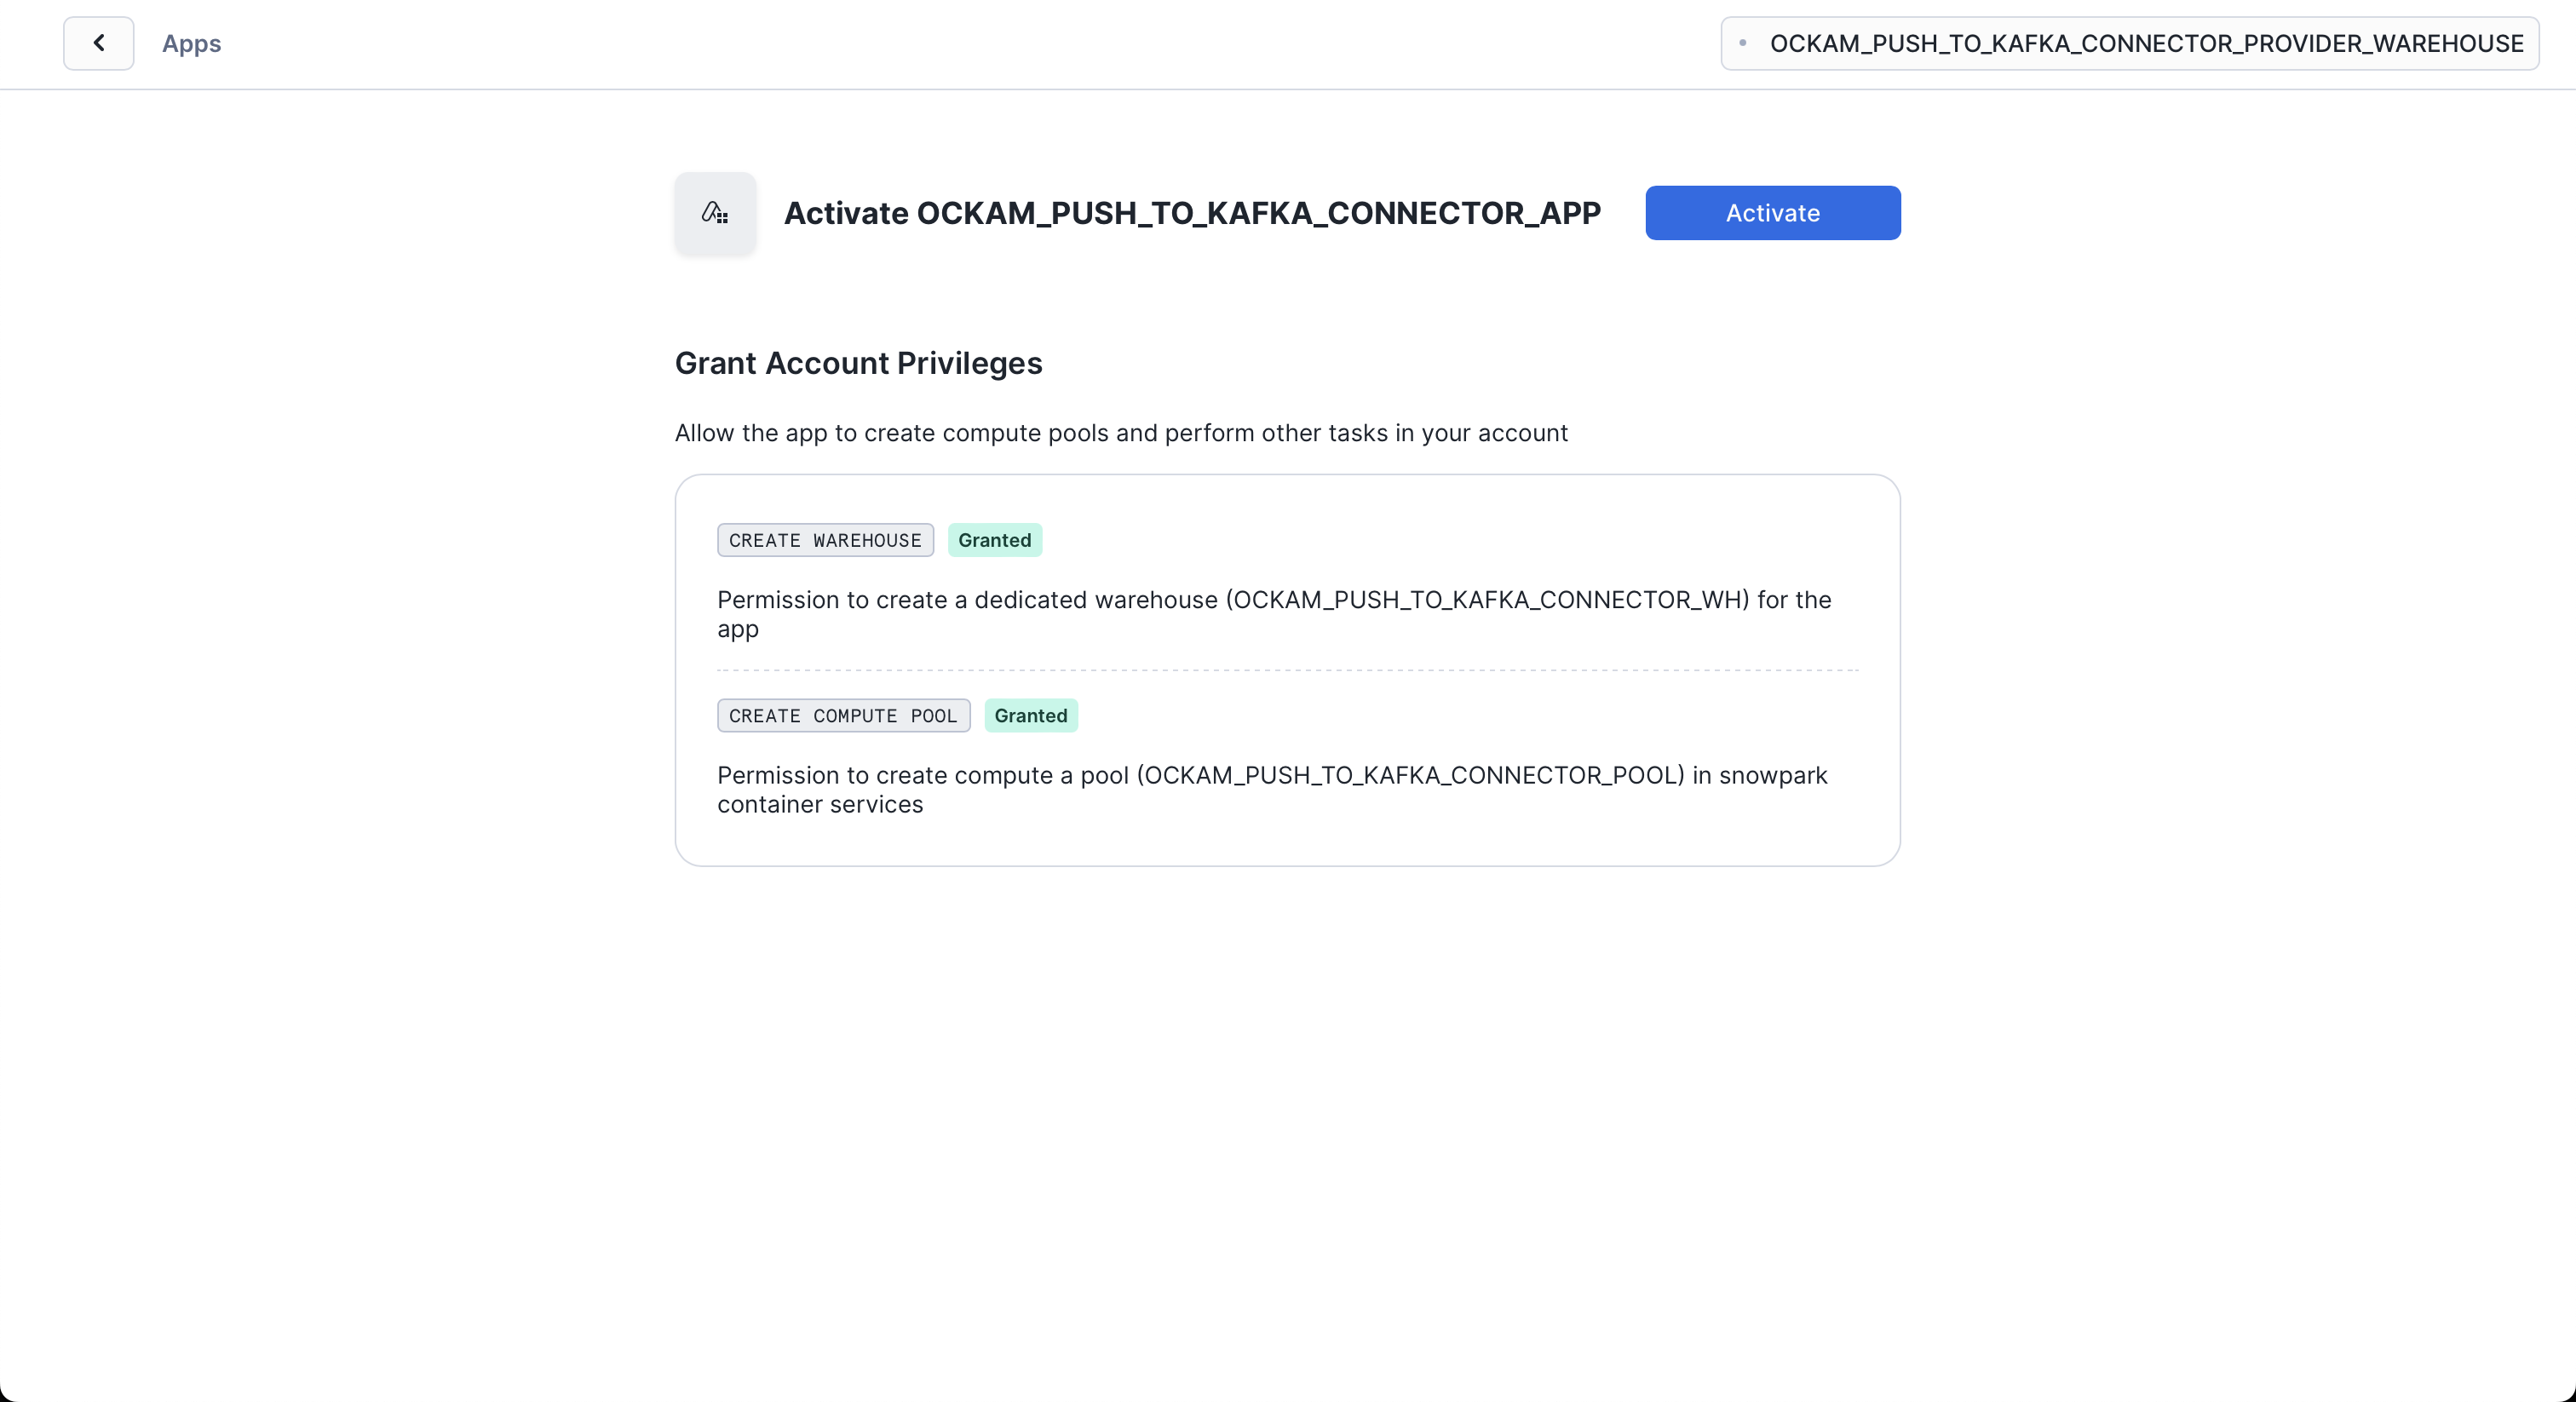
Activate app
Once the permissions grants complete, an Activate button will appear. Click
it and the activation process will begin.
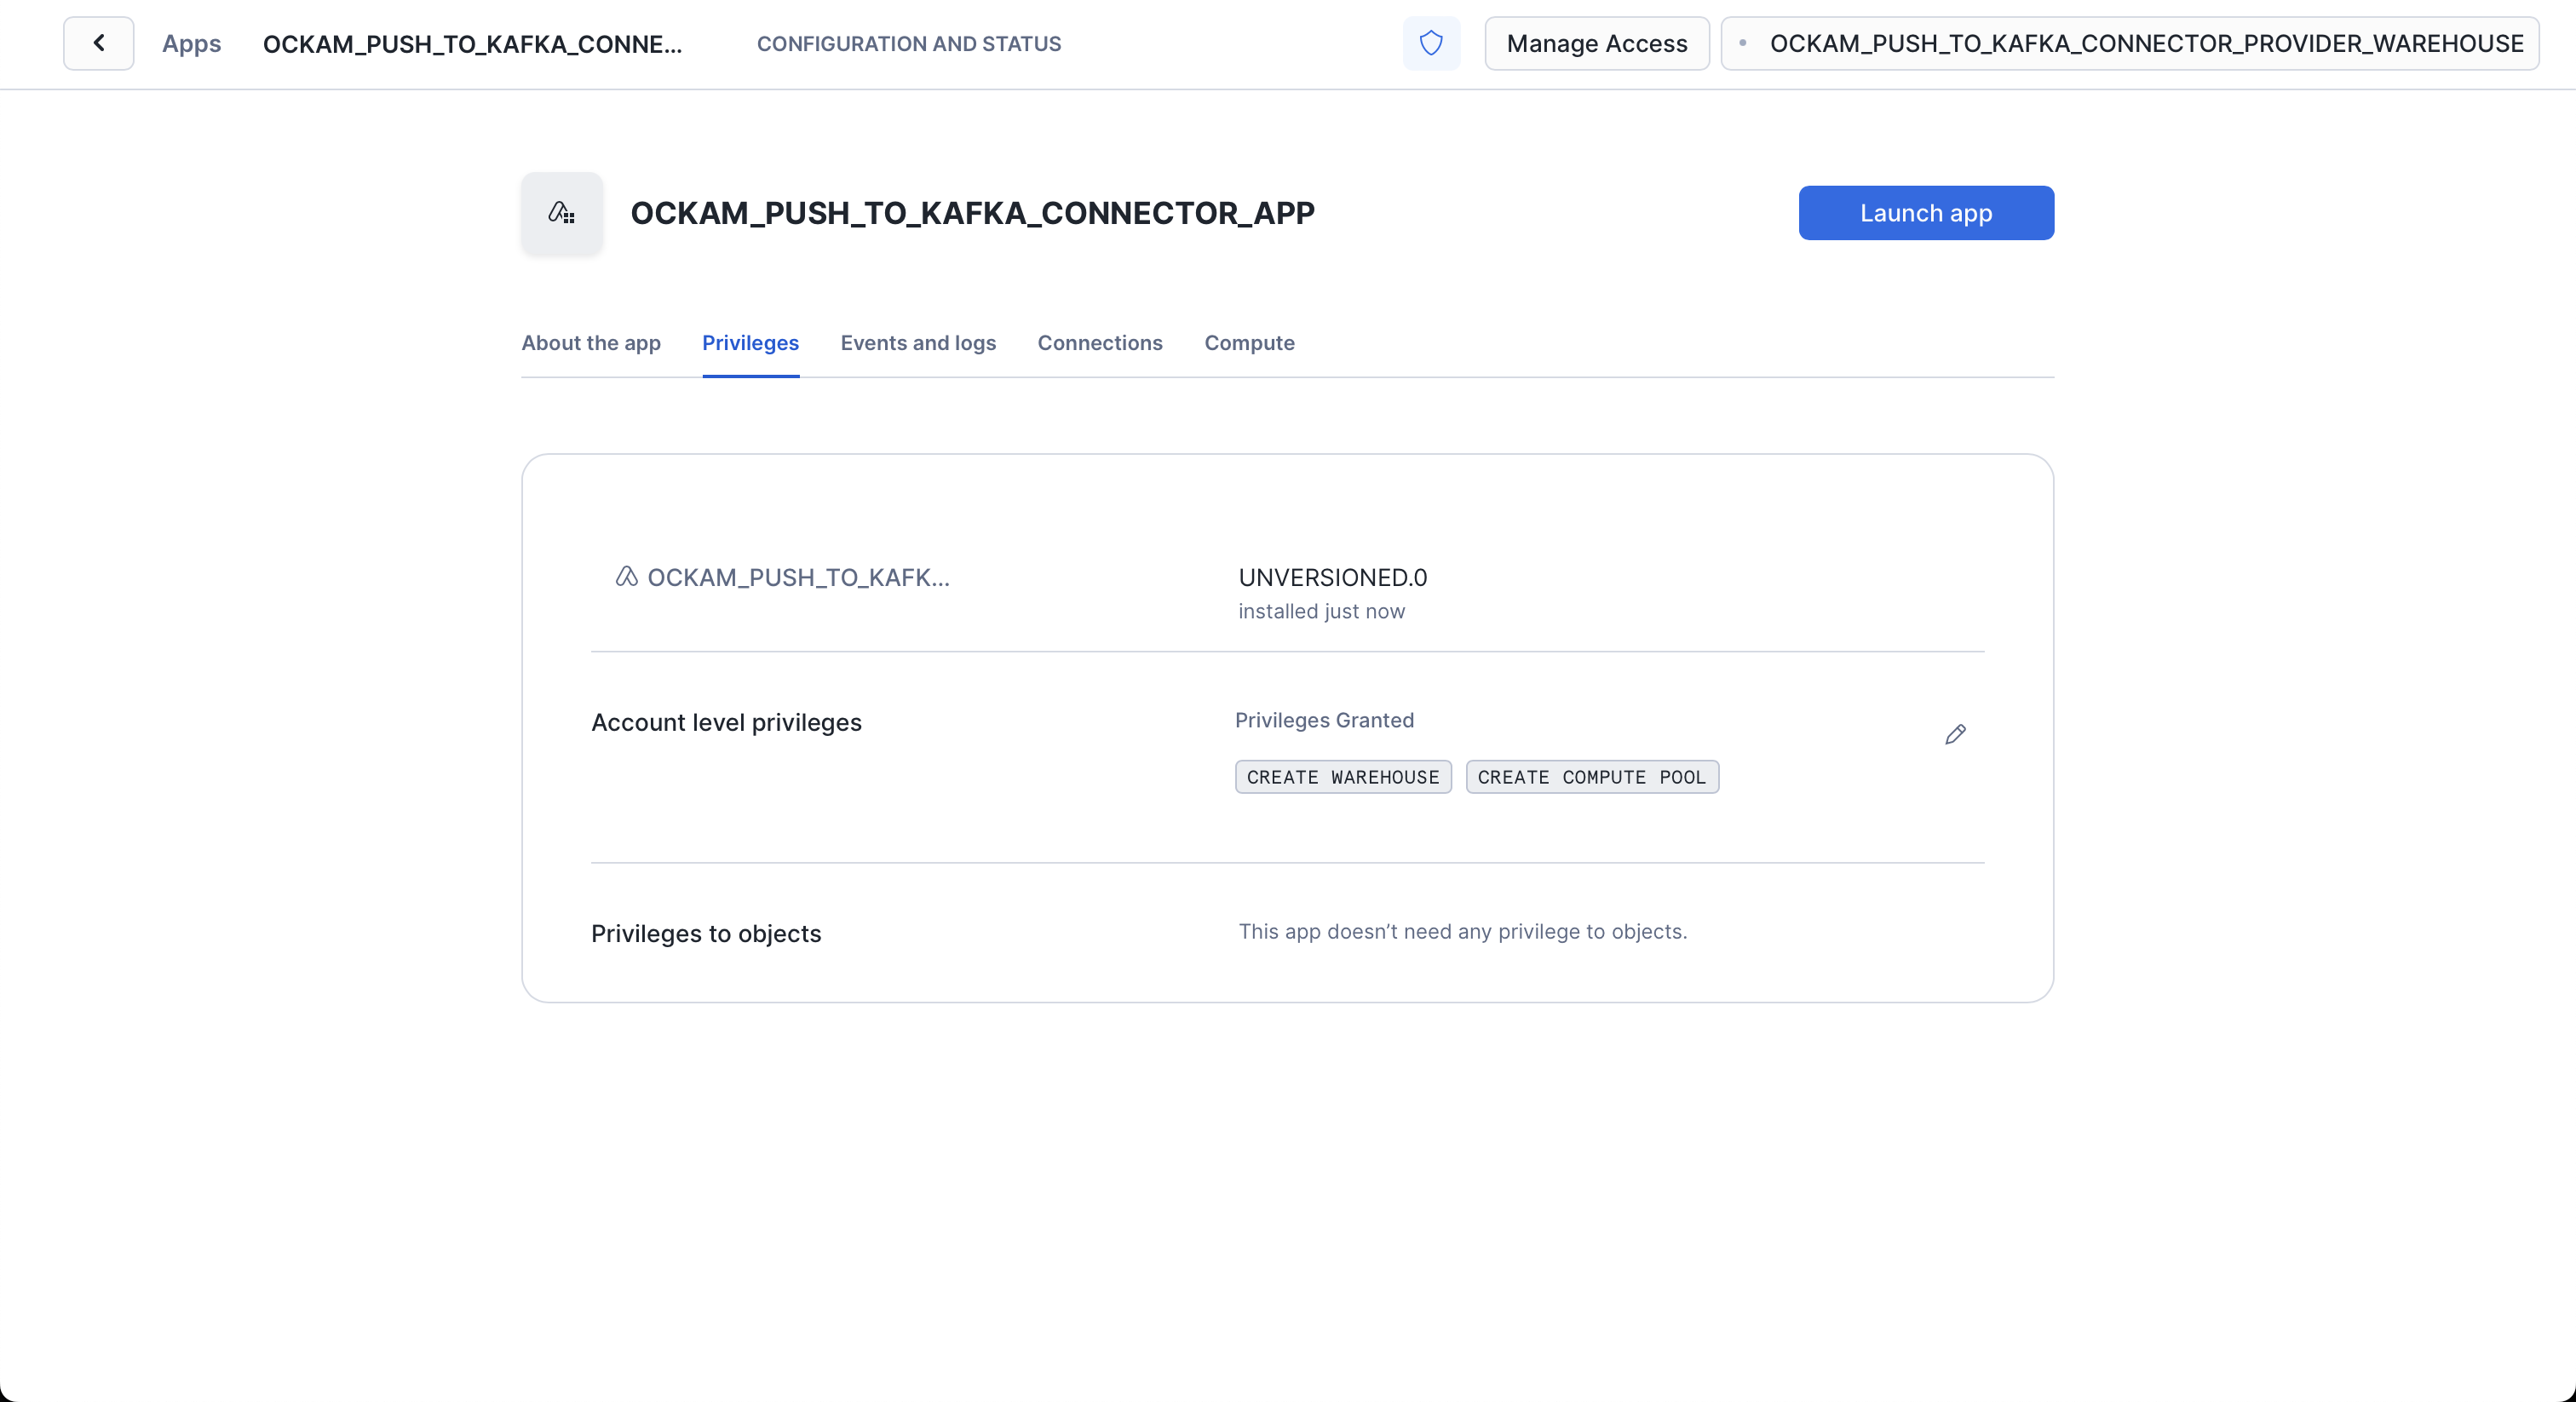
Launch app
After the app activates you'll see a page that summarizes the
privileges that the application now has. There's nothing we need
to review or update on these screens yet, so proceed by clicking the Launch app button.
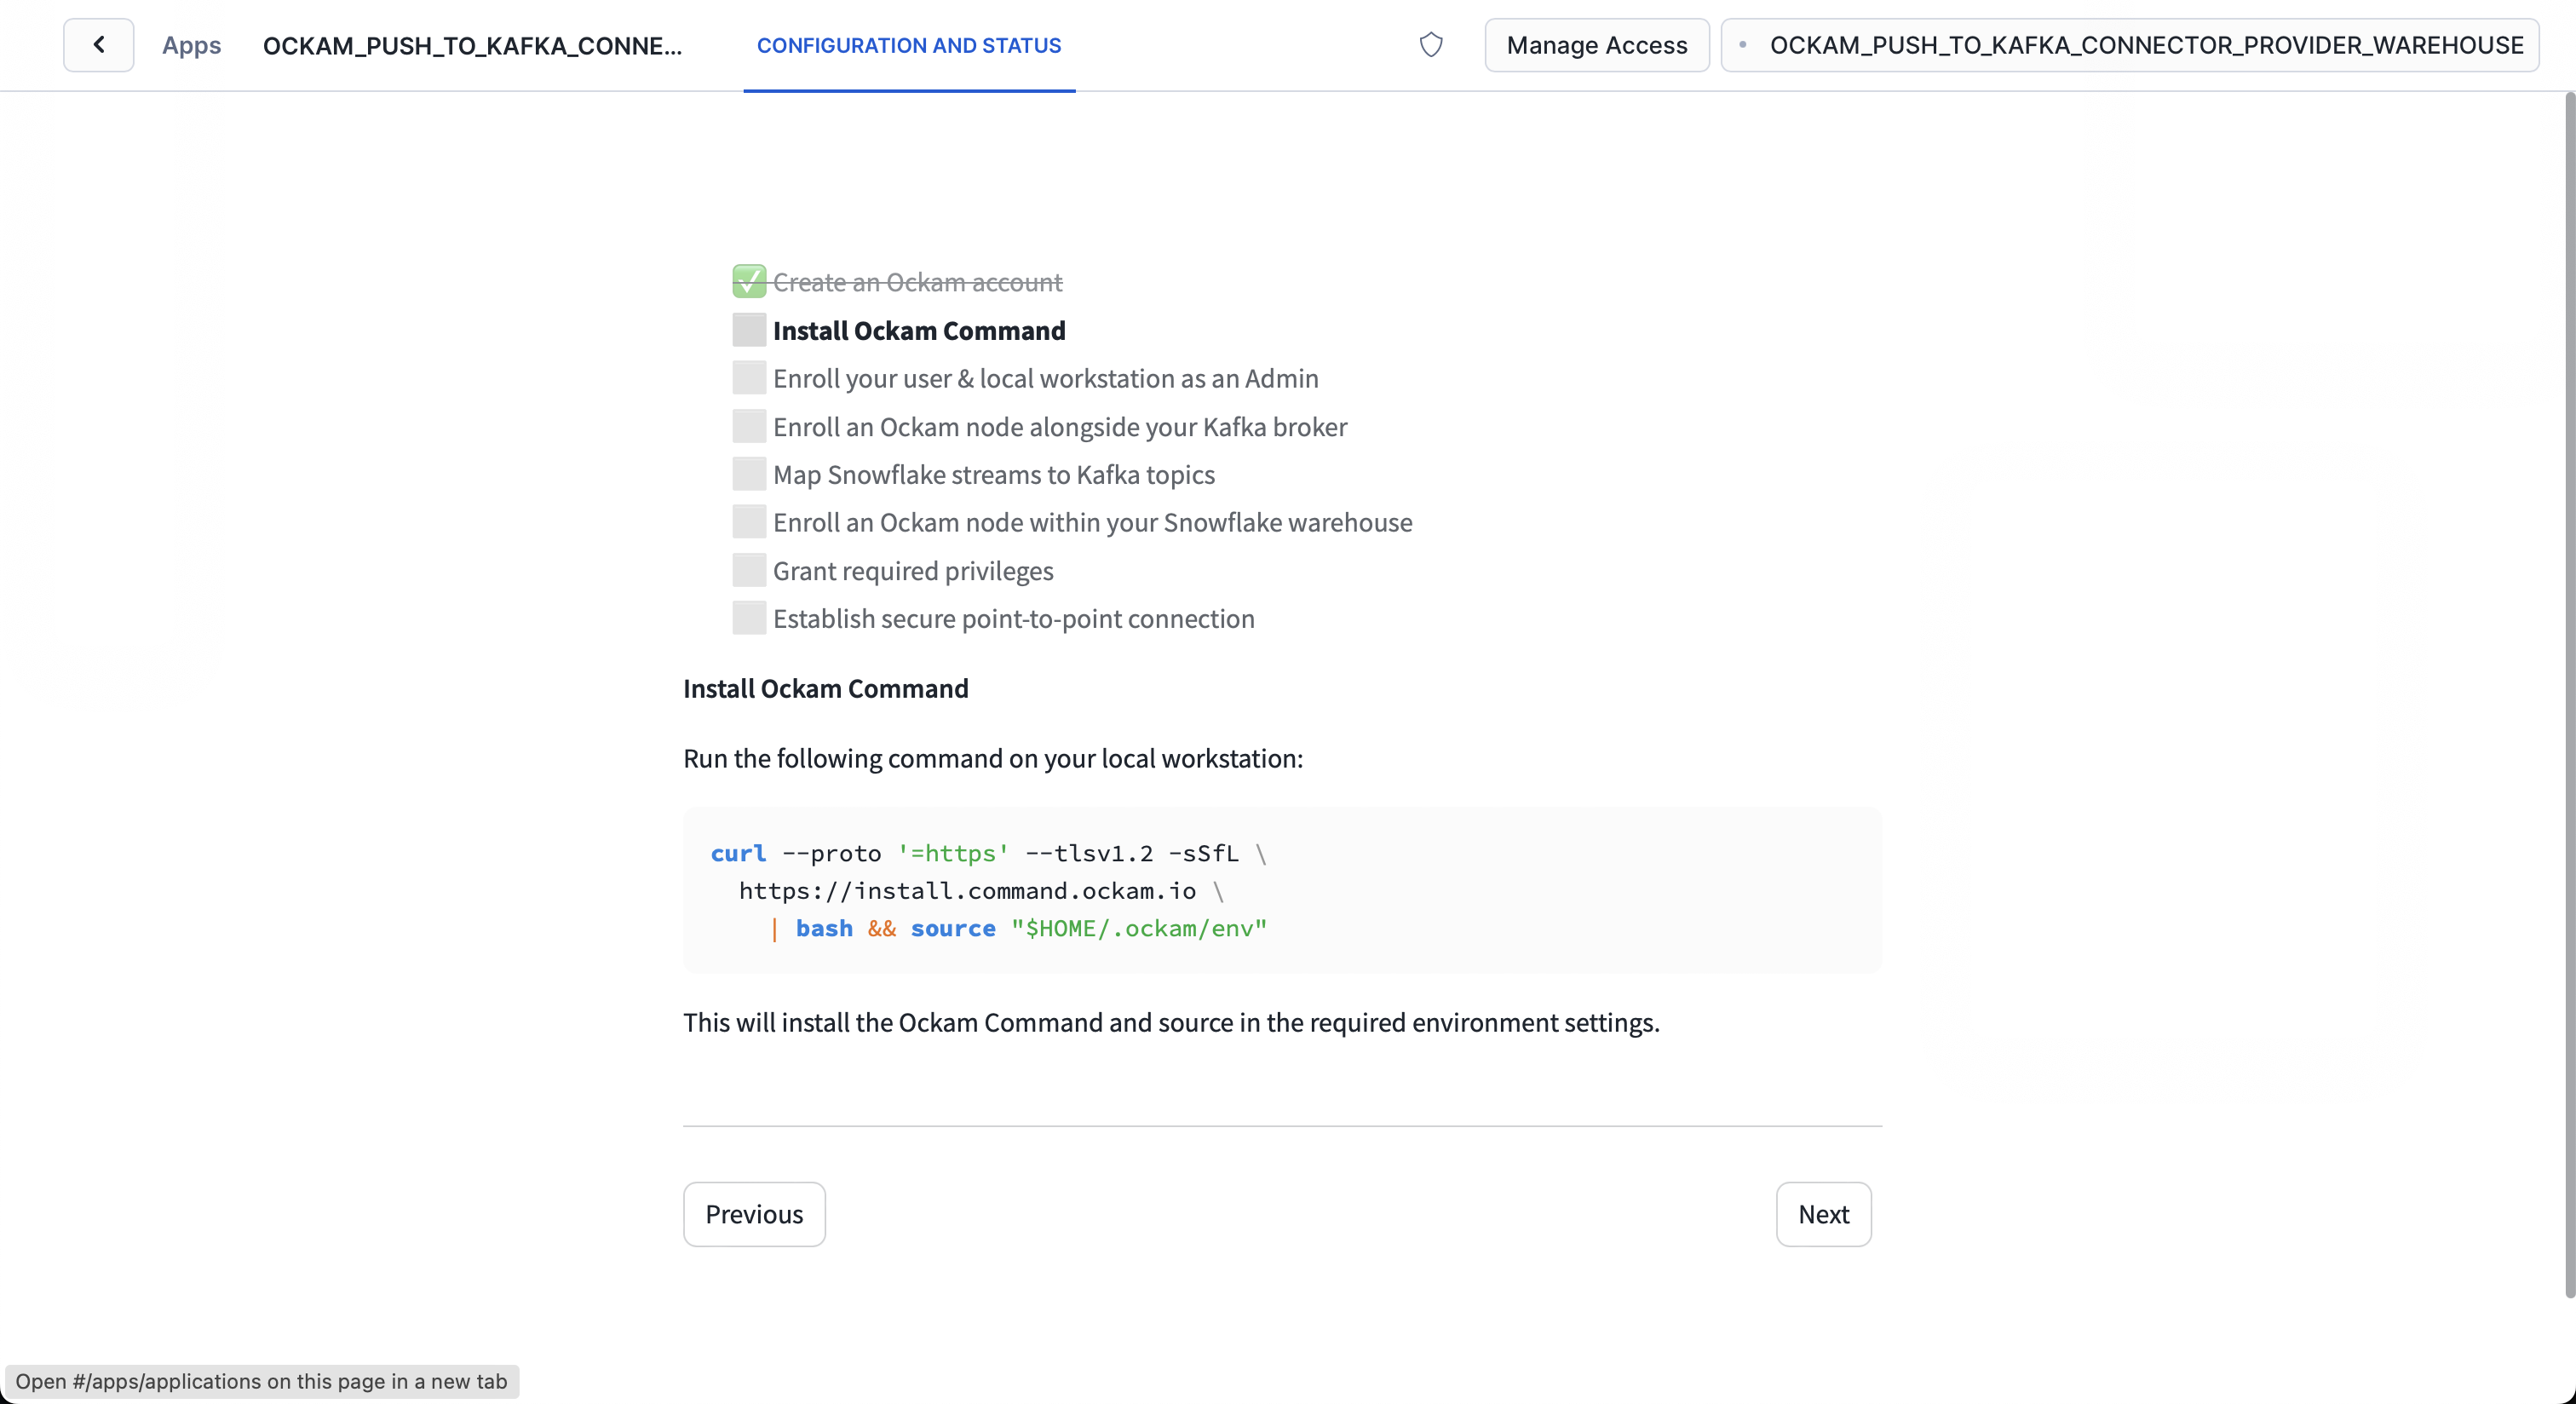
Download Ockam Command
Run the following command on your local workstation:
_10curl --proto '=https' --tlsv1.2 -sSfL \_10 https://install.command.ockam.io \_10 | bash && source "$HOME/.ockam/env"
This will install the Ockam Command and source in the required environment settings. If you've installed Ockam Command before you can skip this step.

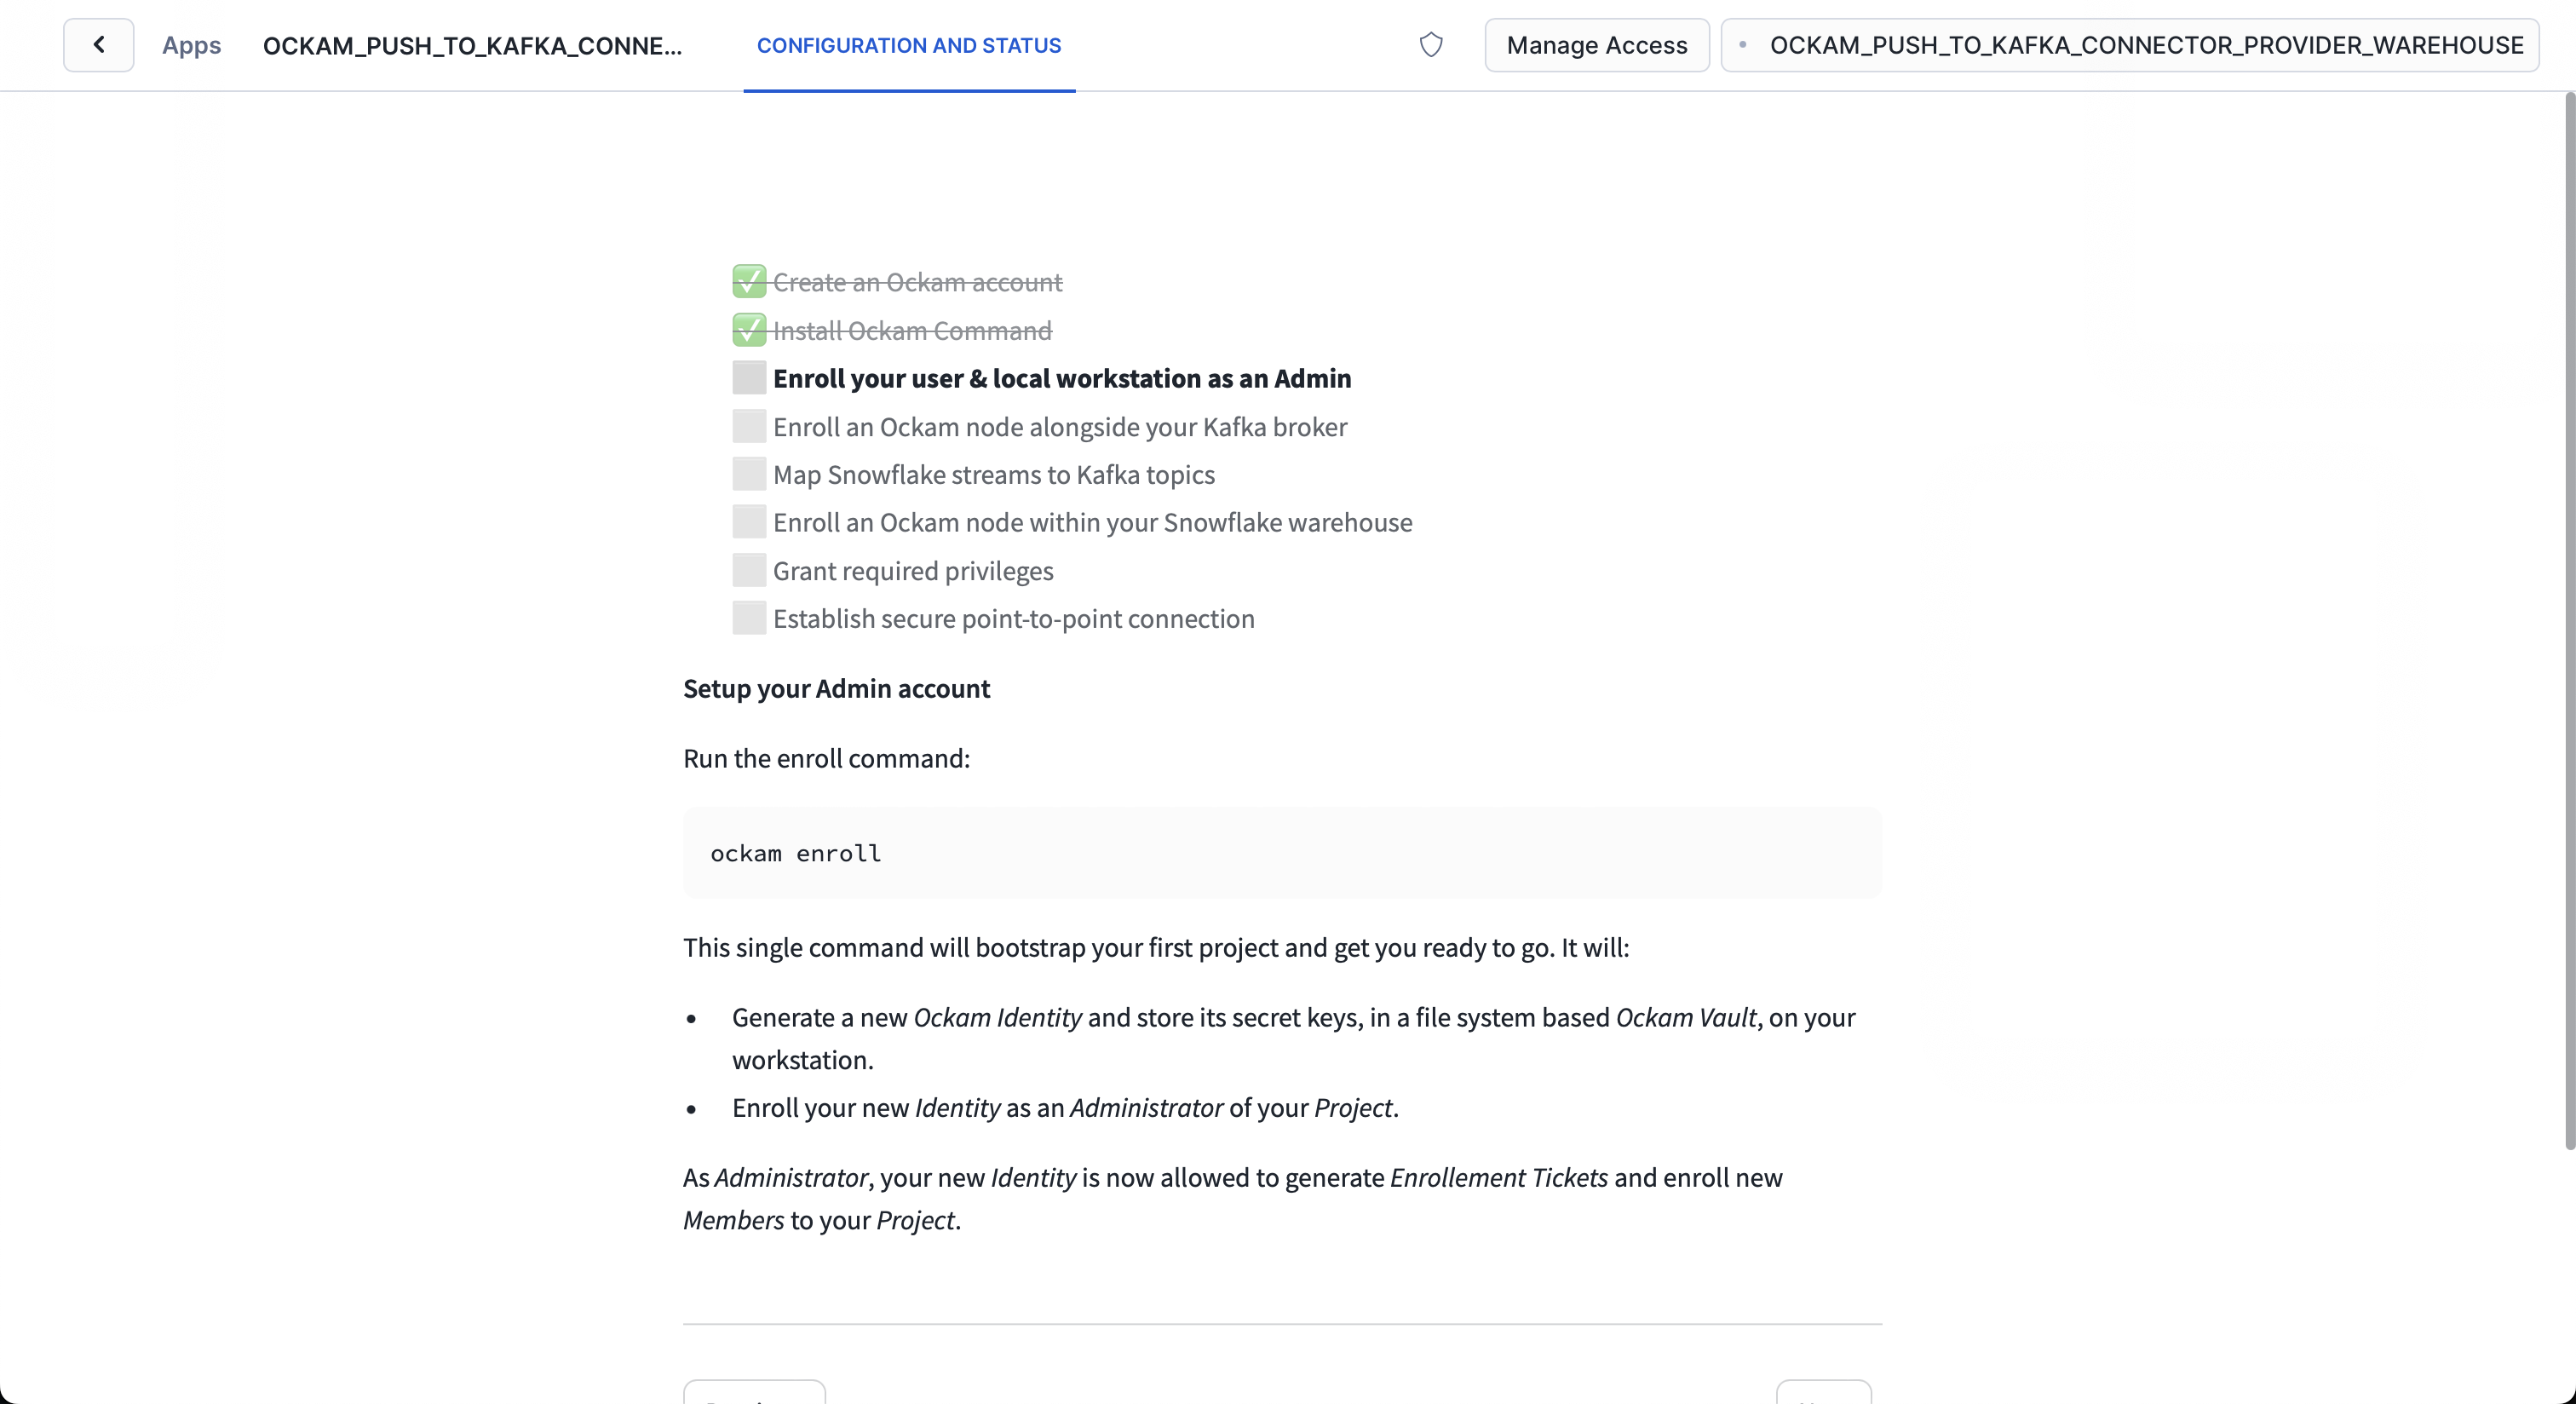
Setup Ockam
Once Ockam Command installation is complete you can run:
_10ockam enroll
Wrapped up in this single ockam enroll command are several steps that will
bootstrap your first project and get you ready to go. It will:
- Generate an Ockam Identity and store its secret keys in a file system based Ockam Vault.
- Create an account with Ockam Orchestrator.
- Provision a trial Space and Project in the Orchestrator.
- Make your Ockam Identity the administrator of your new Project.
Generate enrollment ticket for Kafka
In this section we're going to provision an Ockam node that will run alongside our Kafka broker, and provide one of the ends of our point-to-point connection.
We need to generate an enrollment ticket to allow a new Ockam Node to join the project that was just created. This node will run alongside the Kafka broker, in the network where the Kafka is running:
_10ockam project ticket --usage-count 1 \_10 --expires-in 24h --attribute kafka \_10 --relay kafka > kafka.ticket
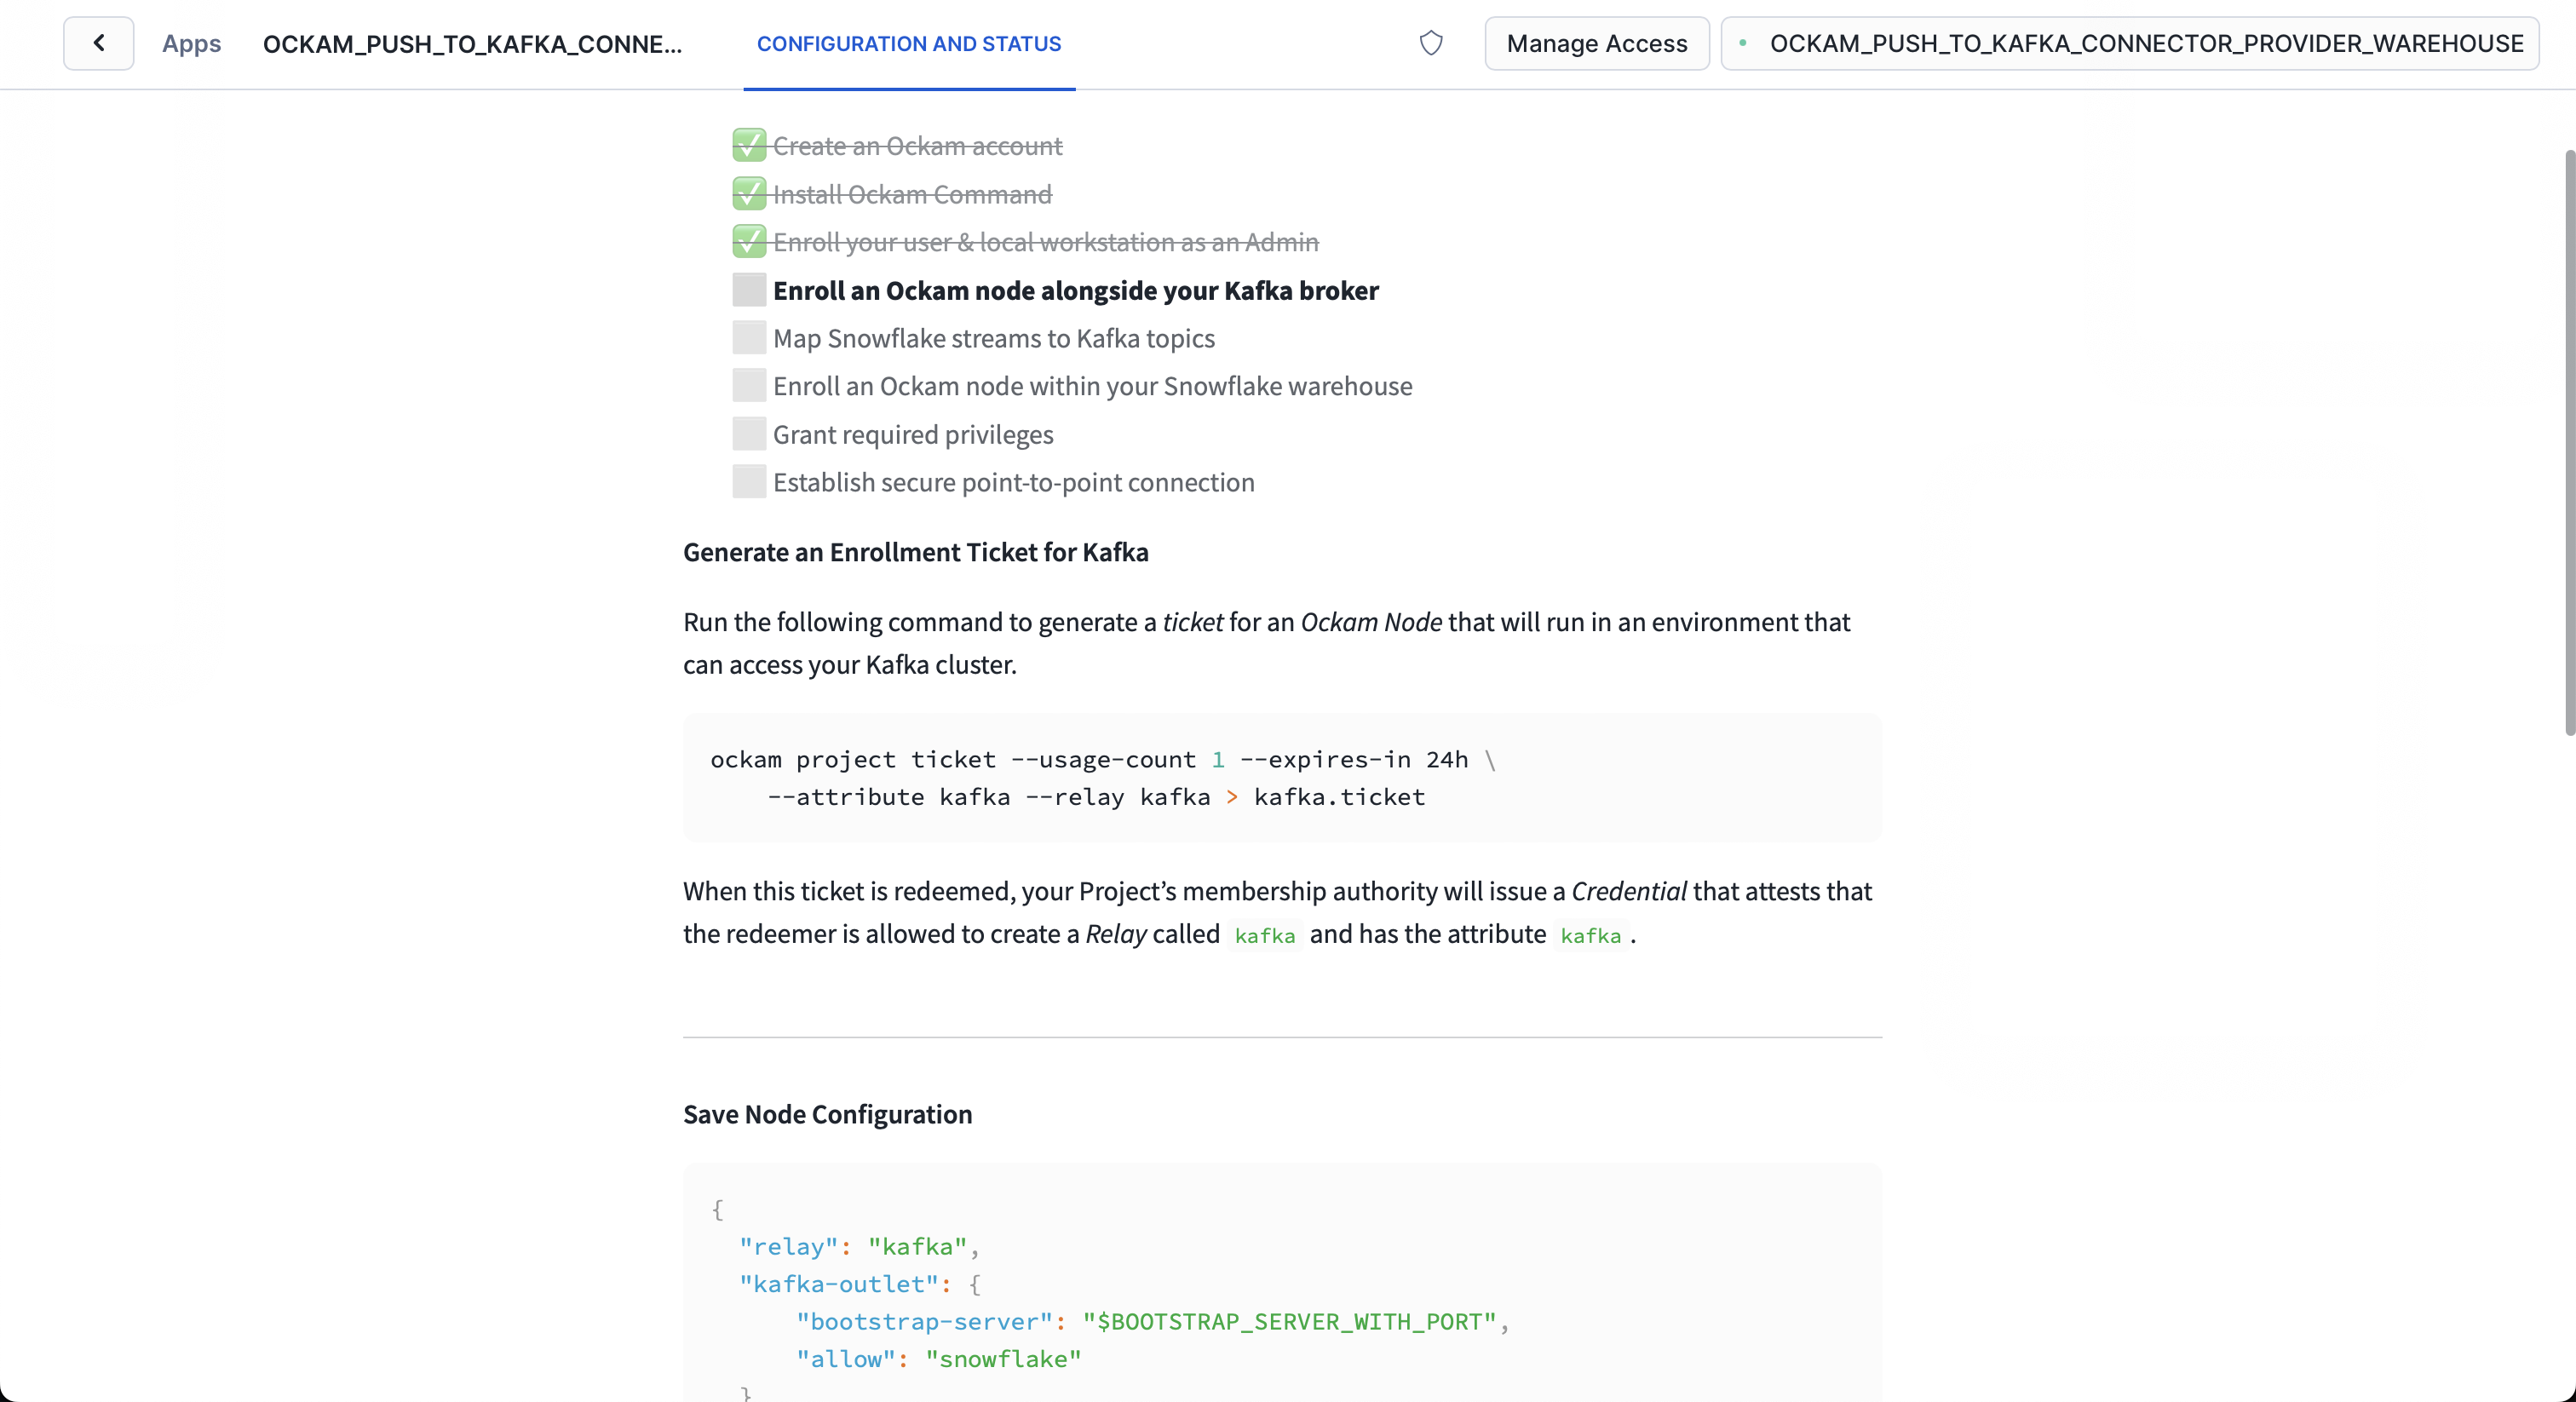
Option 1 - Run an Ockam node next to Kafka via the AWS Marketplace
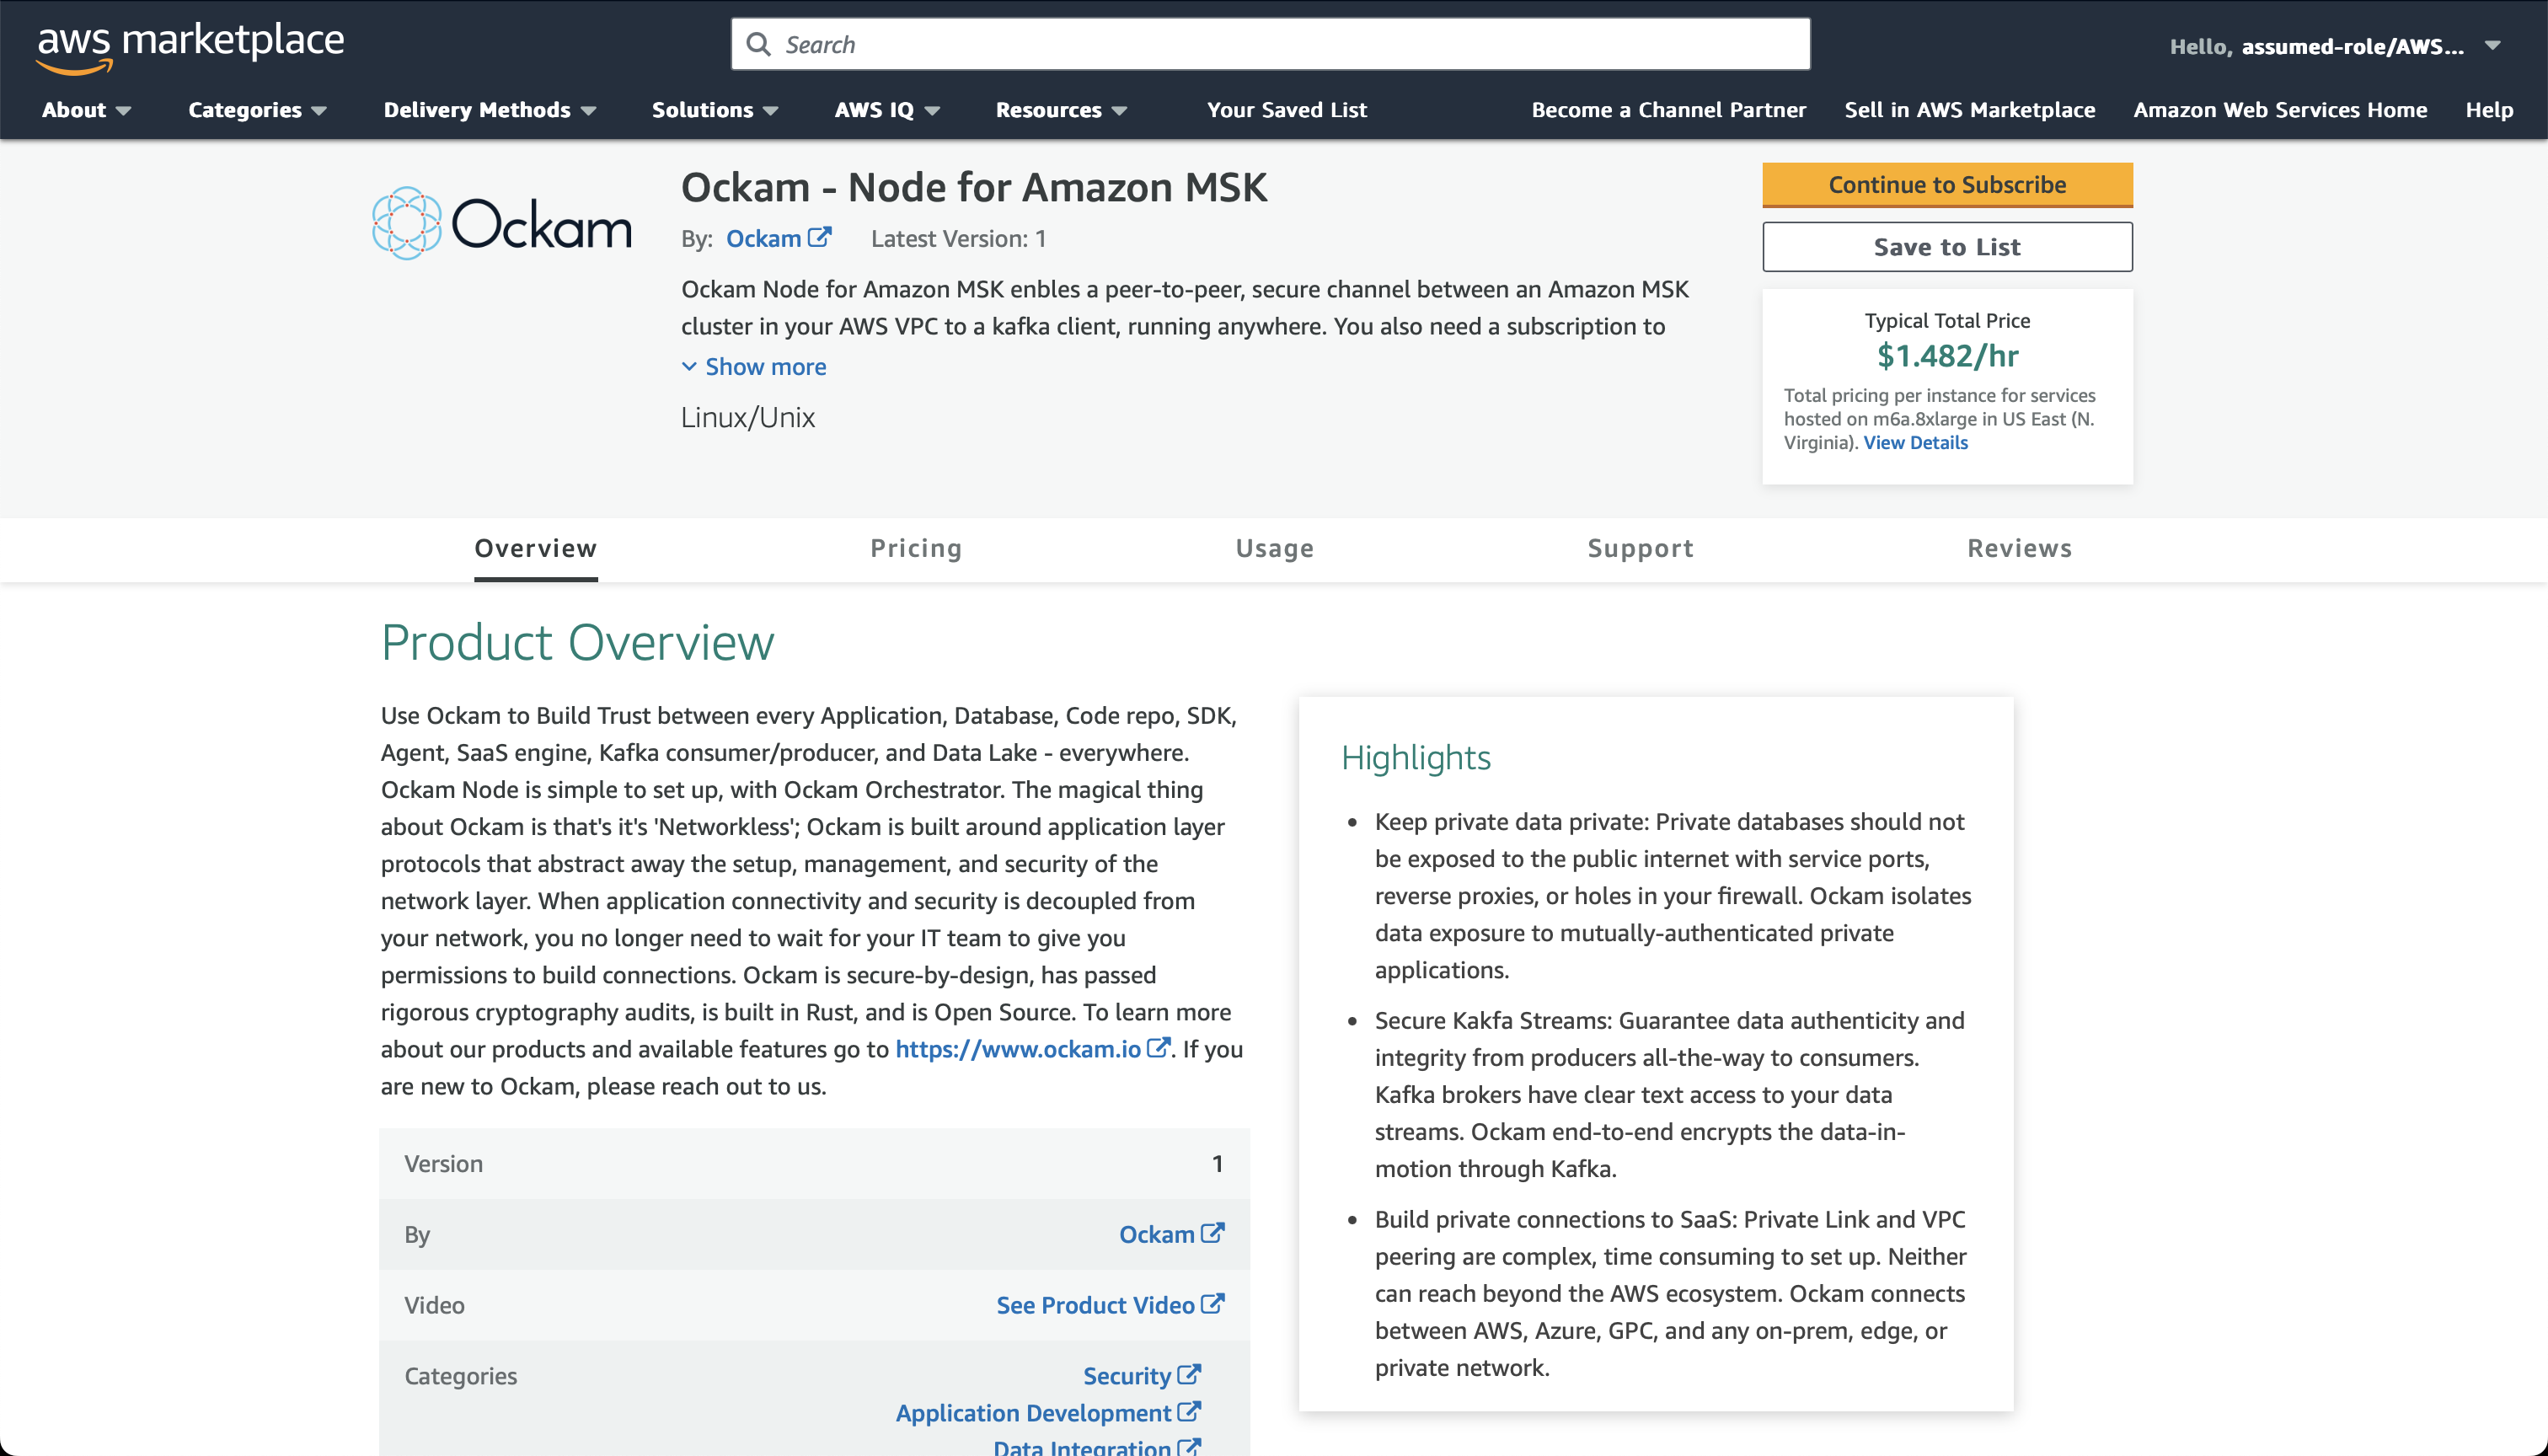
The Ockam Node for Amazon MSK is a streamlined way to provision a managed Ockam Node within your private AWS VPC. If you'd prefer the ability to deploy your Ockam Node yourself (for example on an existing machine or in a container) jump to our instructions on how to run an Ockam Node manually.
To deploy the node that will allow Snowflake to reach your Kafka broker visit
the Ockam Node for Amazon MSK listing in the AWS Marketplace, and click the Continue to Subscribe button, and then
Continue to Configuration.
On the configuration page choose the region that your Amazon MSK cluster is
running in, and then click Continue to Launch followed by Launch.
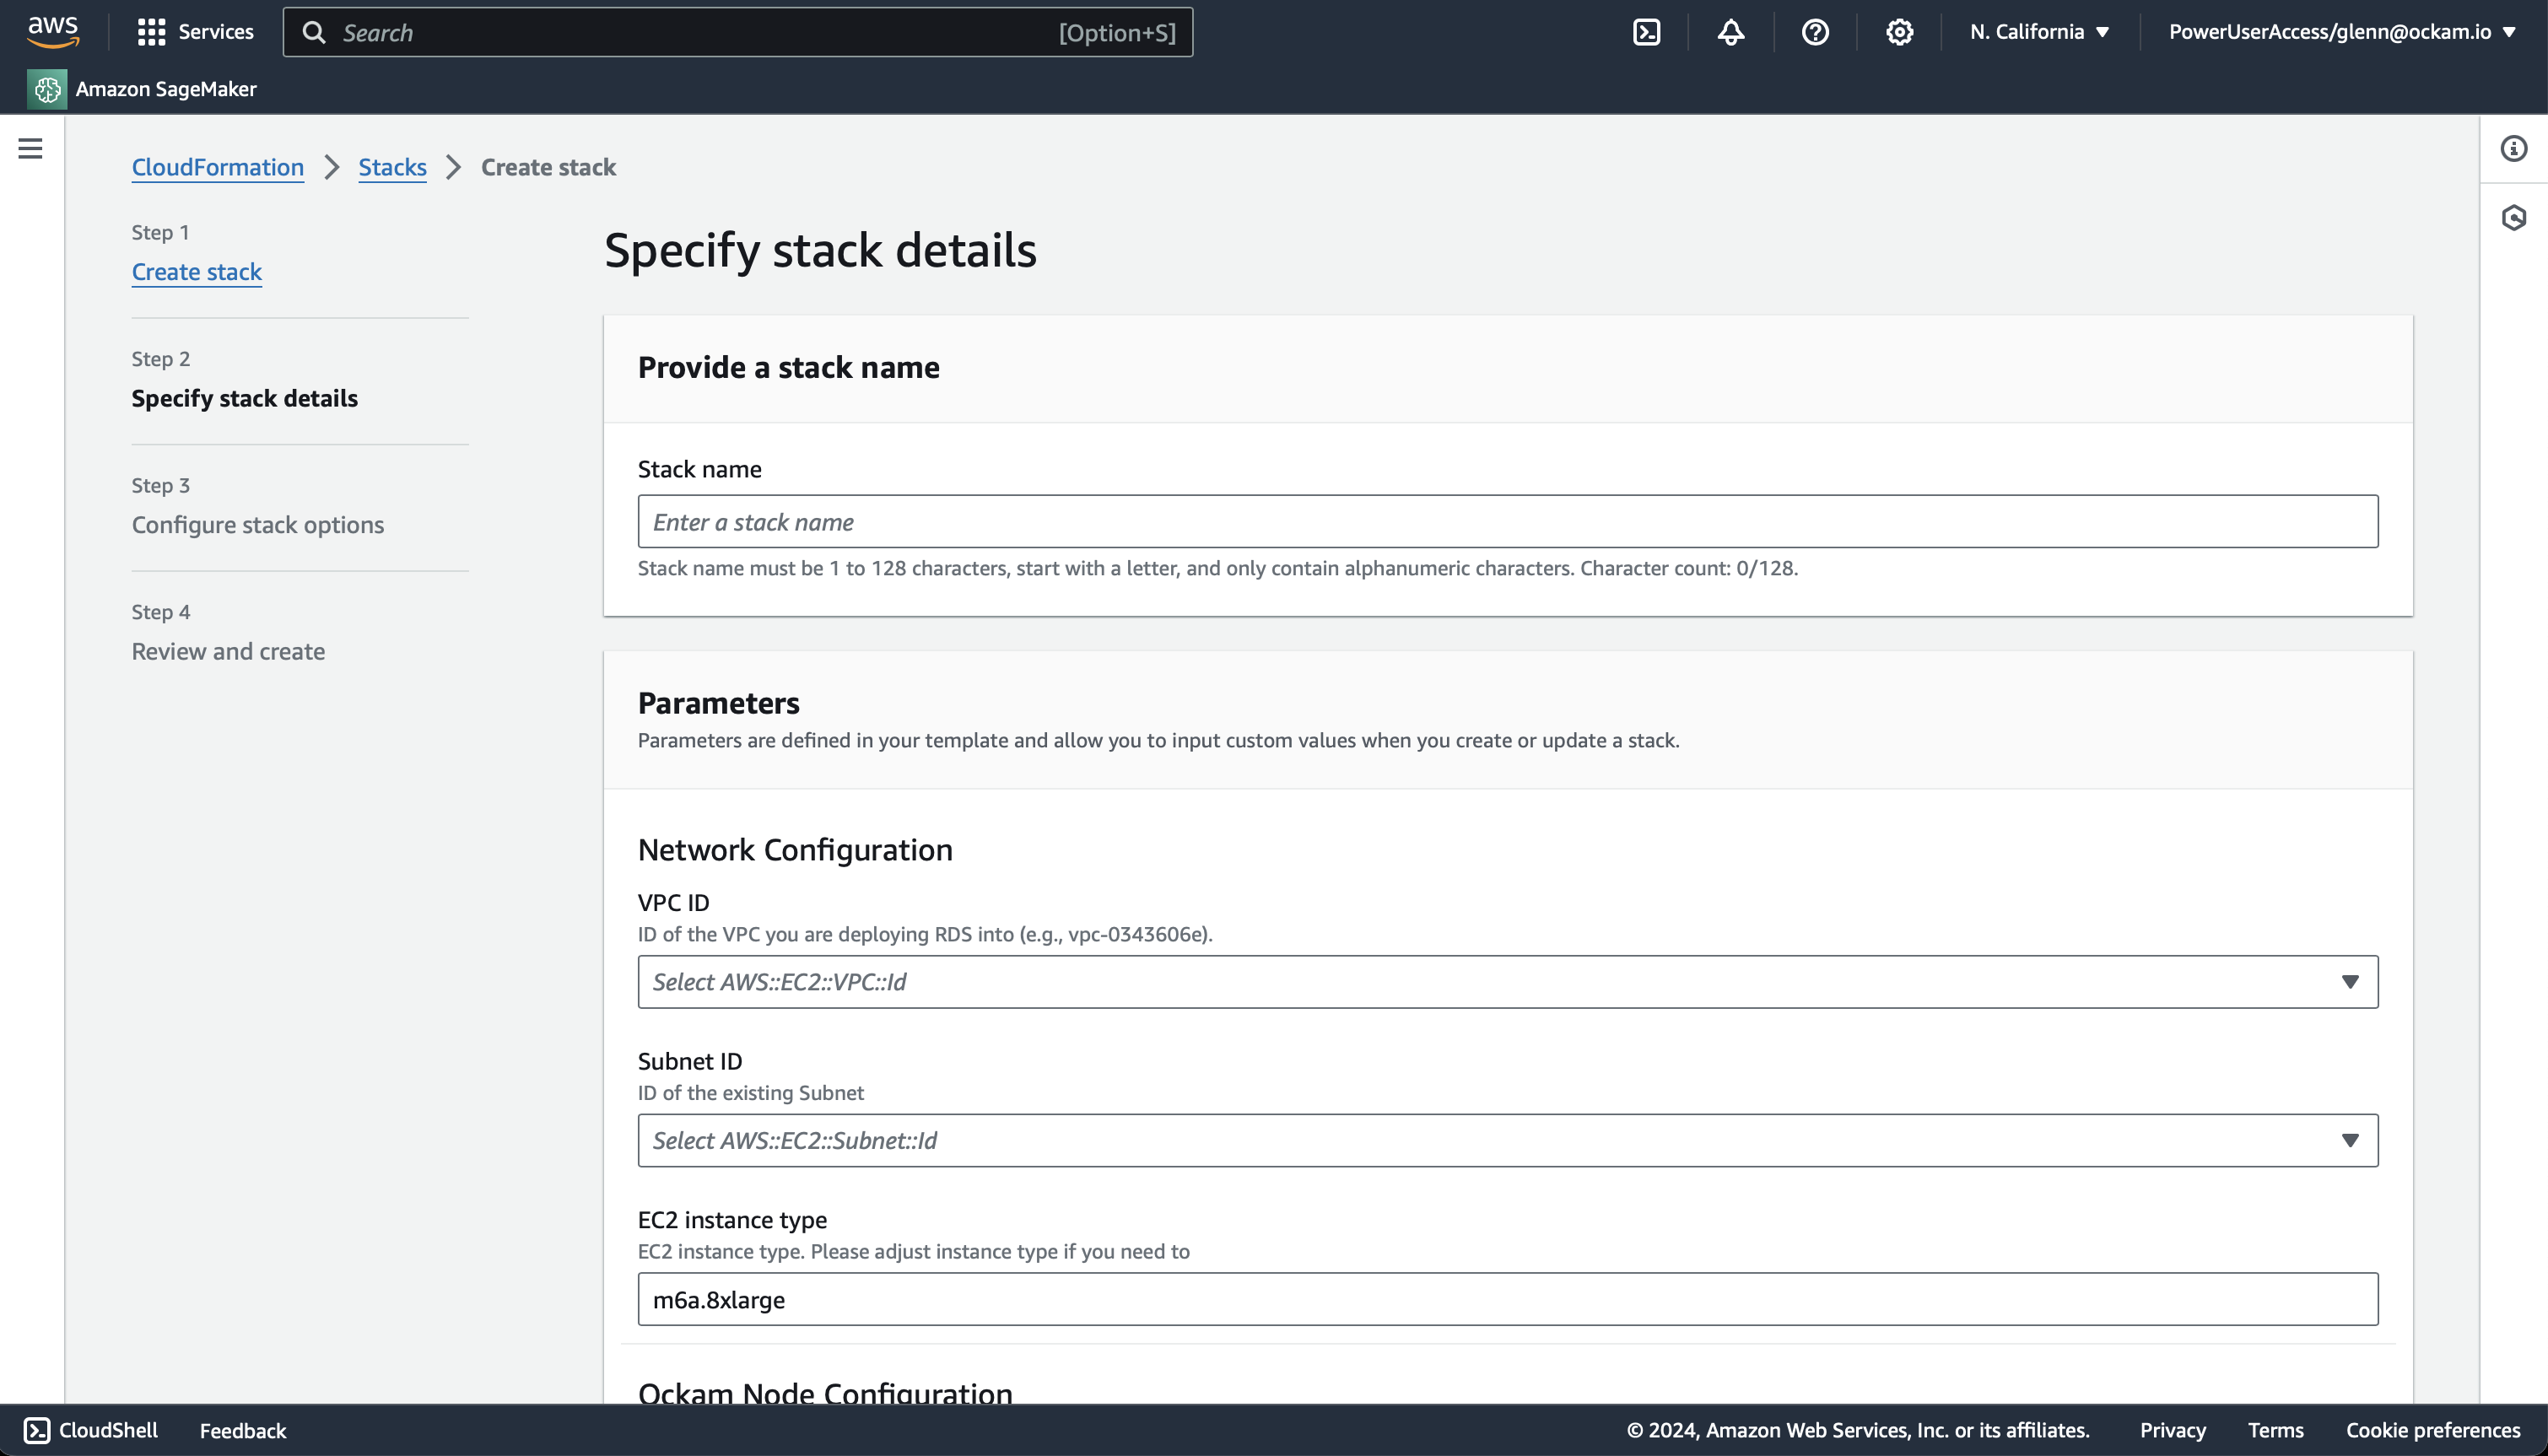
Enter stack details
The initial Create Stack screen pre-fills the fields with the correct
information for your node, so you can press Next to proceed.
Enter node configuration
This screen has important details to you need to fill in:
- Stack name: Give this stack a recognisable name, you'll see this in various locations in the AWS Console. It'll also make it easier to clean these resources up later if you wish to remove them.
- VPC ID: The ID of the Virtual Private Cloud network to deploy the node in. Make sure it's the same VPC where you've deployed your Amazon MSK cluster.
- Subnet ID: Choose one of the subnets within your VPC, ensure MSK has a broker address available in that subnet.
- Enrollment ticket: Copy the contents of the
kafka.ticketfile we created earlier and paste it in here. - Amazon MSK Bootstrap Server with Port: In the client configuration details for your Amazon MSK cluster you will have a list of bootstrap servers. Copy the
hostname:portvalue for the Private endpoint that's in the same subnet you chose above. - JSON Node Configuration: Copy the contents of the
kafka.jsonfile we created earlier and paste it in here.
We've now completed the highlighted part of the diagram below, and our Kafka broker node is waiting for another node to connect.

Option 2 - Run an Ockam Node next to Kafka manually
Connect the Ockam node in Snowflake
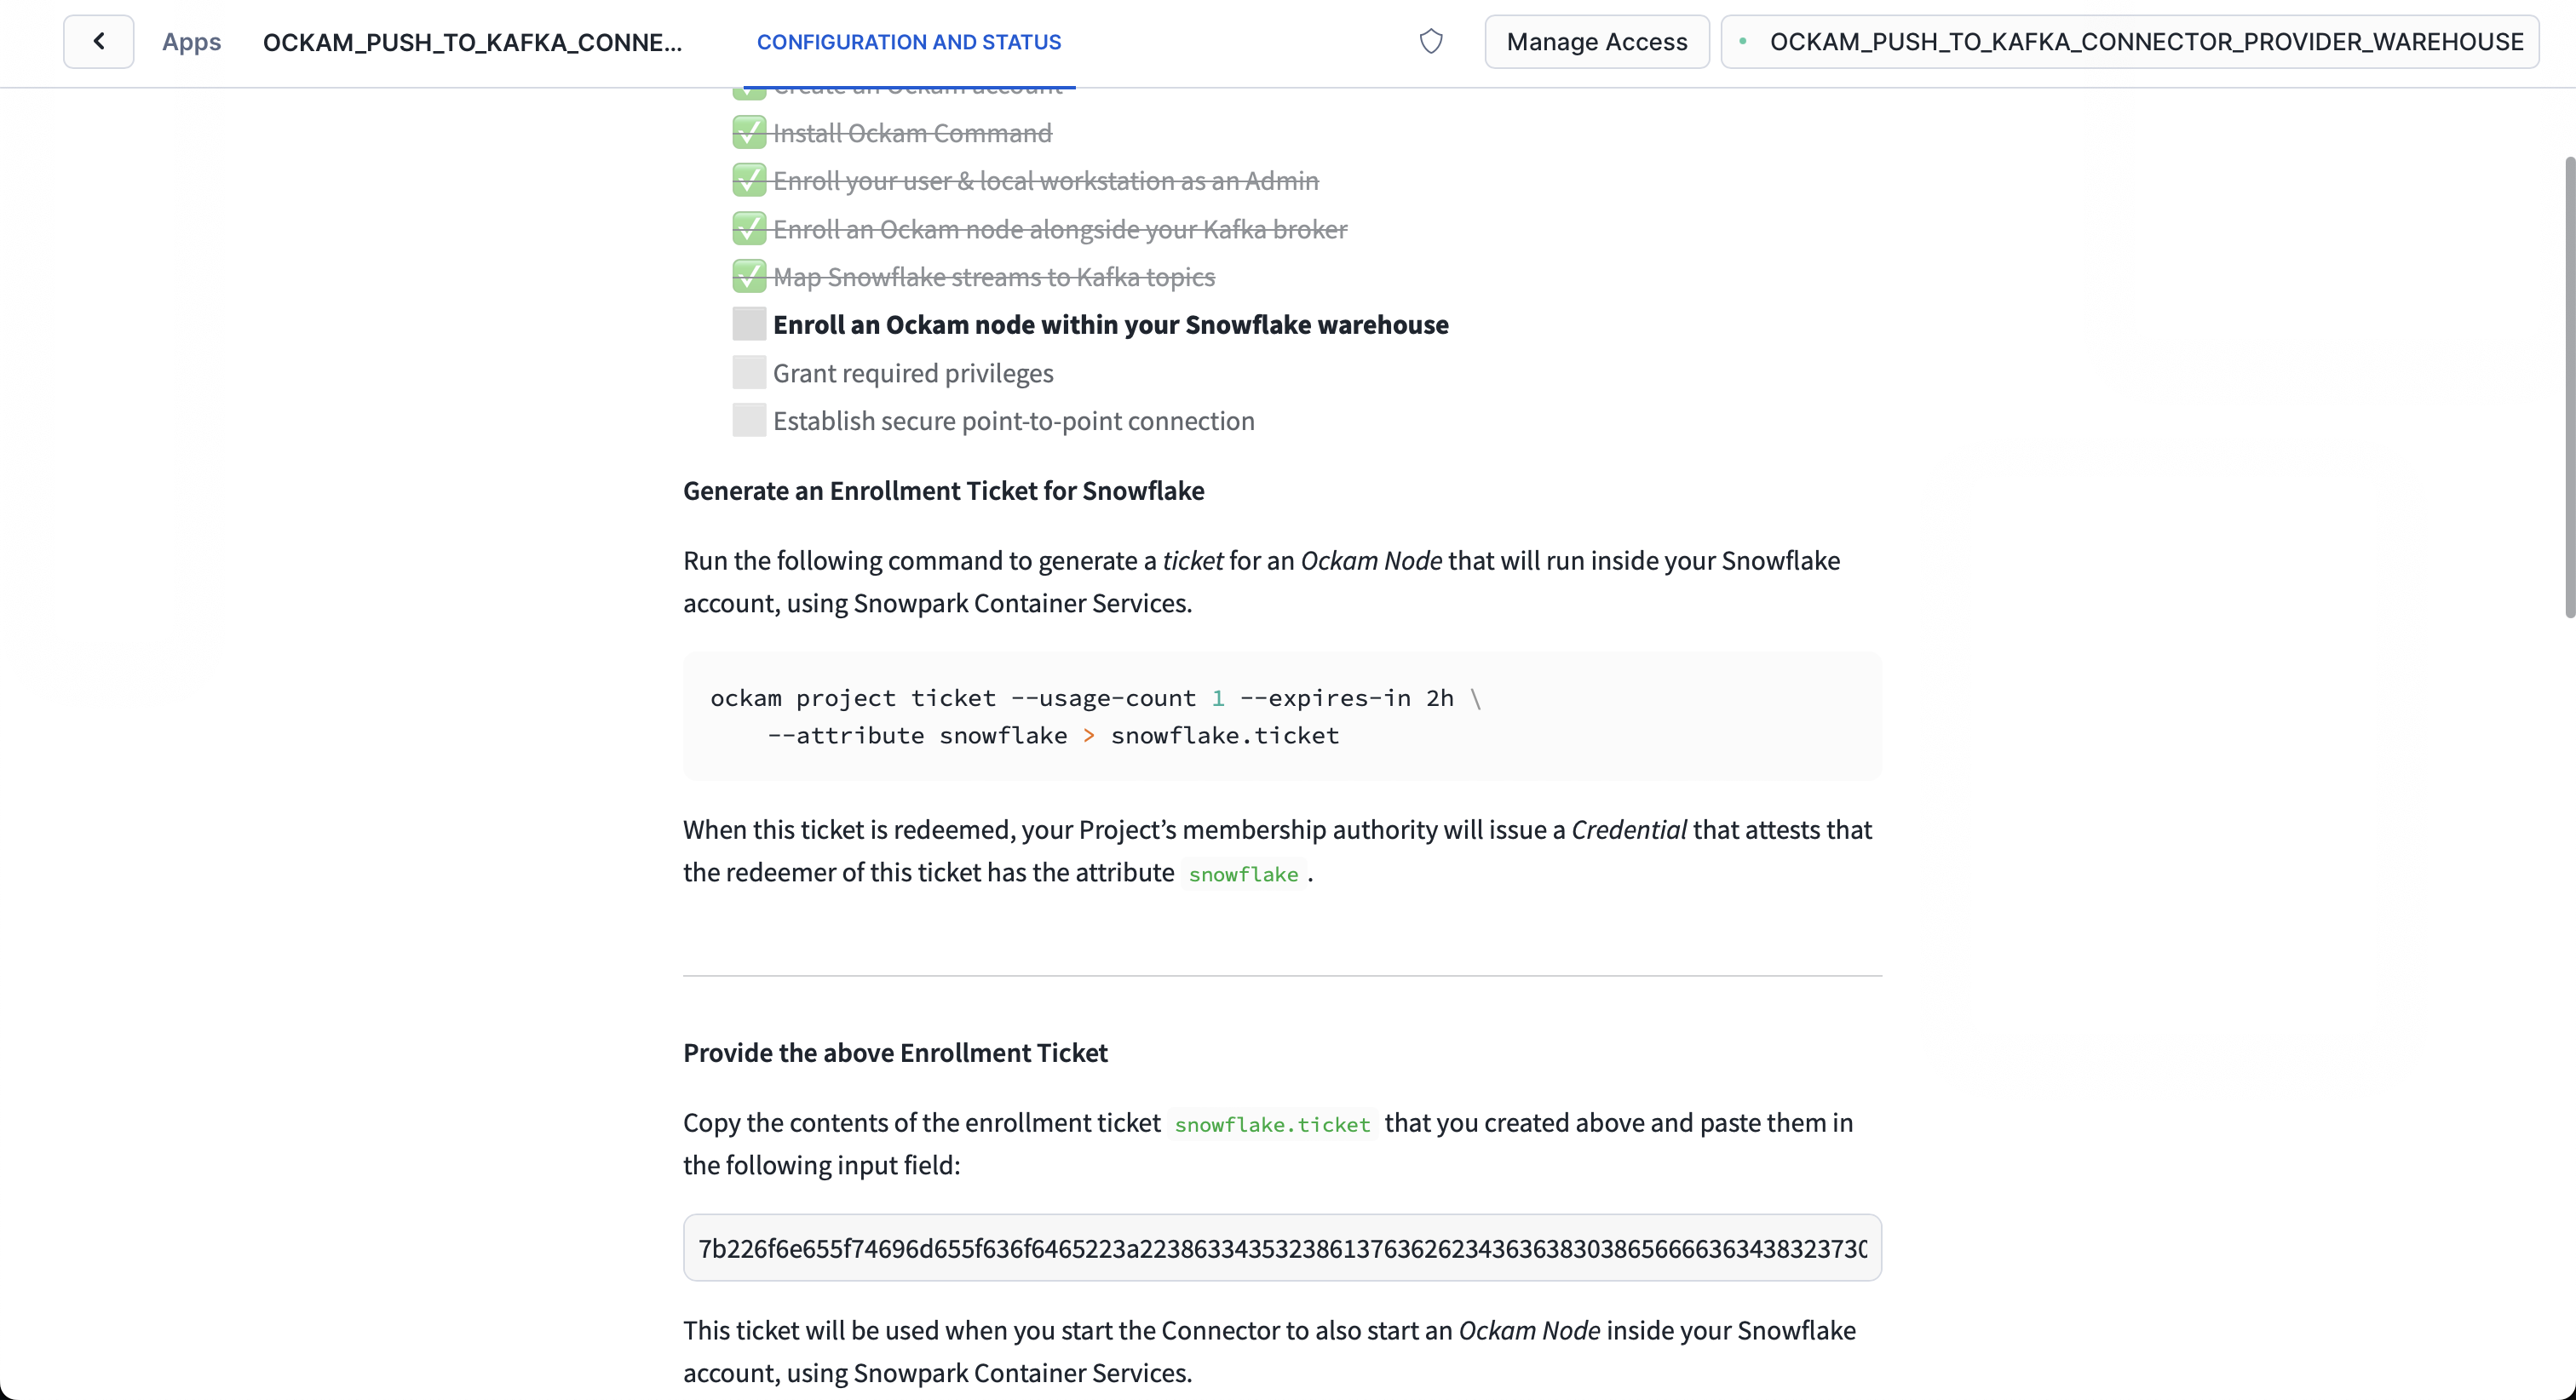
One end of our connection is now setup, it's time to connect the Snowflake end. We need to generate an enrollment ticket to allow another Ockam Node to join our project. This node will run in our Snowflake warehouse:
_10ockam project ticket \_10 --usage-count 1 --expires-in 2h \_10 --attribute snowflake > snowflake.ticket
Configure connection details
Take the contents of the file snowflake.ticket that we just created and paste
it into "Provide the above Enrollment Ticket" form field in the "Configure app"
setup screen in Snowflake.
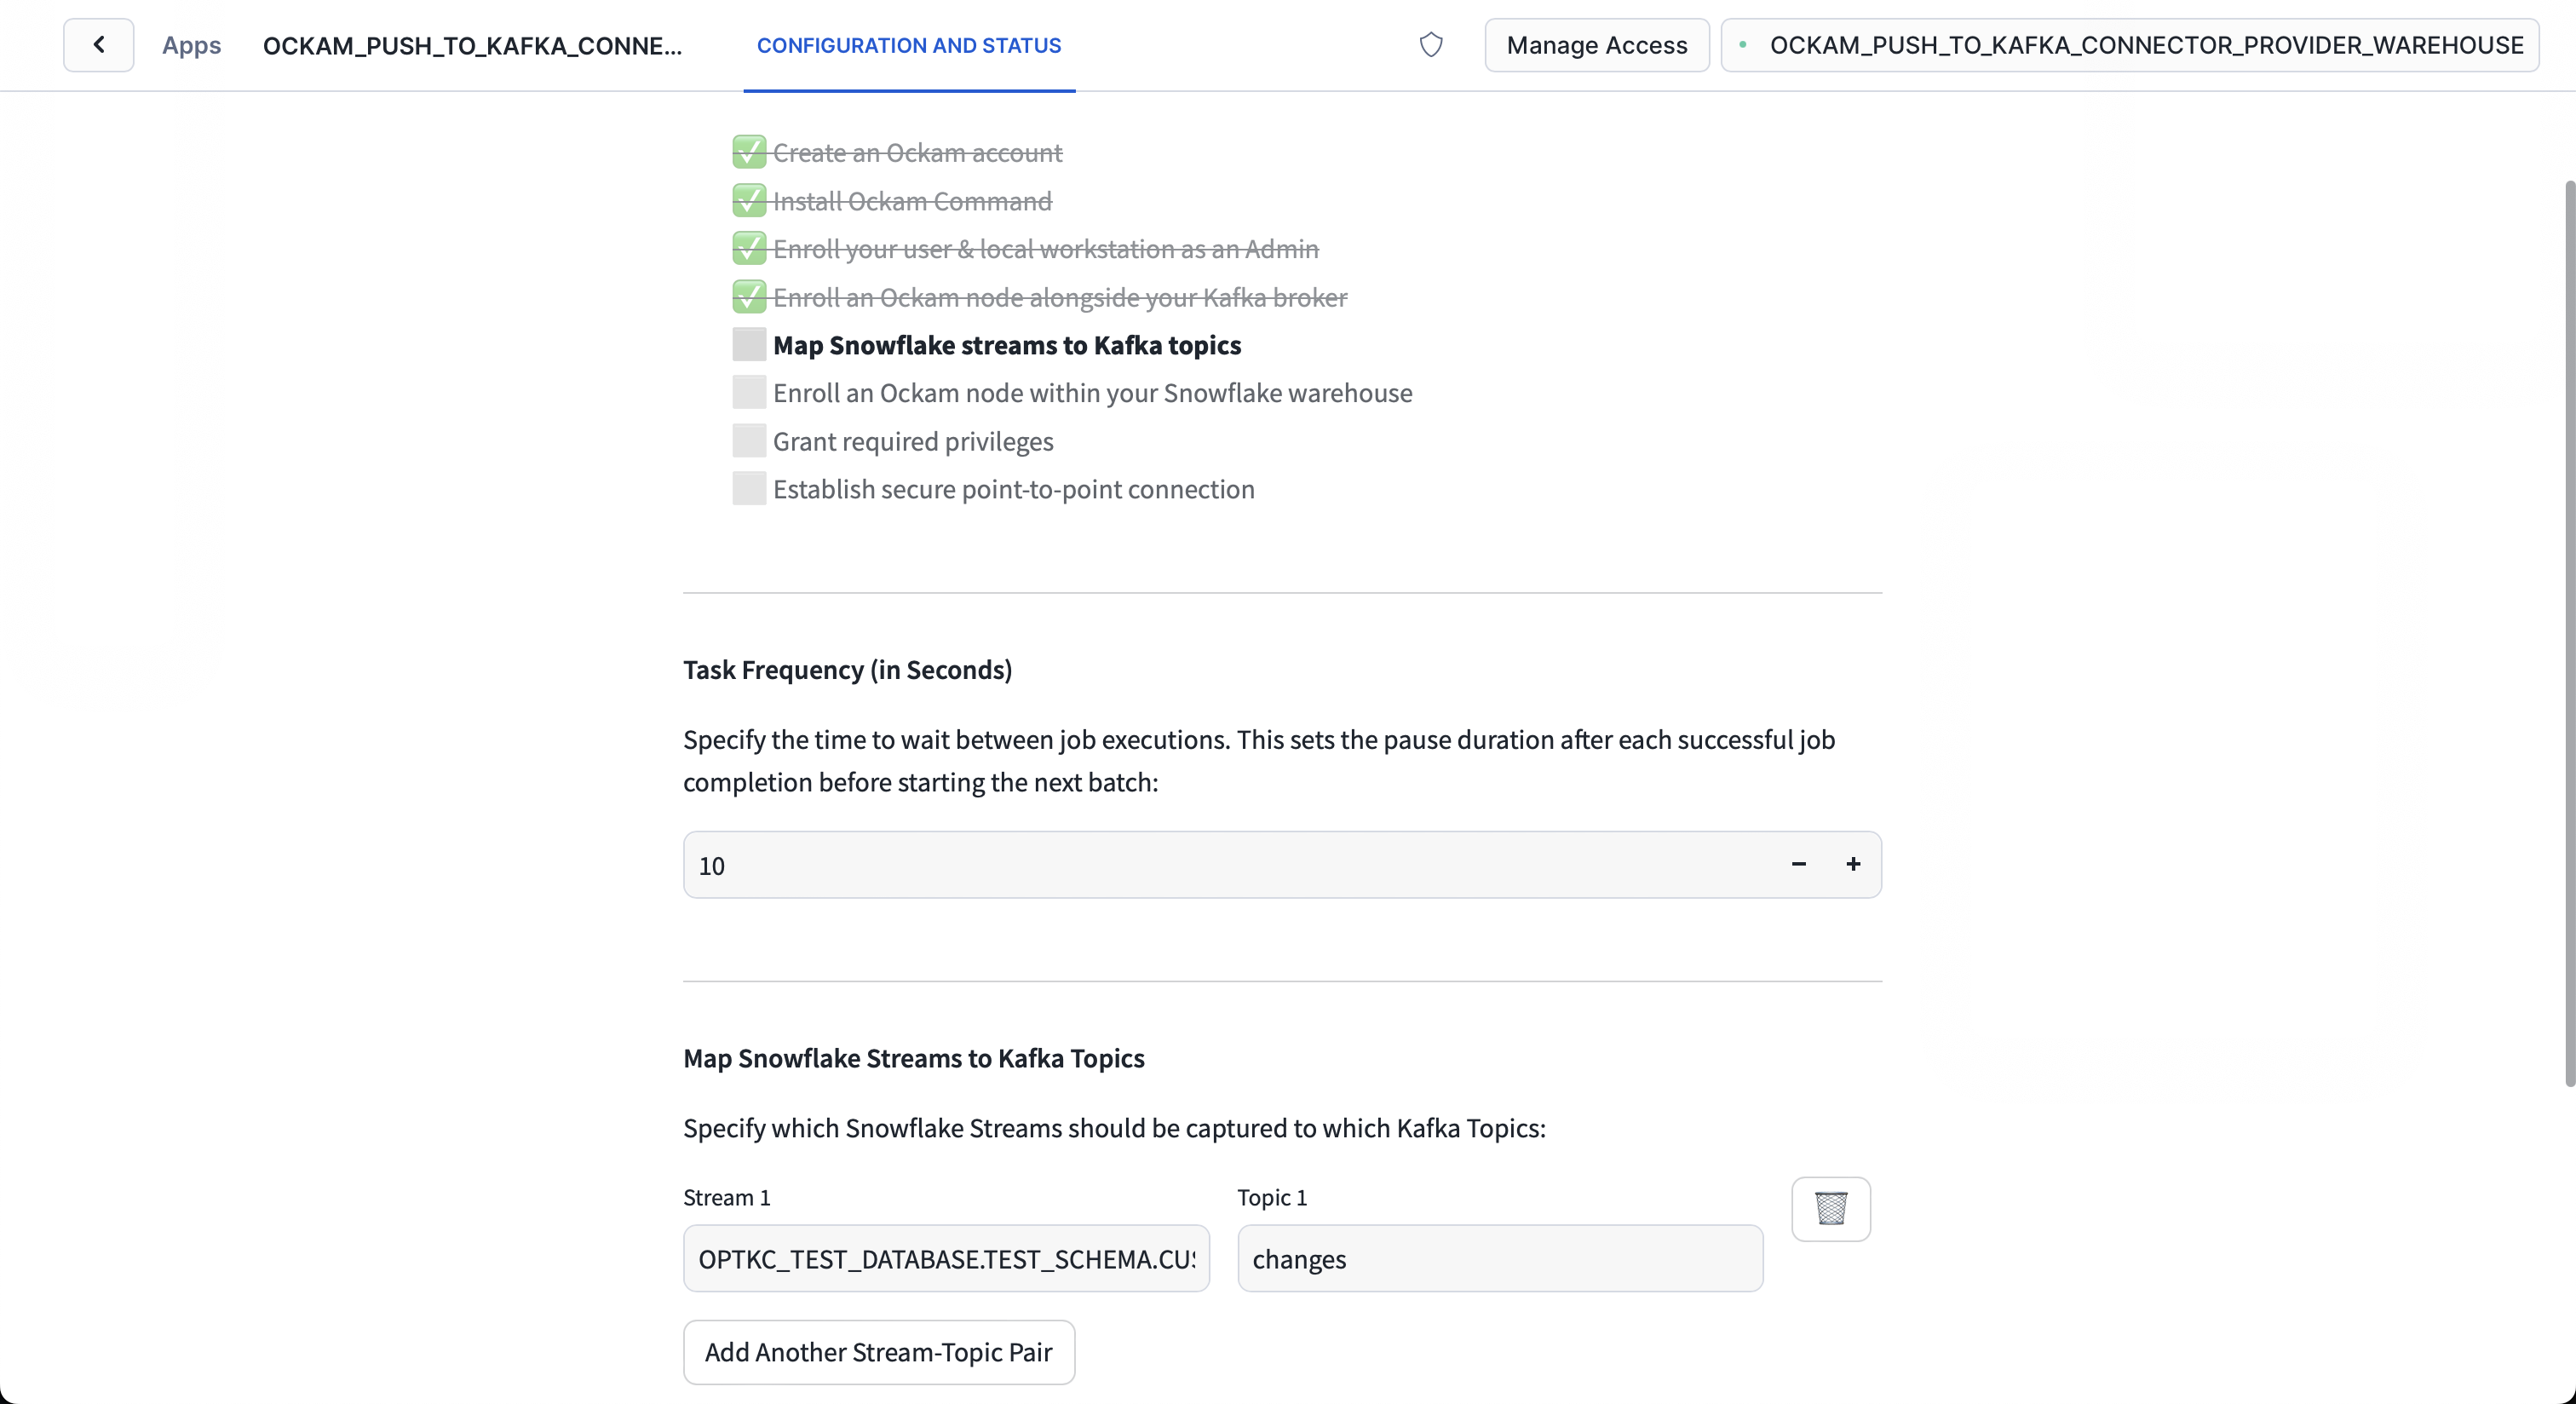
Map Snowflake stream to Kafka topic
Snowflake sends each stream of changes to a topic in Kafka, and we need to define the mapping between each stream and topic. Enter the stream you want to send (in the format of database.schema.stream), and then enter the name of the topic in Kafka.
If the topic doesn't exists the system will create it.
Grant privileges
To be able to authenticate with Ockam Orchestrator and then
discover the route to our outlet, the Snowflake app needs to allow
outbound connections to your Ockam project. Toggle the
Grant access to egress and reach your Project and approve the connection by
pressing Connect.
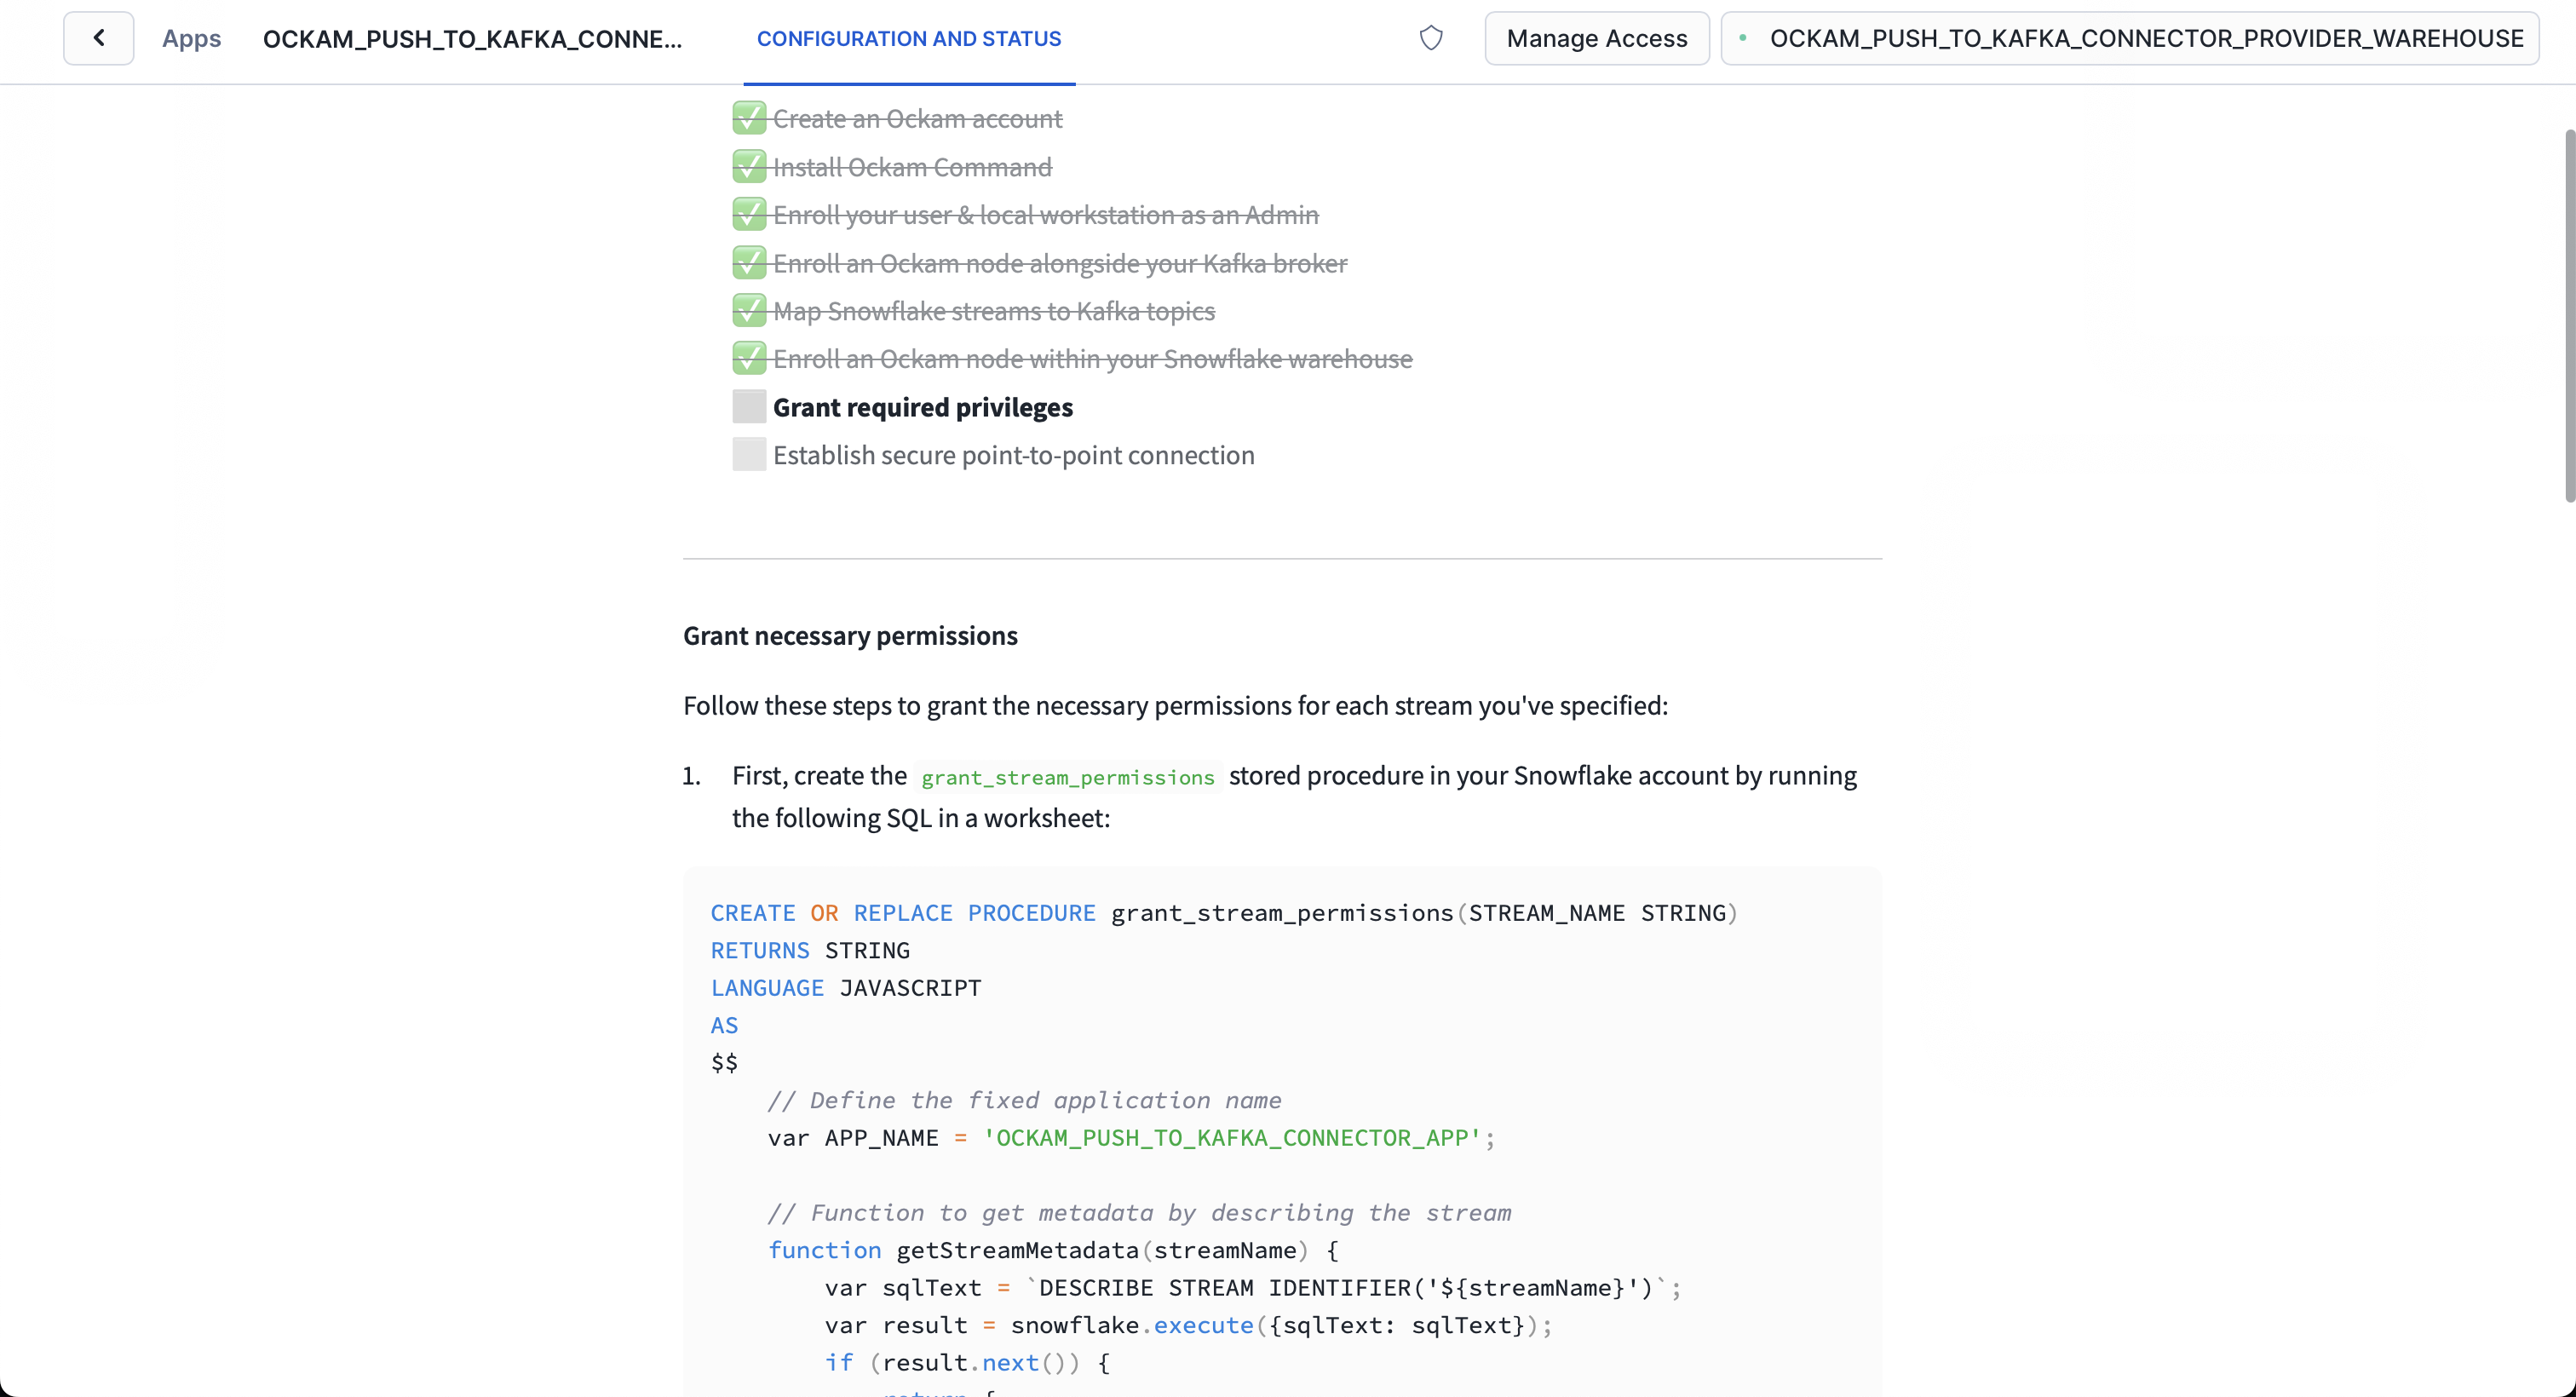
Now that you've created the stored procedure, it's time to run it. Copy the
code below and run it in a Snowflake Worksheet, replacing
database.schema.stream with the correct value for your stream:
_10CALL grant_stream_permissions('database.schema.stream');
With that, we've completed the last step in the setup. We've now got a complete point-to-point connection that allows our Snowflake warehouse to securely push data through to our private Kafka broker.
Next steps
Any updates to your data in your Snowflake table will now create a new record in your Snowflake stream, which are then sent over your Ockam portal to your Kafka broker. To see it in action insert a row into your Snowflake table, then use your usual Kafka admin tooling to see the message arrive in your topic.
From here you can take advantage of the existing Kafka infrastructure and ecosystem. Write consumers that update data as required in your CRM and marketing systems, or use it as the foundations for a highly scalable reverse ETL process. The possibilities are limitless!
If you'd like to explore some other capabilities of Ockam I'd recommend:
- Encrypting data through Kafka
- Zero-trust data streaming with Redpanda Connect
- Adding security as a feature in your SaaS product
Previous Article
Build completely private APIs in Snowflake
Next Article
How to build in security as a SaaS feature