How to build in security as a SaaS feature

Glenn Gillen
VP of Product, GTM


How to build in security as a SaaS feature
In this post I'm going to show you how to provide more granular and more secure connectivity to and from a SaaS platform. The end result is a holistic solution that looks and feels like a natural extension of the SaaS platform, and is either offered as a feature for enterprise focused plans, or as a competitive differentiator to all your customers. The total time required to run the demo is just a few minutes. I'll also dig deep into what's happening behind the scenes to explain how the magic works.
First, let me give some background on why this specific need arises and highlight the shortcomings in traditional implementations. Because those old approaches don't work any more.
You need to start thinking of security as a feature. If you're a VP of engineering, if you're a product manager, product owner, give time to security, let your developers create a better, more secure infrastructure.
— Joel Spolsky, Founder of Stack Overflow
The most successful products over the coming decade will be the ones that realise the status-quo approaches are no longer good enough. You don't need to take Joel's word for it either, take a read of the details of the recently announced Private Cloud Compute from Apple. One of the most successful companies over the past two decades is making a clear statement that security, privacy, and trust will be a core differentiator. They even discuss how current usage of protocols like TLS can't provide the end-to-end security and privacy guarantees customers should expect.
I worked on connecting systems to each other many years ago, a labor-intensive task in the earliest stages of my career. Our company was growing and we'd patch the server room in the current building to the system we just installed in the new building. The new office was a few blocks down the street and we were working with the local telco to install a dedicated line. At the time, connecting two separate networks had an obvious and physically tangible reality to it.
We all moved on from those days. Now, modern tech stacks are more complicated; a series of interconnected apps spread across the globe, run in the cloud by 'best of breed' product companies. Over decades, we evolved. Today it's rare that two separate companies actually want to connect their entire networks to each other—it's specific apps and workloads within each network that need to communicate. Yet we've continued to use old approaches as the way to "securely" connect our systems. The actual running of cables has been abstracted away but we're virtually doing the same thing. These old approaches expose you transitively to an uncountable number of networks, which is an enormous attack surface ripe for exploitation.
The need to connect to a private system
What people mean when they say "cloud" or "on-prem" has become blurred over the previous decades. To avoid any confusion I'll create a hypothetical scenario for us:
- Initech Platform: This is a SaaS platform that you operate. It's elastic and scaleable and hosted on one of the major cloud providers. Customers buy the platform to improve their DevOps processes as it provides visibility over a bunch of useful metrics and provides useful feedback directly into their development workflows.
- ACME Corp: This is a large customer of Initech that you want to support. They run a lot of infrastructure in various locations. Is it "on-prem" in the classic sense of being inside their own data center? Is it inside their own VPC on one of the major cloud providers? It doesn't matter! Customer systems are running in one or more networks that Initech doesn't control, that we don't have access to, and that aren't directly accessible from the public internet.
Proactive engagement in developer workflows
In building the early version of the Initech Platform there's a lot of potential customers to work with to prove product-market fit. It will integrate with the public APIs of the major version control system providers (For example GitHub, GitLab, Bitbucket, etc.), use the commit/webhooks to react to events, push results into the workflow, and everything works as expected.
This is great while the product is passive and simply reacts to events initiated by someone at ACME Corp. Many services want to provide value by assessing external changes in the world, and being proactive in driving improvements for their customers.
Think of the many dependency or security scanning services—if there's a new vulnerability disclosure they want to create a pull/merge request on all impacted repositories as quickly as possible. The fully managed VCS services with public APIs provide ways to enable this, however the self-hosted versions of these products don't have a publicly accessible API. The customers that opt to self-host these systems typically skew towards large enterprises, so now we're faced with some difficult decisions: Is Initech unable to sell their product to these high value customers? Do customers have to buy a diminshed version of the product that's missing one of the most valuable features? Or do we ask them to re-assess some aspect of their security & networking posture to give Initech access?
Access to private data
Initech needs to query a database to display their custom reporting solution. This isn't a problem that's unique to Initech as almost every Customer Data Platform (CDP) or visualization tool has the same problem: customers don't want to make their private data accessible from the public internet, so it will typically be in a database in a private subnet.
The problems with our current approaches
As I said earlier, modern tech stacks have evolved to a series of interconnected apps. However the way we connect these apps has changed only a little from the way we connected networks decades ago. While these approaches are convenient and familiar, they were never designed for the use cases we have today. They're instead attempts to make the smallest tweaks possible to the way things used to work to try and get close to how we need things to work today.
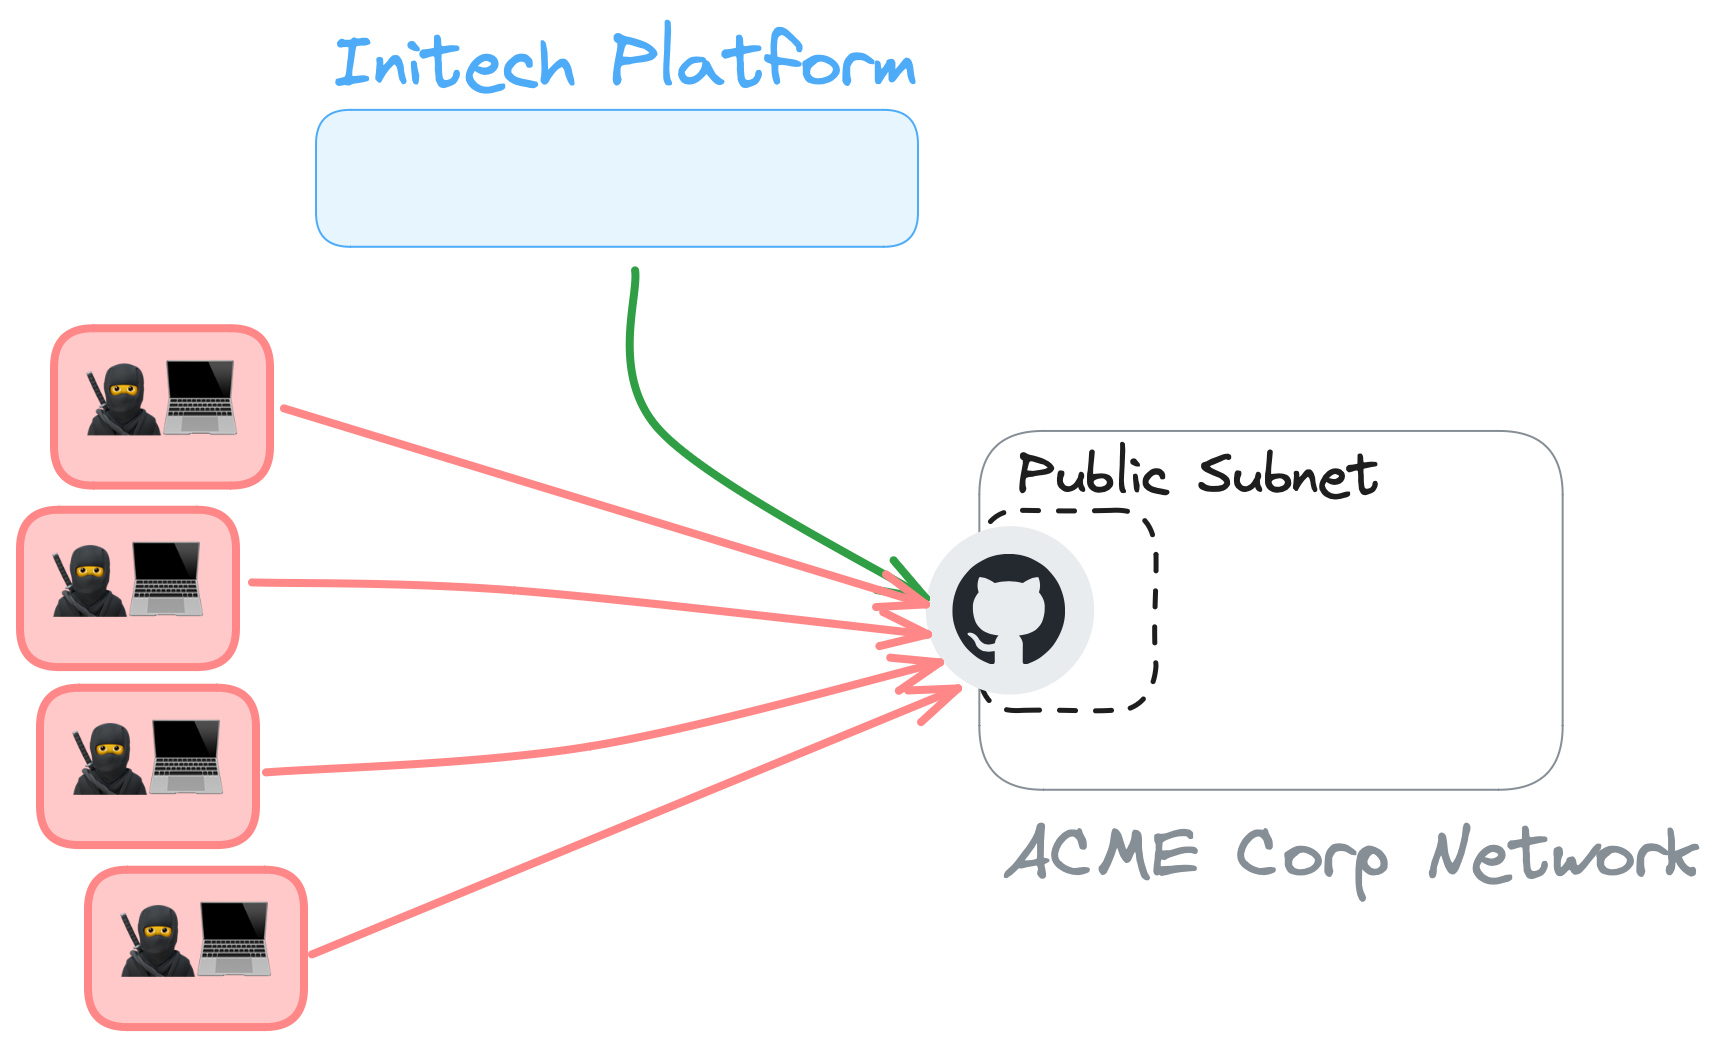
Putting systems on the public internet
The default deployment option for most private systems is to locate them in a private network, with a private subnet, with no public IP addresses. There are very good reasons for this! The easiest option for Initech to connect to this private system would be to ask ACME Corp to provide a public IP address or hostname that could be accessible from the internet.
This is bad.
All of the good reasons for initially putting a system in a private network disconnected from the world immediately vanish. This system is now reachable by the entire public internet, allowing thousands of would-be hackers to constantly try and brute-force their way into the system or to simply DoS it. You're a single leaked credential, CVE, or other issue away from getting owned.
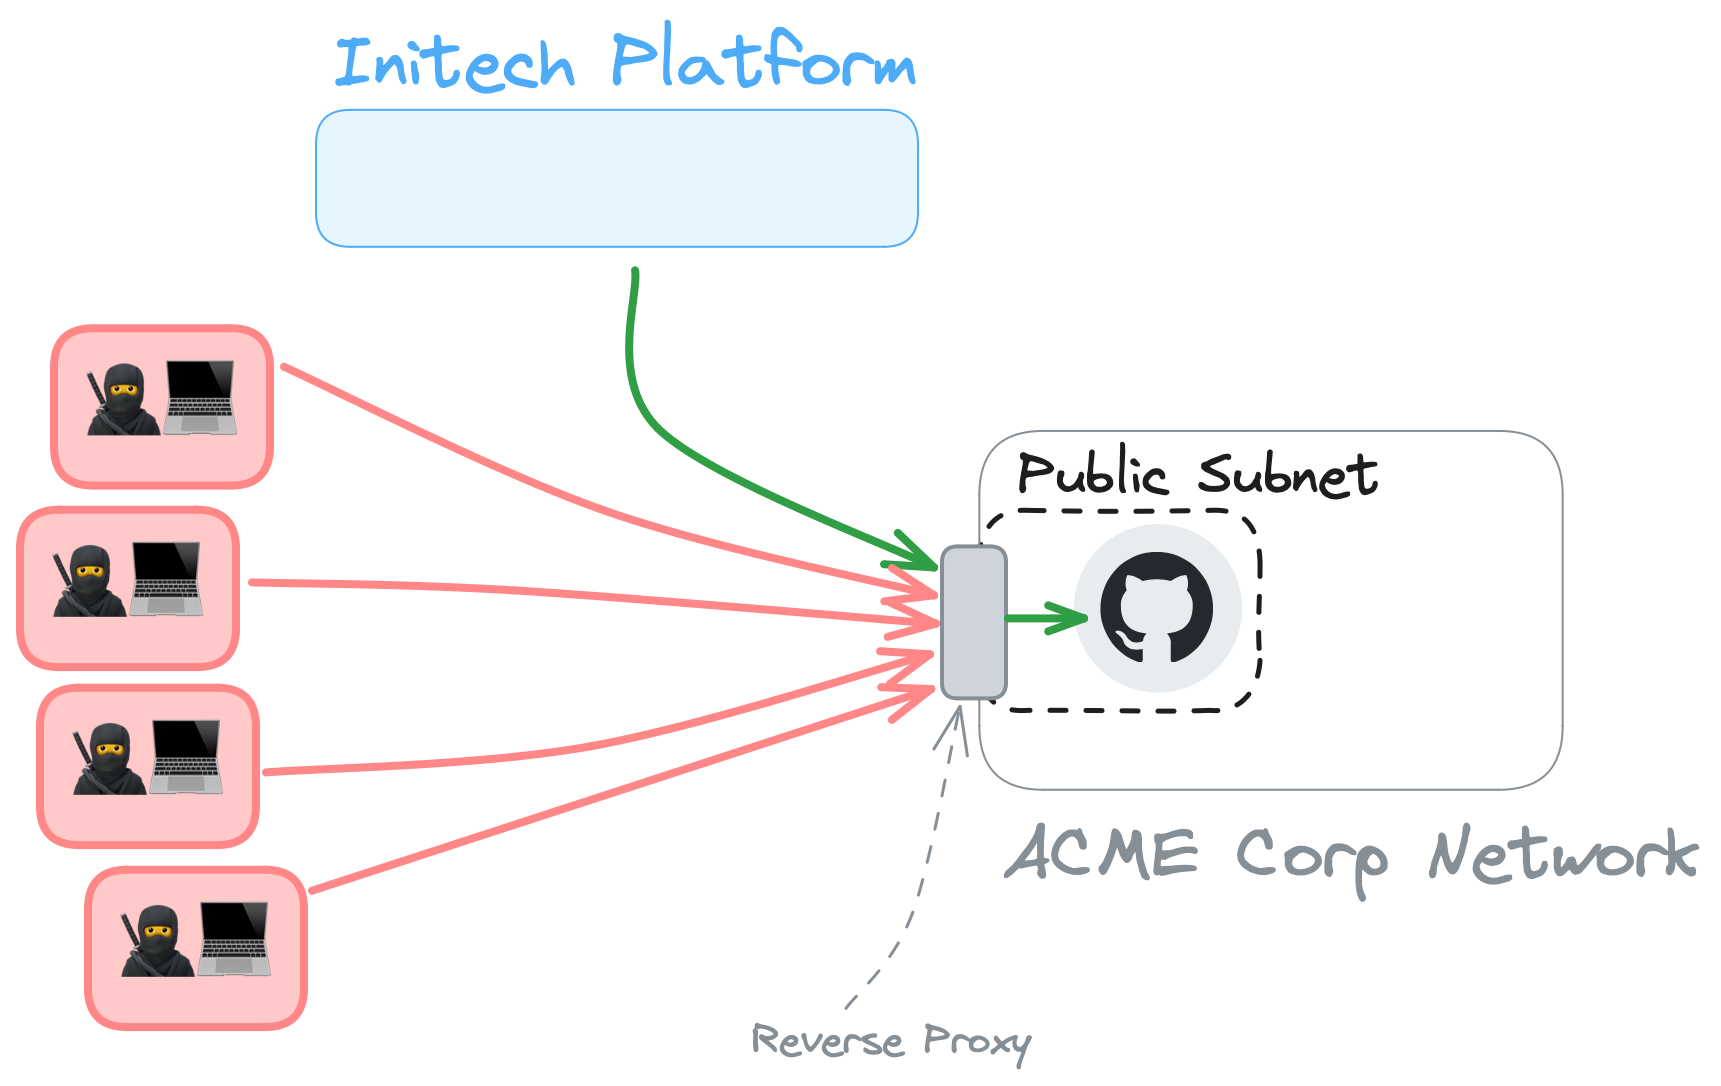
Reverse proxies
Another approach is to put a reverse proxy in front of the system. I'm not just talking something like nginx and HA Proxy, there's a whole category of hosted or managed services that fit this description too.
This has the advantage that ACME Corp is no longer putting a private system directly on the public internet. The reverse proxy also adds the ability to rate-limit or fine-tune access restrictions to mitigate potential DoS attacks. This is a defense in depth improvement, but ACME Corp is still allowing the entire public internet to reach and attempt to attack the proxy. If it's compromised, it'll do what a proxy does: let traffic through to the intended destination.
IP allow lists
An incremental improvement is for Initech to provide a list of IPs they will be sending requests from, and have ACME Corp manage their firewall and routing rules to allow requests only from those IP addresses. This isn't much of an improvement though.

At Initech you won't want to have a tight coupling to your current app instances and the IP addresses, you'll want the flexibility to be able to scale infrastructure as required without the need to constantly inform customers of new IP addresses. So the IP addresses will most likely belong to a NAT gateway or proxy server. ACME Corp might assume that locking access down to only one or two source IP addresses means that only one or two remote machines have access to their network. The reality is that anything on the remote network that can send a request through the NAT gateway or proxy will now be granted access into the ACME Corp network too. This isn't allowing a single app or machine in, you've permitted an entire remote network.
Even more concerning though is that IP source addresses are trivially spoofed. A potential attacker would be able to create a well formed request, spoof the source address, and send data or instructions into the ACME Corp network. SaaS vendors, Initech included, also inevitably have to document the list of current IP addresses so there's a ready-made list of IPs to try and impersonate.
The more sophisticated your approach to IP filtering the more sophisticated an attacker needs to be to compromise it, but none of them are perfect. I've heard people claim in the past that IP spoofing is only really for DDoS attacks because in most cases the attacker can't receive the response and so they can't do anything useful. Think about the systems we're connecting - how confident are you that there are zero fire and forget API calls that won't dutifully create/update/destroy valuable data? Good security is more than just preventing the exposure of data, it's also about protecting it and guaranteeing its integrity.
If you're a valuable target, such as a major financial instition, attackers have the motivation to use approaches like this to launch MitM attacks & intercept comms flows. If your customers and prospects and valuable targets, that makes you a valuable target too.
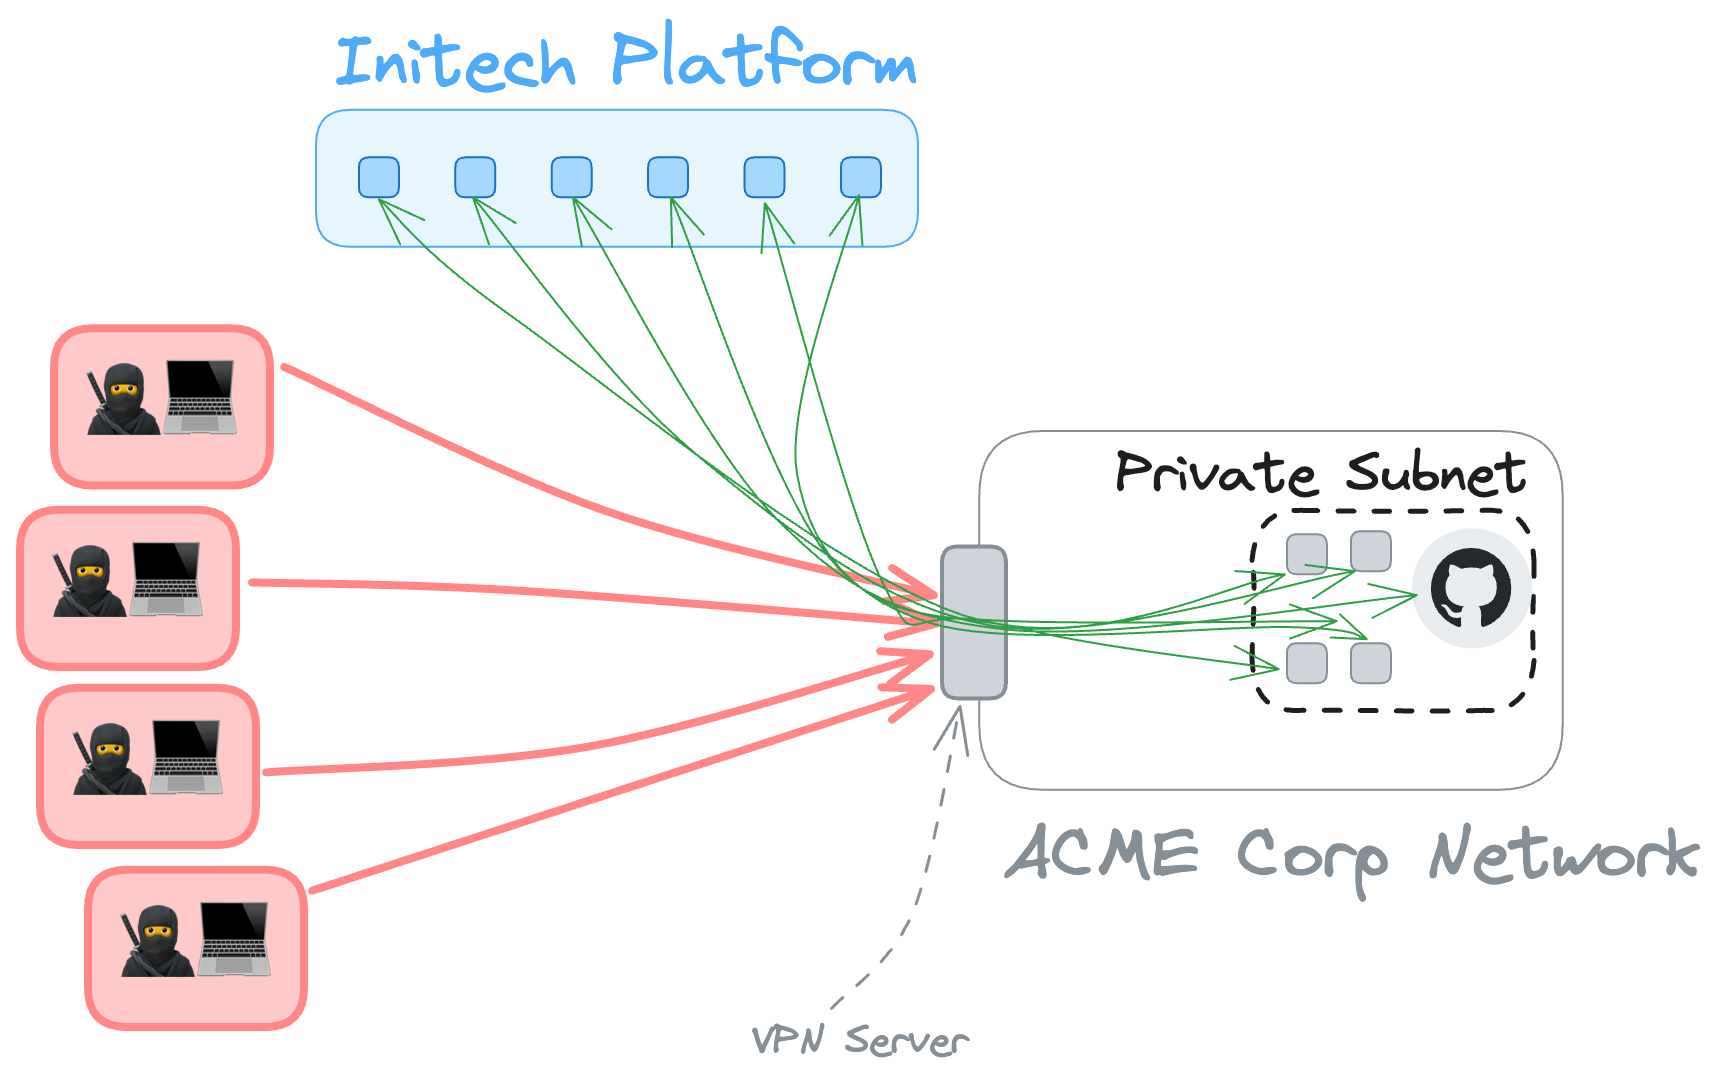
Virtual Private Networks (VPNs)
VPNs are a common solution at many companies to allow employees to connect to the "corporate network" when they're outside of the office. They are also used to allow other systems to connect to an existing network.
The use case we're talking about here is different. It's about allowing two separate companies, a SaaS product and their customer(s), being able to communicate with each other. In many of those cases it's only one system at each end of the connection that should be able to talk to each other. Instead we reach for a tool that is designed to connect entire networks. It's like running a virtual patch lead from the router in one company to the router in another. If I asked you to do the physical version of that, to plug a cable from your production environment directly into the production environment of another company, you'd probably give it some pause. A lot of pause. And for good reason. But VPNs are "virtual" and "private" and so easy (relative to running a cable) and so ubiquitous we don't give it as much thought. If all you needed to do was connect one thing in each network you've used a very blunt instrument for what was meant to be a very precise task.
You can still do the precise task using a VPN, but there are layers of network-level controls and routing rules you need to ensure are in place to close down all the doors to just the one you want open in each network. It's another example of how we've got tools and approaches that are great at what they were designed for, but we're making incremental steps in how we use them to force them to work with our evolved needs. Doing that securely means layering in more complexity and hoping the we get all of the detail in all of those layers right, all of the time. Getting it wrong carries risks of transitive access beyond the original intentions.
You can't trust the network
What if I told you regardless of how much time, people, and money you invest in your security program, your network is almost certainly exposed to an easily exploitable security hole? …
industry data shows that less than 1% of the world's largest enterprises have yet to take any steps to protect their network from this new and emerging threat …
History has taught us that the right thing to do must be the easiest thing to do. This is particularly critical with software developers and protecting from intentionally malicious components. This slow adoption curve for security technology … effectively enabled bad actors to see the potential, innovate, and to drive the spectacular growth of cybercrime
— Mitchell Johnson, Sonatype
The problem with each of these approaches is that to assume it's secure requires many additional assumptions: that nobody on the internet will try to compromise you, that you can trust the source IP of the requests, that the remote network is solely composed of good actors, that these assumptions will continue to be true both now and indefinitely into the future… and that all of these assumptions are also true of every network you've connected to, and any network they've connected to, and any network…
Take a look at what this might look like from ACME Corp's perspective:
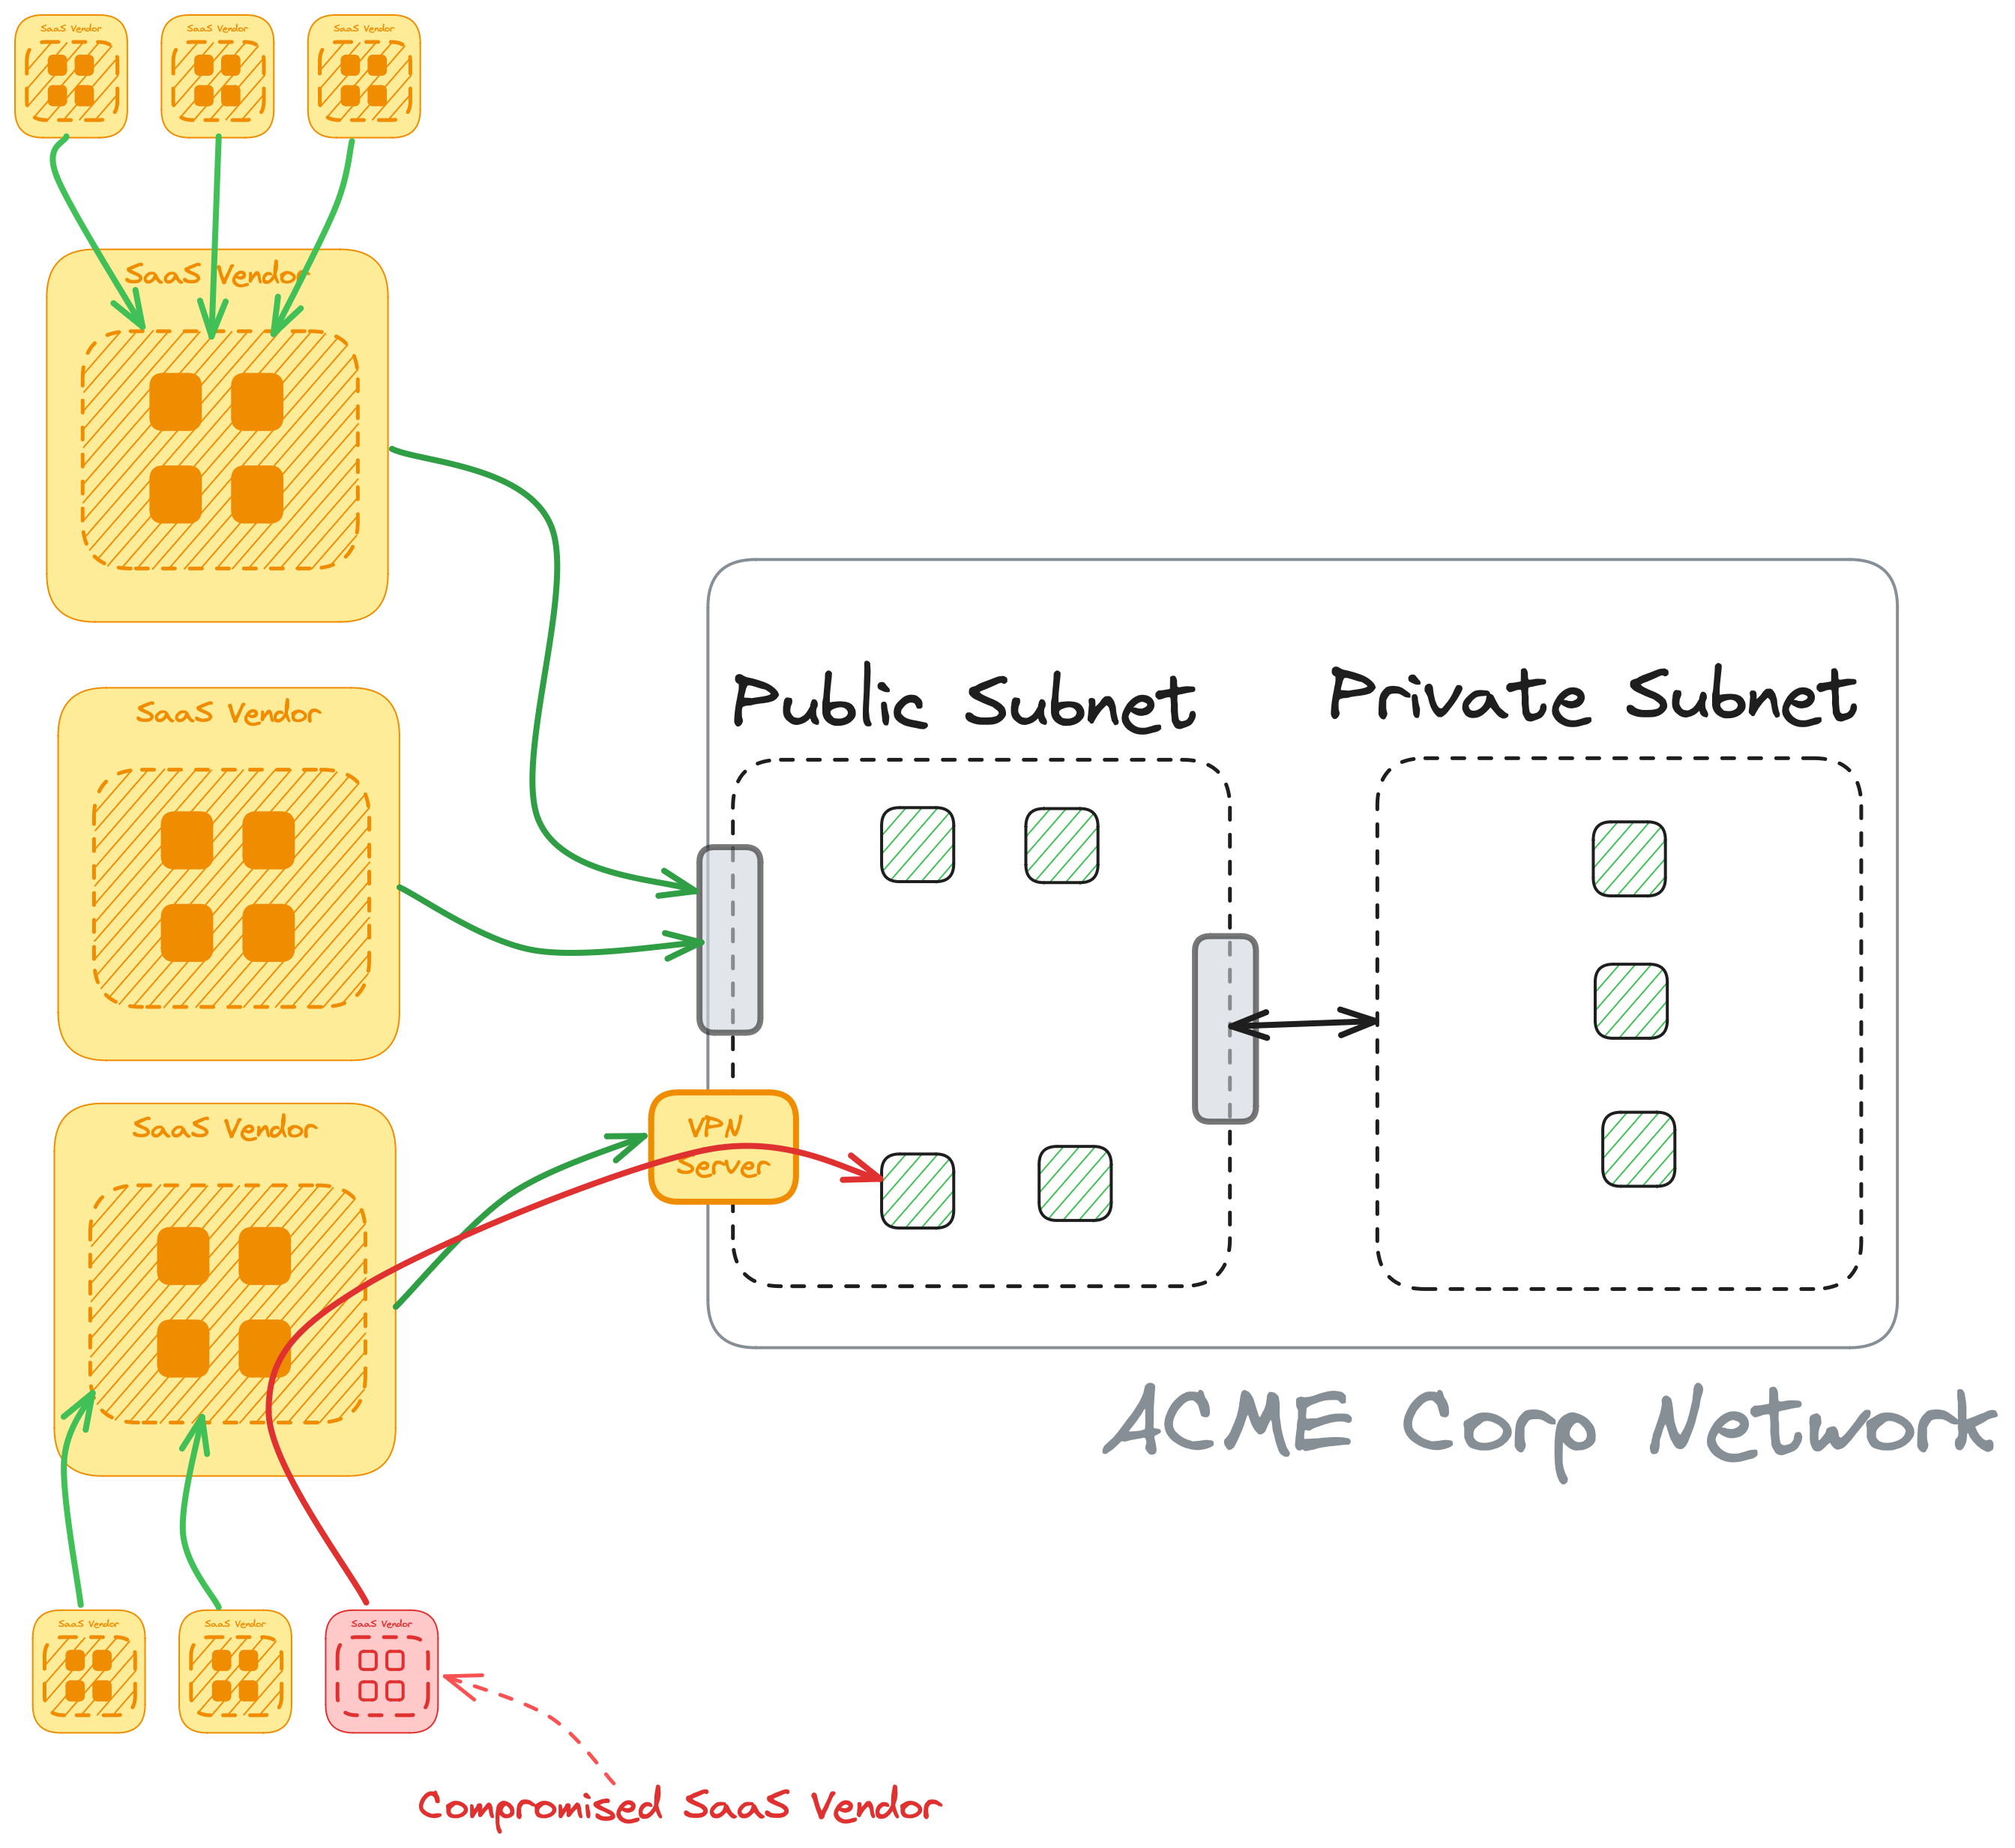
It's not just two networks and two companies now connected to each other, it's many networks. Each SaaS vendor will have their own set of services they use which multiplies this out further. Not only can you not trust the network, you can't trust anybody else's either. Any participant in this picture is only a network misconfiguration or compromised dependency away from transmitting that risk through the network(s). And this picture is the most zoomed in example of a fractal of this problem! Zoom out, and each vendor is connected to their own set of customers, with their own vendors, with their own customers... the risk surface area grows exponentionally.
So let's solve it!
We can build security as a feature into our product within minutes! We'll raise the security bar by providing a more focussed and granular solution. We're also going to stop pushing the problems onto customer's like ACME Corp by asking them to make network-level changes. Instead we're going to shift secure connectivity up to an application-level concern, and provide a holistic product experience by extending the Initech Platform into the specific places it needs to me.
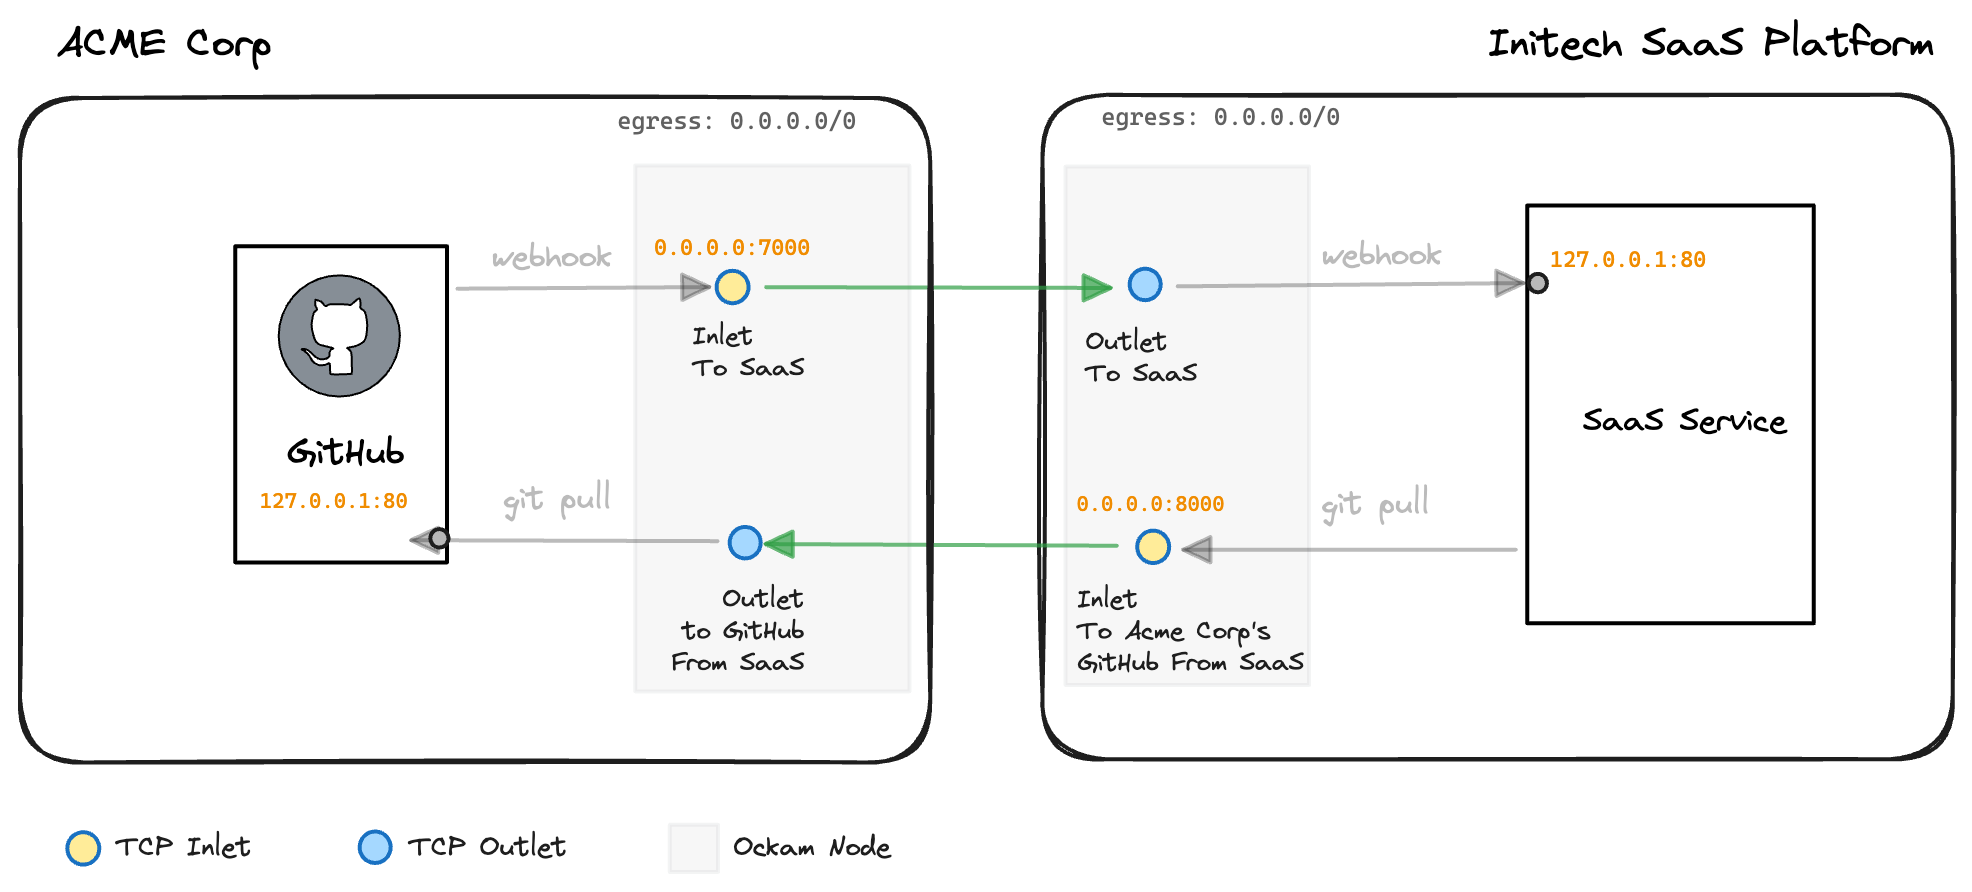
The example here is going to walk through how Initech Platform can establish a connection to a self-hosted GitHub Enterprise server that's managed by ACME Corp. The final result will look like:
Step 1 - Setup a new project
On an admin's work machine, run:
_10curl --proto '=https' --tlsv1.2 -sSfL \_10 https://install.command.ockam.io \_10 | bash && source "$HOME/.ockam/env"_10ockam enroll_10ockam project ticket --expires-in 24h --usage-count 1 \_10 --attribute outlet-to-saas --attribute inlet-from-saas \_10 --relay saas-relay \_10 --enroller \_10 > saas.ticket
If you've not used Ockam before this will take less that a minute to complete (if you're an existing user it will be even quicker!), at the end you'll have a new Ockam account and project, as well as an enrollment ticket your can use to admit the first system into your project.
Let's go through these commands in detail to explain everything that's happening.
Install Ockam
This will install the ockam command and source in the required environment
settings. If you've previously installed ockam you can skip this step.
_10curl --proto '=https' --tlsv1.2 -sSfL \_10 https://install.command.ockam.io \_10 | bash && source "$HOME/.ockam/env"_10ockam enroll_10ockam project ticket --expires-in 24h --usage-count 1 \_10 --attribute outlet-to-saas --attribute inlet-from-saas \_10 --relay saas-relay \_10 --enroller \_10 > saas.ticket
Enroll
Wrapped up in this single ockam enroll command is a number of steps that will
bootstrap your first project and get you ready to go. It will:
- Generate an Ockam Identity and store its secret keys in a file system based Ockam Vault.
- Create an account with Ockam Orchestrator.
- Provision a trial Space and Project in the Orchestrator.
- Make your Ockam Identity the administrator of your new Project.
_10curl --proto '=https' --tlsv1.2 -sSfL \_10 https://install.command.ockam.io \_10 | bash && source "$HOME/.ockam/env"_10ockam enroll_10ockam project ticket --expires-in 24h --usage-count 1 \_10 --attribute outlet-to-saas --attribute inlet-from-saas \_10 --relay saas-relay \_10 --enroller \_10 > saas.ticket
Generate a ticket for Initech Platform
The next step is to generate an enrollment ticket to allow a new Ockam Node to join the project that was just created. This node will run adjacent to the Initech Platform SaaS, in the network where the SaaS service is running.
In this example we've set the new ticket to expire in 24 hours, and a usage
count of 1. This means the generated ticket can only be used a single time,
and that it must be used within 24 hours. A single usage ticket means there is
low risk associated with this ticket being mishandled after use, there's no
means for an attacker to re-use it like a credential to access any system.
Similarly the expiry time could be significantly reduced to only a few minutes
to ensure only the intended party has the chance to use it.
_10curl --proto '=https' --tlsv1.2 -sSfL \_10 https://install.command.ockam.io \_10 | bash && source "$HOME/.ockam/env"_10ockam enroll_10ockam project ticket --expires-in 24h --usage-count 1 \_10 --attribute outlet-to-saas --attribute inlet-from-saas \_10 --relay saas-relay \_10 --enroller \_10 > saas.ticket
Setting custom attributes
The Project Membership Credential that is issued will include additional attributes that will be cryptographically attested to by the Project's Membership Authority. These attributes can then be used to apply policies with Attribute Based Access Controls (ABAC) to allow or restrict specfic actions and communucation paths between nodes.
In this example the attributes being set are outlet-to-saas
and inlet-from-saas.
_10curl --proto '=https' --tlsv1.2 -sSfL \_10 https://install.command.ockam.io \_10 | bash && source "$HOME/.ockam/env"_10ockam enroll_10ockam project ticket --expires-in 24h --usage-count 1 \_10 --attribute outlet-to-saas --attribute inlet-from-saas \_10 --relay saas-relay \_10 --enroller \_10 > saas.ticket
Permission to create a relay
The --relay "saas-relay" flag is a shortcut for creating a policy that allows
this node to create a relay at the address saas-relay.
_10curl --proto '=https' --tlsv1.2 -sSfL \_10 https://install.command.ockam.io \_10 | bash && source "$HOME/.ockam/env"_10ockam enroll_10ockam project ticket --expires-in 24h --usage-count 1 \_10 --attribute outlet-to-saas --attribute inlet-from-saas \_10 --relay saas-relay \_10 --enroller \_10 > saas.ticket
Setting the enroller role
While creating the ticket we are also adding additional attributes that will be applied to any node that enrolls with this ticket.
The ockam-role attribute is a special attribute, and the value of enroller
means this node will be granted permission to generate tickets to enroll new
members into the project in the future.
The output of this ockam project ticket command will generate an enrollment
ticket, which is then piped to a file named saas.ticket.
_10curl --proto '=https' --tlsv1.2 -sSfL \_10 https://install.command.ockam.io \_10 | bash && source "$HOME/.ockam/env"_10ockam enroll_10ockam project ticket --expires-in 24h --usage-count 1 \_10 --attribute outlet-to-saas --attribute inlet-from-saas \_10 --relay saas-relay \_10 --enroller \_10 > saas.ticket
Install Ockam
This will install the ockam command and source in the required environment
settings. If you've previously installed ockam you can skip this step.
Enroll
Wrapped up in this single ockam enroll command is a number of steps that will
bootstrap your first project and get you ready to go. It will:
- Generate an Ockam Identity and store its secret keys in a file system based Ockam Vault.
- Create an account with Ockam Orchestrator.
- Provision a trial Space and Project in the Orchestrator.
- Make your Ockam Identity the administrator of your new Project.
Generate a ticket for Initech Platform
The next step is to generate an enrollment ticket to allow a new Ockam Node to join the project that was just created. This node will run adjacent to the Initech Platform SaaS, in the network where the SaaS service is running.
In this example we've set the new ticket to expire in 24 hours, and a usage
count of 1. This means the generated ticket can only be used a single time,
and that it must be used within 24 hours. A single usage ticket means there is
low risk associated with this ticket being mishandled after use, there's no
means for an attacker to re-use it like a credential to access any system.
Similarly the expiry time could be significantly reduced to only a few minutes
to ensure only the intended party has the chance to use it.
Setting custom attributes
The Project Membership Credential that is issued will include additional attributes that will be cryptographically attested to by the Project's Membership Authority. These attributes can then be used to apply policies with Attribute Based Access Controls (ABAC) to allow or restrict specfic actions and communucation paths between nodes.
In this example the attributes being set are outlet-to-saas
and inlet-from-saas.
Permission to create a relay
The --relay "saas-relay" flag is a shortcut for creating a policy that allows
this node to create a relay at the address saas-relay.
Setting the enroller role
While creating the ticket we are also adding additional attributes that will be applied to any node that enrolls with this ticket.
The ockam-role attribute is a special attribute, and the value of enroller
means this node will be granted permission to generate tickets to enroll new
members into the project in the future.
The output of this ockam project ticket command will generate an enrollment
ticket, which is then piped to a file named saas.ticket.
_10curl --proto '=https' --tlsv1.2 -sSfL \_10 https://install.command.ockam.io \_10 | bash && source "$HOME/.ockam/env"_10ockam enroll_10ockam project ticket --expires-in 24h --usage-count 1 \_10 --attribute outlet-to-saas --attribute inlet-from-saas \_10 --relay saas-relay \_10 --enroller \_10 > saas.ticket
Step 2 - Enroll the Initech Platform
Move the saas.ticket (from the previous step) to a machine on the same network
as the Initech Platform. We're going to create a reusable configuration file
named saas.yaml that we'll use to setup our Ockam node that will run on the
SaaS platform:
Replace the http-server value with the hostname or IP address that resolves
to the Initech Platform from within the Initech network. Then run:
_10ockam node create saas.yaml --enrollment-ticket saas.ticket_10ockam project ticket --expires-in 24h --usage-count 1 \_10 --attribute inlet-to-saas --attribute outlet-from-saas \_10 --relay acme-relay > acme.ticket
Create a node, relay, and policies
An Ockam Node is a program that can interact with other Ockam Nodes using various Ockam protocols like Ockam Routing and Ockam Secure Channels.
Here you can see that when we call the ockam node create command we're providing
the configuration YAML from above, along with the enrollment ticket we created in the
first step. For
now all we need to understand is that this single command creates and starts a
node, enrolls it into our project, sets up a relay so that nodes on other
networks can route to it, and adds attribute based access controls (ABAC) to
restrict which other nodes can establish a route.
_10ockam node create saas.yaml --enrollment-ticket saas.ticket_10ockam project ticket --expires-in 24h --usage-count 1 \_10 --attribute inlet-to-saas --attribute outlet-from-saas \_10 --relay acme-relay > acme.ticket
Generate a ticket for ACME Corp
Because we granted this node the role of enroller, we can now use it to
generate enrollment tickets for other nodes. In this step we generate a ticket
to give to our customer, ACME Corp.
Once again we set the ticket to expire in 24 hours, and specify a usage
count of 1. We also add the custom attributes of inlet-to-saas and outlet-from-saas
which we'll use in our policies to restrict access to our services, we specify
that the node that enrolls with this ticket has permission to create a relay
named acme-relay, and finally we pipe the result to a file name acme.ticket.
_10ockam node create saas.yaml --enrollment-ticket saas.ticket_10ockam project ticket --expires-in 24h --usage-count 1 \_10 --attribute inlet-to-saas --attribute outlet-from-saas \_10 --relay acme-relay > acme.ticket
Create a node, relay, and policies
An Ockam Node is a program that can interact with other Ockam Nodes using various Ockam protocols like Ockam Routing and Ockam Secure Channels.
Here you can see that when we call the ockam node create command we're providing
the configuration YAML from above, along with the enrollment ticket we created in the
first step. For
now all we need to understand is that this single command creates and starts a
node, enrolls it into our project, sets up a relay so that nodes on other
networks can route to it, and adds attribute based access controls (ABAC) to
restrict which other nodes can establish a route.
Generate a ticket for ACME Corp
Because we granted this node the role of enroller, we can now use it to
generate enrollment tickets for other nodes. In this step we generate a ticket
to give to our customer, ACME Corp.
Once again we set the ticket to expire in 24 hours, and specify a usage
count of 1. We also add the custom attributes of inlet-to-saas and outlet-from-saas
which we'll use in our policies to restrict access to our services, we specify
that the node that enrolls with this ticket has permission to create a relay
named acme-relay, and finally we pipe the result to a file name acme.ticket.
_10ockam node create saas.yaml --enrollment-ticket saas.ticket_10ockam project ticket --expires-in 24h --usage-count 1 \_10 --attribute inlet-to-saas --attribute outlet-from-saas \_10 --relay acme-relay > acme.ticket
Create a node & relay
The saas.yaml configuration file passed into the ockam node create command
defines a number of properties on this node. So let's walk through all of things
it sets up for us.
After creating the node a relay is created with the name saas-relay.
This relay will allow customers of the Initech Platform, such as ACME Corp,
to establish a secure end-to-end encrypted connection in to the platform.
It provides the ability to have entirely isolated
infrastructure running within a private network, without requiring
Initech to expose any endpoints or post to the public Internet.
_10relay: saas-relay_10_10tcp-outlet:_10 from: saas_10 to: http-server:80_10 allow: inlet-to-saas_10_10policy:_10 resource-type: tcp-inlet_10 allow: outlet-from-saas
Create an outlet
A TCP outlet takes any TCP packets received by the node, and pipes them out to the specified location.
In this example we're giving the TCP outlet the name saas, and forwarding packets
it receives to the http-server:80 address.
_10relay: saas-relay_10_10tcp-outlet:_10 from: saas_10 to: http-server:80_10 allow: inlet-to-saas_10_10policy:_10 resource-type: tcp-inlet_10 allow: outlet-from-saas
Restrict access with policies
An Ockam TCP inlet defines where a node should be listening for connections, and where it should forward that traffic to. We'll create an inlet on this node in the Initech Network later, which will allow us to connect to the outlet that will run in the customer network.
Before we do that though, we can define a policy to restrict what exactly the inlet is allowed to connect to.
This policy applies Attribute Based Access Controls (ABAC) to only allow TCP
inlets to be created to other nodes that have the attribute outlet-from-saas
as part of their attested credentials (which is part of the acme.ticket
we created earlier).
_10relay: saas-relay_10_10tcp-outlet:_10 from: saas_10 to: http-server:80_10 allow: inlet-to-saas_10_10policy:_10 resource-type: tcp-inlet_10 allow: outlet-from-saas
We've also used the shorthand policy form in the configuration file to specify
that only nodes with an attribute of inlet-to-saas are permitted to establish
a route to this node.
_10relay: saas-relay_10_10tcp-outlet:_10 from: saas_10 to: http-server:80_10 allow: inlet-to-saas_10_10policy:_10 resource-type: tcp-inlet_10 allow: outlet-from-saas
Create a node & relay
The saas.yaml configuration file passed into the ockam node create command
defines a number of properties on this node. So let's walk through all of things
it sets up for us.
After creating the node a relay is created with the name saas-relay.
This relay will allow customers of the Initech Platform, such as ACME Corp,
to establish a secure end-to-end encrypted connection in to the platform.
It provides the ability to have entirely isolated
infrastructure running within a private network, without requiring
Initech to expose any endpoints or post to the public Internet.
Create an outlet
A TCP outlet takes any TCP packets received by the node, and pipes them out to the specified location.
In this example we're giving the TCP outlet the name saas, and forwarding packets
it receives to the http-server:80 address.
Restrict access with policies
An Ockam TCP inlet defines where a node should be listening for connections, and where it should forward that traffic to. We'll create an inlet on this node in the Initech Network later, which will allow us to connect to the outlet that will run in the customer network.
Before we do that though, we can define a policy to restrict what exactly the inlet is allowed to connect to.
This policy applies Attribute Based Access Controls (ABAC) to only allow TCP
inlets to be created to other nodes that have the attribute outlet-from-saas
as part of their attested credentials (which is part of the acme.ticket
we created earlier).
We've also used the shorthand policy form in the configuration file to specify
that only nodes with an attribute of inlet-to-saas are permitted to establish
a route to this node.
_10relay: saas-relay_10_10tcp-outlet:_10 from: saas_10 to: http-server:80_10 allow: inlet-to-saas_10_10policy:_10 resource-type: tcp-inlet_10 allow: outlet-from-saas
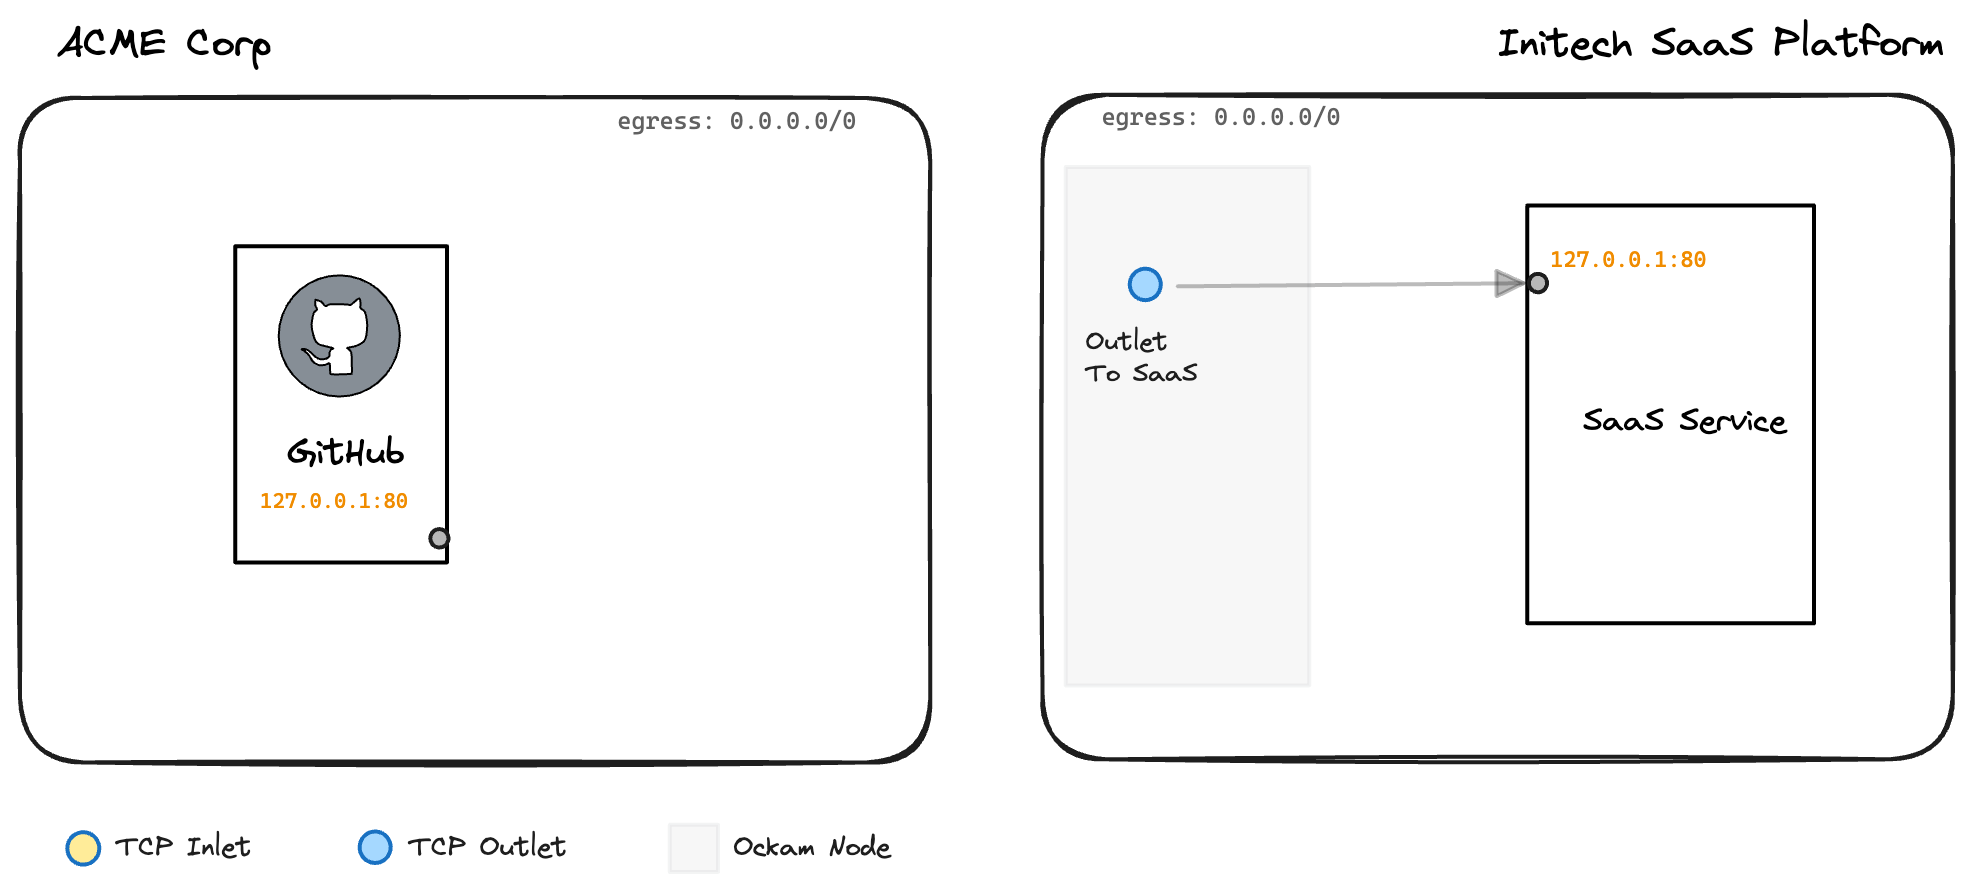
So far we've setup the highlighted parts of our infrastructure:
Step 3 - ACME Corp connects to Initech
Move acme.ticket (from the previous step) to a machine in ACME Corp's
environment, and create the following customer.yaml configuration file:
Then run the following command:
_10ockam node create customer.yaml \_10 --enrollment-ticket acme.ticket \_10 --variable RELAY=acme-relay \_10 --variable GITHUB_ADDRESS=github.local:80
Create the customer node
You've seen most of this command before: The customer would run ockam node create
within the ACME Corp network, pass in the customer.yaml configuration file and
the acme.ticket enrollment ticket we generated earlier.
What is new here is the use of the --variable flag. This allows us to specify
variables that will be interpolated into the customer.yaml file. In a scenario
like this one it means we could have a generic customer.yaml file that is
able to be used by all customers, with any customer-specific values passed in
at runtime as variables.
_10ockam node create customer.yaml \_10 --enrollment-ticket acme.ticket \_10 --variable RELAY=acme-relay \_10 --variable GITHUB_ADDRESS=github.local:80
Create the customer node, relay, inlet, and outlet
After creating the node ACME Corp within the ACME Corp network, a relay is
created using the value of the RELAY variable (i.e., acme-relay). This
relay is what allows the Initech Platform to create a portal into to the
required service within the ACME Corp network — without requiring ACME
Corp to expose listening ports to the Internet!
_16relay: $RELAY_16_16tcp-inlet:_16 from: 0.0.0.0:7000_16 via: saas-relay_16 to: saas_16 allow: outlet-to-saas_16_16tcp-outlet:_16 from: github_16 to: $GITHUB_ADDRESS_16 allow: inlet-from-saas_16_16policy:_16 resource-type: tcp-outlet_16 allow: inlet-from-saas
Create an inlet
A TCP inlet is created, listening on 0.0.0.0:7000. All requests to that
address will be forwarded to saas-relay relay that was created previously,
and then on to the TCP outlet named saas.
This inlet allows ACME Corp to have a private end-to-end connection directly from their network to the Initech Platform, without the need to communicate directly with a publicly addressable interface on the Initech side. So far, this configuration has only enabled communication to be initiated from the ACME Corp side.
_16relay: $RELAY_16_16tcp-inlet:_16 from: 0.0.0.0:7000_16 via: saas-relay_16 to: saas_16 allow: outlet-to-saas_16_16tcp-outlet:_16 from: github_16 to: $GITHUB_ADDRESS_16 allow: inlet-from-saas_16_16policy:_16 resource-type: tcp-outlet_16 allow: inlet-from-saas
Create an outlet
The final step on the ACME Corp side is to create the TCP outlet that will forward packets to the intended destination.
The TCP outlet created here is given an outlet name of github. This provides
flexibility for adding additional destinations later without the need to create
new enrollment tickets, nodes, relays, etc.
The destination for all packets coming through this outlet address will be sent
to the value of the GITHUB_ADDRESS variable, which for this example we're
assuming is the location of the GitHub Enterprise server at github.local on
port 80.
_16relay: $RELAY_16_16tcp-inlet:_16 from: 0.0.0.0:7000_16 via: saas-relay_16 to: saas_16 allow: outlet-to-saas_16_16tcp-outlet:_16 from: github_16 to: $GITHUB_ADDRESS_16 allow: inlet-from-saas_16_16policy:_16 resource-type: tcp-outlet_16 allow: inlet-from-saas
Restrict access with policies
One last bit of polish is to ensure that outlets can only be accessed by nodes
that have the inlet-from-saas attribute set. We set this rule with the
shorthand notation explicitly on the TCP outlet we've defined, in addition to
setting a default policy for any future TCP outlets that might be created.
If you scroll back up to the very start you'll see that the only enrollment ticket
with the inlet-from-saas attribute was the very first one we created for the
Initech Platform. This means the only node that will be permitted to access
the TCP outlets at ACME Corp is the node running on the Initech Platform.
_16relay: $RELAY_16_16tcp-inlet:_16 from: 0.0.0.0:7000_16 via: saas-relay_16 to: saas_16 allow: outlet-to-saas_16_16tcp-outlet:_16 from: github_16 to: $GITHUB_ADDRESS_16 allow: inlet-from-saas_16_16policy:_16 resource-type: tcp-outlet_16 allow: inlet-from-saas
Create the customer node, relay, inlet, and outlet
After creating the node ACME Corp within the ACME Corp network, a relay is
created using the value of the RELAY variable (i.e., acme-relay). This
relay is what allows the Initech Platform to create a portal into to the
required service within the ACME Corp network — without requiring ACME
Corp to expose listening ports to the Internet!
Create an inlet
A TCP inlet is created, listening on 0.0.0.0:7000. All requests to that
address will be forwarded to saas-relay relay that was created previously,
and then on to the TCP outlet named saas.
This inlet allows ACME Corp to have a private end-to-end connection directly from their network to the Initech Platform, without the need to communicate directly with a publicly addressable interface on the Initech side. So far, this configuration has only enabled communication to be initiated from the ACME Corp side.
Create an outlet
The final step on the ACME Corp side is to create the TCP outlet that will forward packets to the intended destination.
The TCP outlet created here is given an outlet name of github. This provides
flexibility for adding additional destinations later without the need to create
new enrollment tickets, nodes, relays, etc.
The destination for all packets coming through this outlet address will be sent
to the value of the GITHUB_ADDRESS variable, which for this example we're
assuming is the location of the GitHub Enterprise server at github.local on
port 80.
Restrict access with policies
One last bit of polish is to ensure that outlets can only be accessed by nodes
that have the inlet-from-saas attribute set. We set this rule with the
shorthand notation explicitly on the TCP outlet we've defined, in addition to
setting a default policy for any future TCP outlets that might be created.
If you scroll back up to the very start you'll see that the only enrollment ticket
with the inlet-from-saas attribute was the very first one we created for the
Initech Platform. This means the only node that will be permitted to access
the TCP outlets at ACME Corp is the node running on the Initech Platform.
_16relay: $RELAY_16_16tcp-inlet:_16 from: 0.0.0.0:7000_16 via: saas-relay_16 to: saas_16 allow: outlet-to-saas_16_16tcp-outlet:_16 from: github_16 to: $GITHUB_ADDRESS_16 allow: inlet-from-saas_16_16policy:_16 resource-type: tcp-outlet_16 allow: inlet-from-saas
Optional - create more outlets
In this example we've used the customer.yaml configuration file to create
a TCP outlet that will connect to ACME Corp's self-hosted GitHub enterprise
server. That works great if you know every customer of Initech is wanting to
expose a GitHub server.
If you need an approach with more flexibility an alternative is to create the
outlets as required via the Ockam Command CLI. Remove the tcp-outlet section
from customer.yaml and instead pass the same parameters directly into
ockam tcp-outlet create.
_10ockam tcp-outlet create --from github --to github.local:80_10ockam tcp-outlet create --from jira --to jira.local:443_10ockam tcp-outlet create --from database --to analytics.prod:5432
Now if some customers require additional outlets you can create a new outlet
that forwards packets to a different destination. These examples show how
you'd create an outlet named jira and database and have each go to a
different destination.
_10ockam tcp-outlet create --from github --to github.local:80_10ockam tcp-outlet create --from jira --to jira.local:443_10ockam tcp-outlet create --from database --to analytics.prod:5432
What's great about this is that we're able to re-use the same Ockam Node and Relay to make this work. The Initech Platform will be able to create a TCP inlet that can access these services by specifying the name of the outlet it wants to connect to.
_10ockam tcp-outlet create --from github --to github.local:80_10ockam tcp-outlet create --from jira --to jira.local:443_10ockam tcp-outlet create --from database --to analytics.prod:5432
Optional - create more outlets
In this example we've used the customer.yaml configuration file to create
a TCP outlet that will connect to ACME Corp's self-hosted GitHub enterprise
server. That works great if you know every customer of Initech is wanting to
expose a GitHub server.
If you need an approach with more flexibility an alternative is to create the
outlets as required via the Ockam Command CLI. Remove the tcp-outlet section
from customer.yaml and instead pass the same parameters directly into
ockam tcp-outlet create.
Now if some customers require additional outlets you can create a new outlet
that forwards packets to a different destination. These examples show how
you'd create an outlet named jira and database and have each go to a
different destination.
What's great about this is that we're able to re-use the same Ockam Node and Relay to make this work. The Initech Platform will be able to create a TCP inlet that can access these services by specifying the name of the outlet it wants to connect to.
_10ockam tcp-outlet create --from github --to github.local:80_10ockam tcp-outlet create --from jira --to jira.local:443_10ockam tcp-outlet create --from database --to analytics.prod:5432
Our secure and private connectivity between ACME Corp and the Initech Platform is almost complete:

Step 4 - Initech connects to ACME Corp (as required)
In the Initech Platform application's environment, run:
_10ockam tcp-inlet create --from 0.0.0.0:8000 --via acme-relay --to github
This call to ockam tcp-inlet create will:
- Create a TCP inlet that is listening on
0.0.0.0:8000 - Forward packets to the
acme-relayrelay created by ACME Corp - Targeting the
githubaddress on the TCP outlet at the other end
The result of this is that requests from the Initech Platform to 0.0.0.0:8000
will resolve to the private GitHub Enterprise server running inside the
ACME Corp network.
We've now added the final piece to our architecture diagram:

This connection does not need to be long-lived either, and can be created on-demand only when the Initech Platform requires access to the ACME Corp GitHub server. To access the Jira and database outlets (from the optional outlets earlier) it's as simple as running:
_10ockam tcp-inlet create --from 0.0.0.0:6000 --via acme-relay --to jira_10ockam tcp-inlet create --from 0.0.0.0:9000 --via acme-relay --to database
The Jira and database sytems will now be available to the Initech Platform at
localhost on ports 6000 and 9000 respectively.
Wrapping it up
There's a lot of detail here explaining how all of this works, in reality it takes only minutes to implement and run each step. Within those few minutes we've been able to:
- Establish an Ockam Portal between two applications in two separate networks.
- See how a customer can quickly create a private path to a service without the need to make network or infrastructure changes.
- Allow a SaaS platform to provide a completely private connection to their own service.
For the SaaS platforms there's only a small step required to wrap the customer-facing
command and config into a single script or binary wrapper. That could then be used
as the initial basis for a broker or agent-like experience products like Snyk or
Buildkite already provide
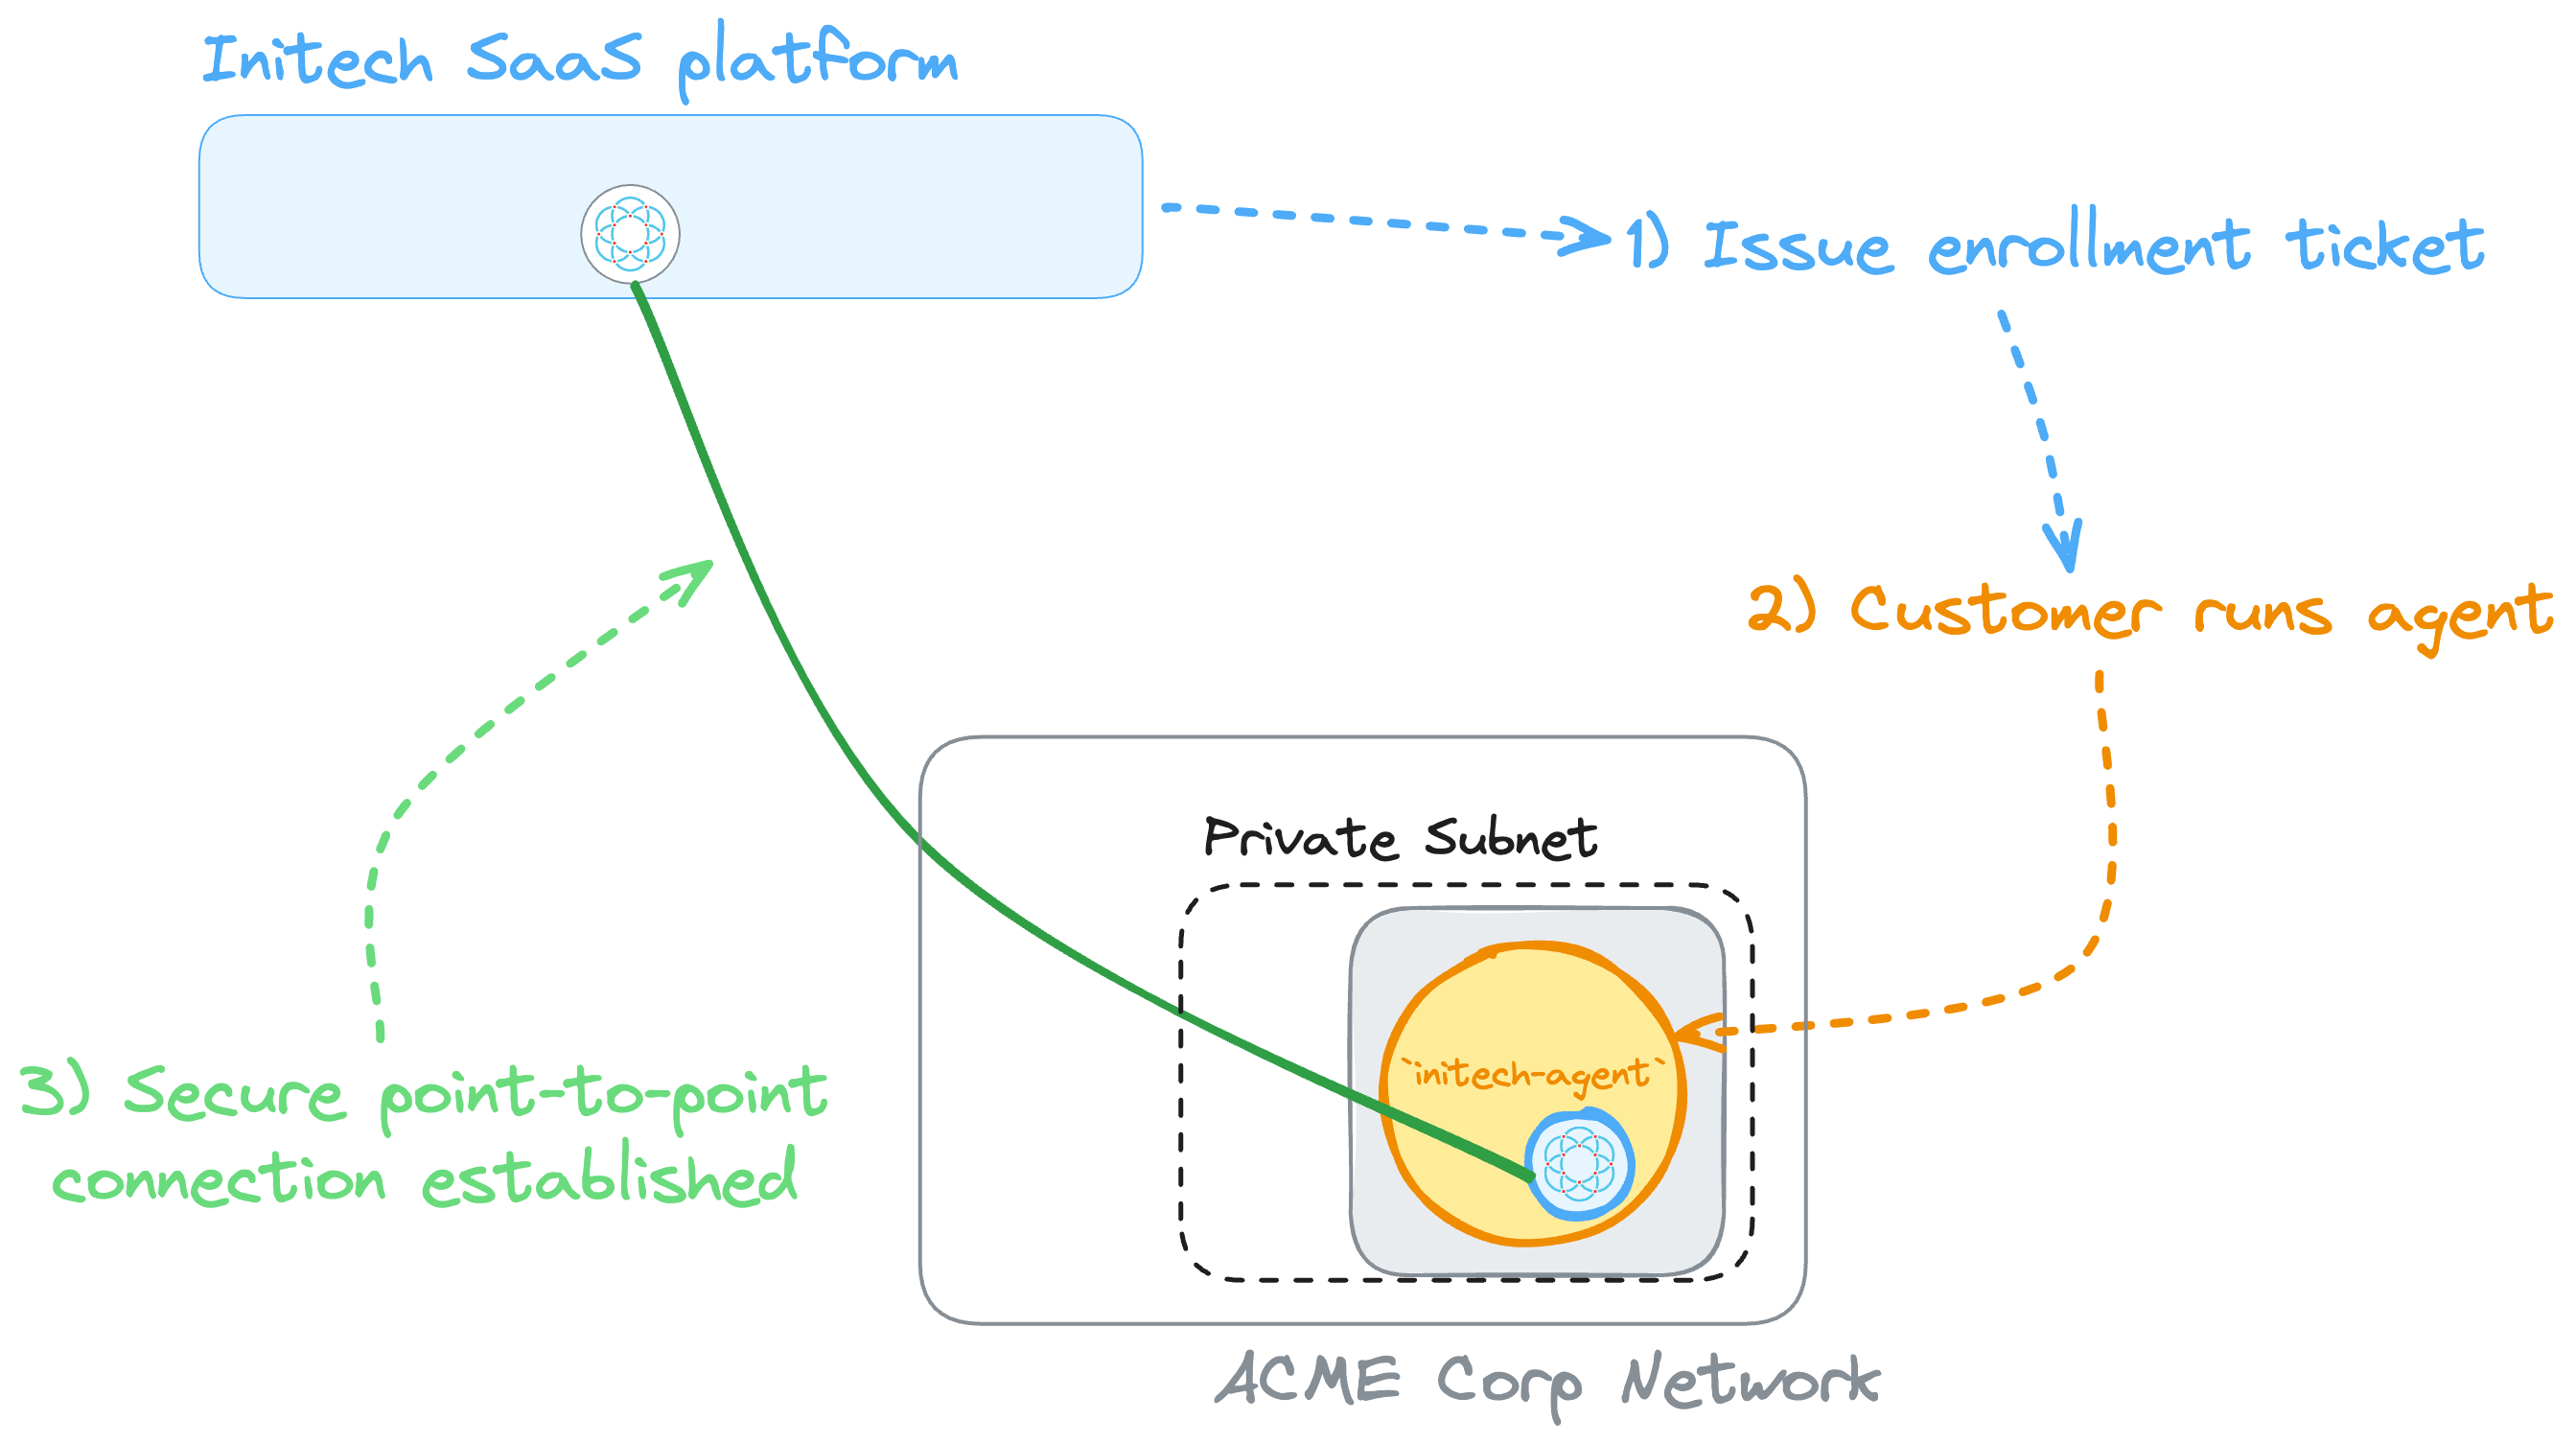
(for example, just rename the wrapper script to initech-agent! 😉).
Special thanks to Bobbie Chen from Anjuna and Richard Park from SixMap for their input on an early draft of this post.
Previous Article
Real-Time CDC Pipelines from Snowflake to Kafka
Next Article
Authenticate & authorize every access decision